

- •About the Author
- •About the Technical Editor
- •Credits
- •Is This Book for You?
- •Software Versions
- •Conventions This Book Uses
- •What the Icons Mean
- •How This Book Is Organized
- •How to Use This Book
- •What’s on the Companion CD
- •What Is Excel Good For?
- •What’s New in Excel 2010?
- •Moving around a Worksheet
- •Introducing the Ribbon
- •Using Shortcut Menus
- •Customizing Your Quick Access Toolbar
- •Working with Dialog Boxes
- •Using the Task Pane
- •Creating Your First Excel Worksheet
- •Entering Text and Values into Your Worksheets
- •Entering Dates and Times into Your Worksheets
- •Modifying Cell Contents
- •Applying Number Formatting
- •Controlling the Worksheet View
- •Working with Rows and Columns
- •Understanding Cells and Ranges
- •Copying or Moving Ranges
- •Using Names to Work with Ranges
- •Adding Comments to Cells
- •What Is a Table?
- •Creating a Table
- •Changing the Look of a Table
- •Working with Tables
- •Getting to Know the Formatting Tools
- •Changing Text Alignment
- •Using Colors and Shading
- •Adding Borders and Lines
- •Adding a Background Image to a Worksheet
- •Using Named Styles for Easier Formatting
- •Understanding Document Themes
- •Creating a New Workbook
- •Opening an Existing Workbook
- •Saving a Workbook
- •Using AutoRecover
- •Specifying a Password
- •Organizing Your Files
- •Other Workbook Info Options
- •Closing Workbooks
- •Safeguarding Your Work
- •Excel File Compatibility
- •Exploring Excel Templates
- •Understanding Custom Excel Templates
- •Printing with One Click
- •Changing Your Page View
- •Adjusting Common Page Setup Settings
- •Adding a Header or Footer to Your Reports
- •Copying Page Setup Settings across Sheets
- •Preventing Certain Cells from Being Printed
- •Preventing Objects from Being Printed
- •Creating Custom Views of Your Worksheet
- •Understanding Formula Basics
- •Entering Formulas into Your Worksheets
- •Editing Formulas
- •Using Cell References in Formulas
- •Using Formulas in Tables
- •Correcting Common Formula Errors
- •Using Advanced Naming Techniques
- •Tips for Working with Formulas
- •A Few Words about Text
- •Text Functions
- •Advanced Text Formulas
- •Date-Related Worksheet Functions
- •Time-Related Functions
- •Basic Counting Formulas
- •Advanced Counting Formulas
- •Summing Formulas
- •Conditional Sums Using a Single Criterion
- •Conditional Sums Using Multiple Criteria
- •Introducing Lookup Formulas
- •Functions Relevant to Lookups
- •Basic Lookup Formulas
- •Specialized Lookup Formulas
- •The Time Value of Money
- •Loan Calculations
- •Investment Calculations
- •Depreciation Calculations
- •Understanding Array Formulas
- •Understanding the Dimensions of an Array
- •Naming Array Constants
- •Working with Array Formulas
- •Using Multicell Array Formulas
- •Using Single-Cell Array Formulas
- •Working with Multicell Array Formulas
- •What Is a Chart?
- •Understanding How Excel Handles Charts
- •Creating a Chart
- •Working with Charts
- •Understanding Chart Types
- •Learning More
- •Selecting Chart Elements
- •User Interface Choices for Modifying Chart Elements
- •Modifying the Chart Area
- •Modifying the Plot Area
- •Working with Chart Titles
- •Working with a Legend
- •Working with Gridlines
- •Modifying the Axes
- •Working with Data Series
- •Creating Chart Templates
- •Learning Some Chart-Making Tricks
- •About Conditional Formatting
- •Specifying Conditional Formatting
- •Conditional Formats That Use Graphics
- •Creating Formula-Based Rules
- •Working with Conditional Formats
- •Sparkline Types
- •Creating Sparklines
- •Customizing Sparklines
- •Specifying a Date Axis
- •Auto-Updating Sparklines
- •Displaying a Sparkline for a Dynamic Range
- •Using Shapes
- •Using SmartArt
- •Using WordArt
- •Working with Other Graphic Types
- •Using the Equation Editor
- •Customizing the Ribbon
- •About Number Formatting
- •Creating a Custom Number Format
- •Custom Number Format Examples
- •About Data Validation
- •Specifying Validation Criteria
- •Types of Validation Criteria You Can Apply
- •Creating a Drop-Down List
- •Using Formulas for Data Validation Rules
- •Understanding Cell References
- •Data Validation Formula Examples
- •Introducing Worksheet Outlines
- •Creating an Outline
- •Working with Outlines
- •Linking Workbooks
- •Creating External Reference Formulas
- •Working with External Reference Formulas
- •Consolidating Worksheets
- •Understanding the Different Web Formats
- •Opening an HTML File
- •Working with Hyperlinks
- •Using Web Queries
- •Other Internet-Related Features
- •Copying and Pasting
- •Copying from Excel to Word
- •Embedding Objects in a Worksheet
- •Using Excel on a Network
- •Understanding File Reservations
- •Sharing Workbooks
- •Tracking Workbook Changes
- •Types of Protection
- •Protecting a Worksheet
- •Protecting a Workbook
- •VB Project Protection
- •Related Topics
- •Using Excel Auditing Tools
- •Searching and Replacing
- •Spell Checking Your Worksheets
- •Using AutoCorrect
- •Understanding External Database Files
- •Importing Access Tables
- •Retrieving Data with Query: An Example
- •Working with Data Returned by Query
- •Using Query without the Wizard
- •Learning More about Query
- •About Pivot Tables
- •Creating a Pivot Table
- •More Pivot Table Examples
- •Learning More
- •Working with Non-Numeric Data
- •Grouping Pivot Table Items
- •Creating a Frequency Distribution
- •Filtering Pivot Tables with Slicers
- •Referencing Cells within a Pivot Table
- •Creating Pivot Charts
- •Another Pivot Table Example
- •Producing a Report with a Pivot Table
- •A What-If Example
- •Types of What-If Analyses
- •Manual What-If Analysis
- •Creating Data Tables
- •Using Scenario Manager
- •What-If Analysis, in Reverse
- •Single-Cell Goal Seeking
- •Introducing Solver
- •Solver Examples
- •Installing the Analysis ToolPak Add-in
- •Using the Analysis Tools
- •Introducing the Analysis ToolPak Tools
- •Introducing VBA Macros
- •Displaying the Developer Tab
- •About Macro Security
- •Saving Workbooks That Contain Macros
- •Two Types of VBA Macros
- •Creating VBA Macros
- •Learning More
- •Overview of VBA Functions
- •An Introductory Example
- •About Function Procedures
- •Executing Function Procedures
- •Function Procedure Arguments
- •Debugging Custom Functions
- •Inserting Custom Functions
- •Learning More
- •Why Create UserForms?
- •UserForm Alternatives
- •Creating UserForms: An Overview
- •A UserForm Example
- •Another UserForm Example
- •More on Creating UserForms
- •Learning More
- •Why Use Controls on a Worksheet?
- •Using Controls
- •Reviewing the Available ActiveX Controls
- •Understanding Events
- •Entering Event-Handler VBA Code
- •Using Workbook-Level Events
- •Working with Worksheet Events
- •Using Non-Object Events
- •Working with Ranges
- •Working with Workbooks
- •Working with Charts
- •VBA Speed Tips
- •What Is an Add-In?
- •Working with Add-Ins
- •Why Create Add-Ins?
- •Creating Add-Ins
- •An Add-In Example
- •System Requirements
- •Using the CD
- •What’s on the CD
- •Troubleshooting
- •The Excel Help System
- •Microsoft Technical Support
- •Internet Newsgroups
- •Internet Web sites
- •End-User License Agreement

CHAPTER
Getting Data from External Database Files
Excel has some great analysis and presentation tools, but these tools require data. In many cases, the data that you need is available in an external database. For example, your company may have a database
that contains customer information, sales data, and so on. This chapter is an introduction to retrieving data from external database files for use in Excel.
IN THIS CHAPTER
Understanding external database files
Getting started using Microsoft Query
Understanding External
Database Files
Working with external data
When you work with an Excel workbook, the entire workbook must be loaded into memory before you can begin working. Although loading all the data provides you with immediate access to the entire file and all the data it contains, it also means that you can’t work with extremely large amounts of data. Although Excel 2010 supports more than a million rows, actually using that many rows can slow your system to a crawl — even if your system has plenty of memory.
Note
Using the 64-bit version of Excel allows you to work with much larger workbooks. But for extremely large data sets, it’s usually more efficient to work with a subset of the data. n
When you access an external database file using Excel, you can perform a query to load just a subset of the data into your workbook.
677

Part V: Analyzing Data with Excel
Accessing external database files from Excel is useful in the following situations:
•You need to work with a subset of a very large database.
•The subset of data changes over time. It’s very easy to refresh a query and replace the old data with updated information.
•The database is in a format that Excel can’t import, or the database may be too large to import.
•The database contains multiple tables with relationships between those tables.
If you need to work with data in an external database, you may prefer to use Excel rather than the tools available in database programs. The advantage? After you bring the data into Excel, you can manipulate and format it by using familiar tools such as formulas, charts, and pivot tables.
Of course, real database programs, such as Access, have advantages, too. For example, creating a complex database report in Access may be easier than creating it in Excel.
Understanding Some Database Terminology
People who spend their days working with databases seem to have their own special language. The following terms can help you hold your own among a group of database experts:
•External database: A collection of data stored in one or more files (not Excel files). A database contains one or more tables, and tables are composed of records and fields.
•Field: A component of a database table, it corresponds to a column in Excel.
•ODBC: Open DataBase Connectivity is a standard developed by Microsoft that uses drivers to access database files in different formats. Microsoft Query comes with drivers for Access, dBASE, FoxPro, Paradox, SQL Server, Excel workbooks, and ASCII text files. ODBC drivers for other databases are available from Microsoft and from third-party providers.
•OLAP Cube: A multidimensional aggregate data source, often created from various other sources. OLAP is an acronym for OnLine Analytical Processing.
•Query: Search a database for records that meet specific criteria. This term is also used as a noun; you can write a query, for example.
•Record: In a database table, a single element that corresponds to a row.
•Refresh: Rerun a query to get the latest data. It’s applicable when the database contains information that is subject to change, as in a multiuser environment.
•Relational database: A database stored in more than one table or file. At least one common field (sometimes called the key field) connects the tables.
•Result set: The data returned by a query, usually a subset of the original database. Query returns the result set to your Excel workbook or to a pivot table. (I discuss pivot tables in Chapter 34.)
•SQL: An acronym for Structured Query Language (pronounced see-quel). Microsoft Query (discussed in this chapter) uses SQL to search data stored in ODBC databases.
•Table: A recordand field-oriented collection of data. A database consists of one or more tables.
678

Chapter 33: Getting Data from External Database Files
Importing Access Tables
Microsoft Access is included with some versions of Office 2010. An Access database contains one or more tables of data, and you can import an Access table directly into a worksheet by choosing Data Get External Data From Access. When you choose this command, Excel displays the Select Data Source dialog box, which you use to locate the Access file.
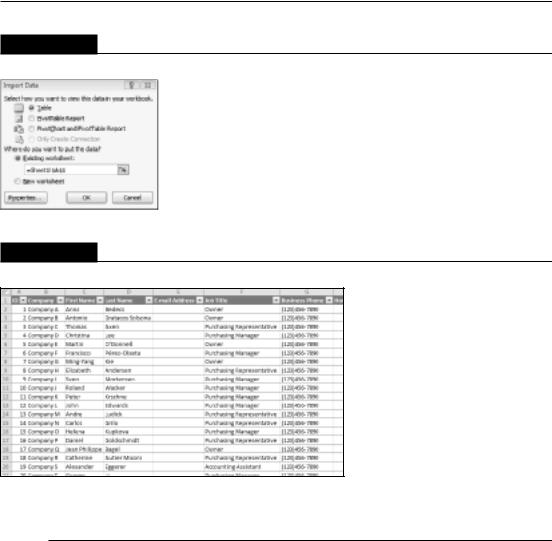
After you locate the Access database file, Excel displays the Select Table dialog box, from which you select the table (or view) to import. Figure 33.1 shows the tables and views available for the Microsoft Northwind Traders database, which is a sample Access database that you can download from the Microsoft Web site. Select the table that contains the data you need, click OK, and Excel displays its Import Data dialog box, shown in Figure 33.2. Use this dialog box to specify the location and whether you want a normal table or a pivot table. See Chapter 34 for information about pivot tables.
FIGURE 33.1
Selecting an Access table to import.
Note
Importing an Access table in this manner is all or none. You’re not given an opportunity to query the database for specific records. n
Figure 33.3 shows part of the Customers table from the Northwind Traders database. Excel converts the data to a table. You can use all of Excel’s tools to work with the data. Note, however, that you cannot make changes and send the changed data back to the Access database.
679
Part V: Analyzing Data with Excel
FIGURE 33.2
Use this dialog box to specify the location of the imported table.
FIGURE 33.3
An Access table, imported into Excel.
Retrieving Data with Query: An Example
This section discusses Microsoft Query, an application that ships with Excel. Use Query to import a subset of a database.
Note
To perform queries using external databases, Microsoft Query must be installed on your system. If Query isn’t installed, you’re prompted to install it when you first choose Data Get External Data From Other Sources From Microsoft Query. n
The best way to become familiar with Microsoft Query is to walk through an example. In the following sections, you learn how to use Query to open a database file and import a specified set of records.
680

Chapter 33: Getting Data from External Database Files
On the CD
The database file used in this example is available on the companion CD-ROM. It’s an Access 2010 file named budget data.accdb.
The database file
The database file used in this example is a single-table Access file that consists of 31,680 records. This table contains the following fields:
•Sort: A numeric field that holds record sequence numbers.
•Division: A text field that specifies the company division (Asia, Europe, N. America, Pacific Rim, or S. America).
•Department: A text field that specifies the department within the division. Each division is organized into the following departments: Accounting, Advertising, Data Processing, Human Resources, Operations, Public Relations, R&D, Sales, Security, Shipping, and Training.
•Category: A text field that specifies the budget category. The four categories are Compensation, Equipment, Facility, and Supplies & Services.
•Item: A text field that specifies the budget item. Each budget category has different budget items. For example, the Compensation category includes the following items: Benefits, Bonuses, Commissions, Conferences, Entertainment, Payroll Taxes, Salaries, and Training.
•Month: A text field that specifies the month (abbreviated as Jan, Feb, and so on).
•Year: A numeric field that stores the year (either 2008 or 2009).
•Budget: A numeric field that stores the budgeted amount.
•Actual: A numeric field that stores the actual amount spent.
•Variance: A numeric field that stores the difference between the Budget and Actual.
The task
The objective of this exercise is to create a report that shows the first quarter 2009 (January through March) Compensation expenditures of the Training Department in the North American Division. In other words, the query will extract records that meet all the following criteria:
•Division: N. America
•Department: Training
•Category: Compensation
•Month: Jan, Feb, or Mar
•Year: 2009
681

Part V: Analyzing Data with Excel
One approach to this task is to import the entire Access file into a worksheet using the method described earlier in this chapter (see “Importing Access Tables”). When the table is imported, you can filter it to display only the rows that meet the specified criteria. This approach works because this particular table isn’t very large. However, in some cases, the number of records in the table may exceed the number of rows in a worksheet.
The advantage of using Query is that it imports only the data that’s required. And, after you import the data, you can refresh the query at any time to bring in updated data.
Selecting a data source
Begin with an empty worksheet. Choose Data Get External Data From Other Sources From Microsoft Query, which displays the Choose Data Source dialog box, as shown in Figure 33.4. This dialog box contains three tabs:
•Databases: Lists the data sources that are known to Query. This tab may be empty, depending on which data sources are defined on your system.
•Queries: Contains a list of stored queries. Again, this tab may or may not be empty.
•OLAP Cubes: Lists OLAP databases available for query.
FIGURE 33.4
The Choose Data Source dialog box.
Your system may have some data sources already defined. If so, they appear in the list on the Databases tab. To set up a new data source, use the New Data Source option. For this example, choose New Data Source and click OK. The Create New Data Source dialog box, which has four parts, appears:
1.Enter a descriptive name for the data source. For this example, use the name Budget Database.
2.Select a driver for the data source by selecting from the list of installed drivers. For this example, choose Microsoft Access Driver (*.mdb, *.accdb).
682

Chapter 33: Getting Data from External Database Files
3.Click the Connect button to display another dialog box that asks for information specific to the driver that you selected in Step 2. In this example, you need to click the Select button and then locate the budget data.accdb file. Click OK to return to the previous dialog box and click OK again to return to the Create New Data Source dialog box.
4.Select the default data table that you want to use. For this example, the database file contains a single table named budget. If the database requires a password, you can also specify that the password be saved with the data source definition. Figure 33.5 shows the Create New Data Source dialog box at this point.
5.After you supply all the information in the Create New Data Source dialog box, click OK. You’re returned to the Choose Data Source dialog box, which now displays the name of the data source that you created.
FIGURE 33.5
The Create New Data Source dialog box.
Note
You have to go through these steps only once for each data source. The next time that you need to access this data source, the Budget Database (and any other database sources that you’ve defined) appears in the Choose Data Source dialog box. n
Note
The preceding steps are general steps that work with all supported database types. In some situations, you may prefer to open the database file directly and not create a named data source that will appear in the Choose Data Source dialog box. For example, if you won’t be using the database again, you can open the file directly and not have to bother creating a new named data source. If you’re using an Access file, you can select MS Access Database from the Databases tab in the Choose Data Source dialog box. Then, you can specify the file, and you’re taken directly to Microsoft Query. n
683

Part V: Analyzing Data with Excel
Using Query with Excel Files
You may have noticed that one of the options in the Choose Data Source dialog box is Excel Files. If you choose this option, you can use Query to bring in data stored in Excel workbooks. You can put any number of data tables in a workbook, but each one must have a range name because that’s how Query identifies the tables.
Using the Query Wizard
The Choose Data Source dialog box has a check box at the bottom that lets you specify whether to use the Query Wizard to create your query. (Refer to Figure 33.4.) The Query Wizard walks you through the steps used to create your query; if you use the Query Wizard, you don’t have to deal directly with Query. I highly recommend using the Query Wizard, and the examples in this chapter use this tool.
In the Choose Data Source dialog box, do the following:
1.Select your data source (Budget Database, for this example).
2.Make sure that the Query Wizard check box is selected.
3.Click OK to start the Query Wizard.
Query Wizard: Choosing the columns
In the first step of the Query Wizard, select the database columns that you want to appear in your query. Select one or more columns and click the > button to add them (see Figure 33.6). To select all fields, click the table name (budget) and then click the > button.
FIGURE 33.6
In the first step of Query Wizard, you select the columns to use in your query.
684
Chapter 33: Getting Data from External Database Files
If you want to see the data for a particular column, select the column and click the Preview Now button. If you accidentally add a column that you don’t need, select it in the right panel and click the < button to remove it.
For this example, add all the fields and then click the Next button.
Query Wizard: Filtering data
In the second step of the Query Wizard , specify your record selection criteria — how you want to filter the data. This step is optional. If you want to retrieve all the data, just click the Next button to proceed.
Figure 33.7 shows the Filter Data dialog box of the Query Wizard.
FIGURE 33.7
In the second step of the Query Wizard, you specify how you want to filter the data.
For the example, not all records are needed. Recall that you’re interested only in the records in which all the following applies:
•The Division is N. America.
•The Department is Training.
•The Category is Compensation.
•The Year is 2009.
•The Month is Jan, Feb, or Mar.
The criteria are entered by column. In this case, you have five criteria (one for each of five columns):
•From the Column to Filter list, select Division. In the right panel, select equals from the first drop-down list and then select N. America from the second drop-down list.
•From the Column to Filter list, select Department. In the right panel, select equals from the first drop-down list and then select Training from the second drop-down list.
685

Part V: Analyzing Data with Excel
•From the Column to Filter list, select Category. In the right panel, select equals from the first drop-down list and then select Compensation from the second drop-down list.
•From the Column to Filter list, select Year. In the right panel, select equals from the first drop-down list and then select 2009 from the second drop-down list.
•From the Column to Filter list, select Month. In the right panel, select equals from the first drop-down list and then select Jan from the second drop-down list. And because this column is filtered by multiple values, select the Or option button and then select equals and Feb from the drop-down lists in the second row. Finally, select equals and Mar from the drop-down lists in the third row.
To review the criteria that you entered, select the column from the Column to Filter list. The Query Wizard displays the criteria that you entered for the selected column. Notice that columns that are used in the query display in bold.
After you enter all the criteria, click Next.
Query Wizard: Sort order
The third step of the query lets you specify how you want the records to be sorted (see Figure 33.8). This step is optional, and you can click Next to move to the next step if you don’t want the data sorted or if you prefer to sort it after it’s returned to your worksheet.
For this example, sort by Category in ascending order. You can specify as many sort fields as you like. Click Next to move on to the next step.
Query Wizard: Finish
The final step of the Query Wizard, shown in Figure 33.9, lets you save the query so that you can reuse it. To save the query, click Save Query and then enter a filename.
Select an option that corresponds to what you want to do with the returned data. Normally, you want to return the data to Excel. If you know how to use the Microsoft Query application, you can return the data to Query and examine it or even modify the selection criteria.
FIGURE 33.8
In the third step of the Query Wizard, you specify the sort order.
686

Chapter 33: Getting Data from External Database Files
For this example, select the Return Data to Microsoft Excel option button and then click Finish.
FIGURE 33.9
The final step of the Query Wizard.
Specifying a location for the data
Figure 33.10 shows the Import Data dialog box, which appears after you click the Finish button in the Query Wizard.
For this example, select the Table option button and place the data beginning in cell A1 of the existing worksheet. Click OK to import the data.
Note
If you choose PivotTable Report, or PivotChart and PivotTable Report, you can specify the layout for a pivot table (see Chapters 34 and 35). In such a case, the database is used as the source for the pivot table, and the original data table does not appear in your workbook. n
FIGURE 33.10
Specifying what to do with the data.
Figure 33.11 shows the data that is returned to a worksheet.
687