


CHAPTER
Understanding
Excel Files
Excel, of course, uses files to store its workbooks. This chapter describes the operations that you perform with workbook files: opening, saving, closing, deleting, and so on. It discusses how Excel uses
files and provides an overview of the various types of files. Most of the file operations discussed here occur in the new Backstage View, the screen that you see when you click File on the Excel Ribbon.
This chapter also discusses the Excel 2007 and Excel 2010 file formats and describes how to determine what (if anything) will be lost if you save your workbook in an earlier file format.
As you read through this chapter, remember that you can have any number of workbooks open simultaneously, and that only one workbook is the active workbook at any given time. The workbook’s name appears in its title bar (or in the Excel title bar if the workbook is maximized).
Creating a New Workbook
When you start Excel normally, it automatically creates a new (empty) workbook called Book1. This workbook exists only in memory and has not been saved to disk. By default, this workbook consists of three worksheets named Sheet1, Sheet2, and Sheet3. If you’re starting a project from scratch, you can use this blank workbook.
IN THIS CHAPTER
Creating a new workbook
Opening an existing workbook
Saving and closing workbooks
Sharing workbooks with those who use an older version of Excel
141

Part I: Getting Started with Excel
While you’re working in Excel, you can create a new (empty) workbook at any time. Excel provides two ways to create a new workbook:
•Choose File New, which displays a screen like the one shown see Figure 7.1. This screen lets you create a blank workbook, a workbook based on a template, or a workbook based on an existing workbook. To create a new blank workbook, select Blank Workbook and then click the Create button.
•Press Ctrl+N. This shortcut is the fastest way to start a new workbook if you’re not using a template.
FIGURE 7.1
Choosing File New presents you with options for creating a new workbook.
Cross-Reference
See Chapter 8 for more information about using and creating templates. n
142

Chapter 7: Understanding Excel Files
Starting Excel without an Empty Workbook
If you prefer to avoid the empty workbook displayed when Excel starts up, edit the command line used to start Excel. You need to create a new shortcut to excel.exe and then modify the properties:
1.Use Windows Explorer and locate the excel.exe program. The default location is
C:\Program Files\Microsoft Office\Office14\
2.Pressing and holding the right mouse button, drag the excel.exe filename (or icon) to your desktop and then release the mouse button.
3.From the shortcut menu that appears, choose Create Shortcuts Here. Windows creates a new shortcut icon on your desktop.
4.Right-click the shortcut icon and choose Properties.
5.In the Properties dialog box that appears, click the Shortcut tab.
6.Edit the Target field by adding a space, followed by /e, to the end. For example:
“C:\Program Files\Microsoft Office\Office14\EXCEL.EXE” /e
7.(Optional) Specify a shortcut key. If you provide a shortcut key, you can use that keystroke combination to start or active Excel.
8.Click OK.
After making that change, Excel doesn’t display an empty workbook when you start it by clicking that shortcut icon. In addition, you won’t see the normal “splash” screen.
Opening an Existing Workbook
Following are some of the ways to open a workbook saved on your hard drive:
•Choose File Recent and then select the file you want from the Recent Workbooks list. Only the most recently used files are listed. You can specify the number of files to display (maximum of 50) in the Advanced section of the Excel Options dialog box.
•Locate the Excel workbook file via a Windows Explorer file list. Just double-click the filename (or icon), and the workbook opens in Excel. If Excel is not running, Windows automatically starts Excel and loads the workbook file.
•Use either of the following methods to display the Open dialog box:
•Choose File Open.
•Press Ctrl+O.
From this dialog box, you can browse your computer for workbooks.
143
Part I: Getting Started with Excel
Tip
When you choose File Recent, each file in the recent workbooks list displays a pushpin icon on the right.
Click the pushpin icon, and that file becomes “pinned” to the list and will always appear at the top of the list. This handy feature ensures that important files always appear on the recent workbooks list — even if you haven’t opened the file recently.
Also, notice that you can right-click a workbook in the list and choose Remove from List. Or, choose Clear Unpinned Items to clear the list and start fresh. n
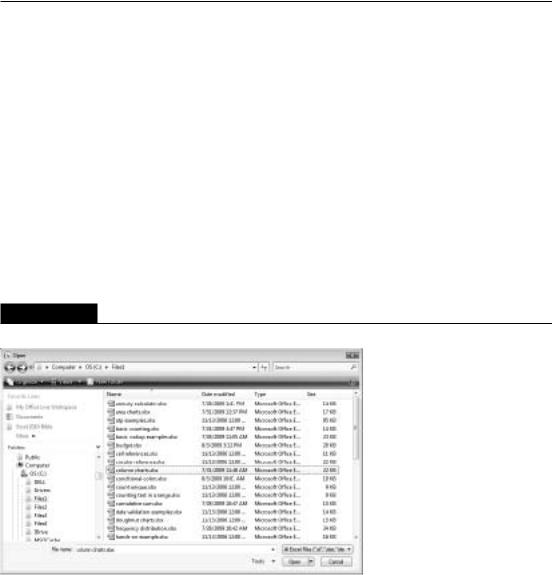
The Open dialog box, shown in Figure 7.2, is resizable. To make it larger or smaller, click the lower-right corner and drag. Also, notice that it’s virtually identical to a Windows Explorer window. The only difference is that it includes additional controls at the bottom.
Note
The appearance of the Open dialog box varies, depending on the version of Windows you use. The dialog box in Figure 7.2 shows the Open dialog box when running Windows Vista. n
FIGURE 7.2
Use the Open dialog box to open any of your Excel workbook files.
To open a workbook from the Open dialog box, use the folder tree display on the left to locate the folder that contains the file, and then select the workbook file from the list on the right. After you locate and select the file, click Open, and the file opens. Or, just double-click the filename to open it.
144
Chapter 7: Understanding Excel Files
About Protected View
New Feature
Protected View is a new feature in Excel 2010. n
One of the new features in Excel 2010 is Protected View. Although it might seem like Excel is trying to keep you from opening your own files, protected view is all about protecting you from malware. Malware refers to something that can harm your system. Hackers have figured out several way to manipulate Excel files in a way that harmful code can be executed. Protected View essentially prevents these types of attacks by opening a file in a protected environment (a “sandbox”).
If you use Excel 2010 to open an Excel workbook that you downloaded from the Web, you’ll see a colorful message above the Formula bar. In addition, the Excel title bar displays [Protected View].
If you are certain that the file is safe, click Enable Editing. If you don’t enable editing, you will be able to view the contents of the workbook, but you won’t be able to make any changes to it.
If the workbook contains macros, you’ll see another message after you enable editing: Security Warning. Macros have been disabled. If you are sure that the macros are harmless, click Enable Content.
Protected View kicks in for the following:
•Files downloaded from the Internet
•Attachments opened from Outlook 2010
•Files open from potentially unsafe locations, such as your Temporary Internet Files folder
•File that are blocked by File Block Policy (a feature that allows administrators to define potentially dangerous files)
•Files that were digitally signed, but the signature has expired
In some situations, you don’t care about working with the document. You just want to print it. In that case, choose File Print, and then click the Enable Printing button.
It would be nice if copying were allowed in Protected View — but it’s not. The only way to copy information from a workbook in Protected View is to enable editing.
You have some control over how Protected View works. To change the settings, choose File Options, and click Trust Center. Then click the Trust Center Settings button and click the Protected View tab in the Trust Center dialog box.
Notice that the Open button is actually a drop-down list. Click the arrow, and you see the additional options:
•Open: Opens the file normally.
•Open Read-Only: Opens the selected file in read-only mode. When a file is opened in this mode, you can’t save changes with the original filename.
145

Part I: Getting Started with Excel
•Open as Copy: Opens a copy of the selected file. If the file is named budget.xlsx, the workbook that opens is named Copy(1)budget.xlsx.
•Open in Browser: Opens the file in your default Web browser. If the file can’t be opened in a browser, this option is disabled.
•Open in Protected View: Opens the file in a special mode that does not allow editing. In this view, most of the Excel Ribbon commands are disabled. Read more about this new feature in the sidebar, “About Protected View.”
•Open and Repair: Attempts to open a file that may be damaged and recover information contained in it.
Tip
You can hold down the Ctrl key and select multiple workbooks. When you click Open, all the selected workbook files open. n
Right-clicking a filename in the Open dialog box displays a shortcut menu with many extra Windows commands. For example, you can copy, delete, or rename the file, modify its properties, and so on.
Using the Favorite Links
Your Favorite Links list appears at the top of the left panel of the Open dialog box. It contains a list of shortcuts to folders on your system. Initially, it’s just a partial list of folders, but you can click More to expand the list.
To add a new folder to the Favorite Links section, click the folder in the Open dialog box and drag it into the Favorite Links area. Customizing the Favorite Links section by adding shortcuts to folders that you use frequently can save you lots of clicking.
Filtering filenames
At the bottom of the Open dialog box is a button with a drop-down list. When the Open dialog box is displayed, this button shows All Excel Files (and a long list of file extensions). The Open dialog box displays only those files that match the extensions. In other words, you see only standard Excel files.
If you want to open a file of a different type, click the arrow in the drop-down list and select the file type that you want to open. This changes the filtering and displays only files of the type that you specify.
You can also type a filter directly in the File Name box. For example, typing the following will display only files that have an .xlsx extension (press Enter after typing the filter): *.xlsx.
146