

CHAPTER
Worksheet
Formatting
Formatting your worksheet is like the icing on a cake — it may not be absolutely necessary, but it can make the end product a lot more attractive. In an Excel worksheet, formatting can also make it easier
for others to understand the worksheet’s purpose.
Stylistic formatting isn’t essential for every workbook that you develop — especially if it is for your own use only. On the other hand, it takes only a few moments to apply some simple formatting; and, after you apply it, the formatting will remain in place without further effort on your part.
In Chapter 5, I show how easy it is to apply formatting to a table. The information in this chapter applies to normal ranges. I show you how to work with the Excel formatting tools: fonts; colors; and styles, such as bold and italic. I also cover custom styles that you can create to make formatting large amounts of material in a similar way easier.
Getting to Know the
Formatting Tools
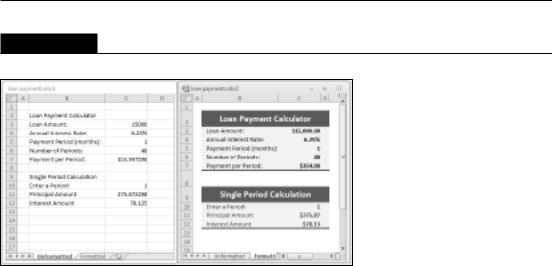
Figure 6.1 shows how even simple formatting can significantly improve a worksheet’s readability. The unformatted worksheet (on the left) is perfectly functional but not very readable compared with the formatted worksheet (on the right).
On the CD
This workbook is available on the companion CD-ROM. The file is named loan payments.xlsx.
IN THIS CHAPTER
Understanding how formatting can improve your worksheets
Getting to know the formatting tools
Using formatting in your worksheets
Using named styles for easier formatting
Understanding document themes
115
Part I: Getting Started with Excel
FIGURE 6.1
In just a few minutes, some simple formatting can greatly improve the appearance of your worksheets.
The Excel formatting tools are available in three locations:
•On the Home tab of the Ribbon
•On the Mini toolbar that appears when you right-click a range or a cell
•From the Format Cells dialog box
In addition, many common formatting commands have keyboard shortcuts that you can use.
Cross-Reference
Excel also enables you to format cells based on the cell’s contents. Chapter 20 discusses conditional formatting. n
Using the formatting tools of the Home Tab
The Home tab of the Ribbon provides quick access to the most commonly used formatting options. Start by selecting the cell or range; then use the appropriate tool in the Font, Alignment, or Number groups.
Using these tools is very intuitive, and the best way to familiarize yourself with them is to experiment. Enter some data, select some cells, and then click the controls to change the appearance. Note that some of these controls are actually drop-down lists. Click the small arrow on the button, and the button expands to display your choices.
Using the Mini toolbar
When you right-click a cell or a range selection, you get a shortcut menu. In addition, the Mini toolbar appears above the shortcut menu. Figure 6.2 shows how this toolbar looks.
116

Chapter 6: Worksheet Formatting
FIGURE 6.2
The Mini toolbar appears above the right-click shortcut menu.
The Mini toolbar contains controls for common formatting:
•Font
•Font Size
•Increase Font
•Decrease Font
•Accounting Number Format
•Percent Style
•Comma Style
•Format Painter
•Bold
•Italic
•Center
•Borders
•Fill Color
•Font Color
•Increase Decimal
•Decrease Decimal
•Merge & Center
117

Part I: Getting Started with Excel
If you use a tool on the Mini toolbar, the shortcut menu disappears, but the toolbar remains visible so you can apply other formatting if you like. Also, notice that after you use it, the Mini toolbar gradually fades away if you move the mouse pointer away from it. To hide the Mini toolbar, just click in any cell.
Some people find the Mini toolbar distracting. Unfortunately, Excel does not provide an option to turn it off. The Excel Options dialog box does offer the Show Mini Toolbar on Selection option, but this option applies only to selecting text while editing a cell.
Tip
If you really want to disable the Mini toolbar, you can execute this VBA statement in the Immediate window of the Visual Basic Editor (VBE):
Application.ShowMenuFloaties = True
Yes, setting the property to True is completely counter-intuitive! But it works. You need to execute this statement only one time, and Excel remembers the setting between sessions. If you change your mind, execute that statement again, but change True to False.
Using the Format Cells dialog box
The formatting controls available on the Home tab of the Ribbon are sufficient most of the time, but some types of formatting require that you use the Format Cells dialog box. This tabbed dialog box lets you apply nearly any type of stylistic formatting, as well as number formatting. The formats that you choose in the Format Cells dialog box apply to the cells that you have selected at the time. Later sections in this chapter cover the tabs of the Format Cells dialog box.
Note
When you use the Format Cells dialog box, you don’t see the effects of your formatting choices until you click OK. n
After selecting the cell or range to format, you can display the Format Cells dialog box by using any of the following methods:
•Press Ctrl+1.
•Click the dialog box launcher in Home Font, Home Alignment, or Home Number. (The dialog box launcher is the small downward-pointing arrow icon displayed to the right of the group name in the Ribbon.) When you display the Format Cells dialog box using a dialog box launcher, the dialog box is displayed with the appropriate tab visible.
•Right-click the selected cell or range and choose Format Cells from the shortcut menu.
•Click the More command in some of the drop-down controls in the Ribbon. For example, the Home Font Border More Borders drop-down includes an item named More Borders.
The Format Cells dialog box contains six tabs: Number, Alignment, Font, Border, Patterns, and Protection. The following sections contain more information about the formatting options available in this dialog box.
118

Chapter 6: Worksheet Formatting
Using Different Fonts to Format
Your Worksheet
You can use different fonts, sizes, or text attributes in your worksheets to make various parts — such as the headers for a table — stand out. You also can adjust the font size. For example, using a smaller font allows for more information on a single page.
By default, Excel uses 11 point (pt) Calibri font. A font is described by its typeface (Calibri, Cambria, Arial, Times New Roman, Courier New, and so on), as well as by its size, measured in points. (Seventy-two pt equal one inch.) Excel’s row height, by default, is 15 pt. Therefore, 11 pt type entered into 15 pt rows leaves a small amount of blank space between the characters in adjacent rows.
Tip
If you’ve not manually changed a row’s height, Excel automatically adjusts the row height based on the tallest text that you enter into the row. n
Updating Old Fonts
Office 2007 introduced several new fonts, and the default font has been changed for all the Office applications. In versions prior to Excel 2007, the default font was 10 pt Arial. In Excel 2007 and Excel 2010, the default font for the Office theme is 11 pt Calibri. Most people will agree that Calibri is much easier to read, and it gives the worksheet a more modern appearance.
If you open a workbook created in a pre-Excel 2007 version, the default font will not be changed, even if you apply a document style (by choosing Page Layout Themes Themes). But here’s an easy way to update the fonts in a workbook that was created using an older version of Excel:
1.Press Ctrl+N to open a new, empty workbook. The new workbook will use the default document theme.
2.Open your old workbook file.
3.Choose Home Styles Cell Styles Merge Styles. Excel displays its Merge Styles dialog box.
4.In the Merge Styles dialog box, select the new workbook that you created in Step 1.
5.Click OK.
6.Click Yes in response to Excel’s question regarding merging styles that have the same name.
This technique changes the font and size for all unformatted cells. If you’ve applied font formatting to some cells (for example, made them bold), the font for those cells will not be changed (but you can change the font manually). If you don’t like the new look of your workbook, just close the workbook without saving the changes.
119
Part I: Getting Started with Excel
Tip
If you plan to distribute a workbook to other users, you should stick with the standard fonts that are included with Windows or Microsoft Office. If you open a workbook and your system doesn’t have the font with which the workbook was created, Windows attempts to use a similar font. Sometimes this attempt works okay, and sometimes it doesn’t. n
Use the Font and Font Size tools on the Home tab of the Ribbon (or on the Mini toolbar) to change the font or size for selected cells.
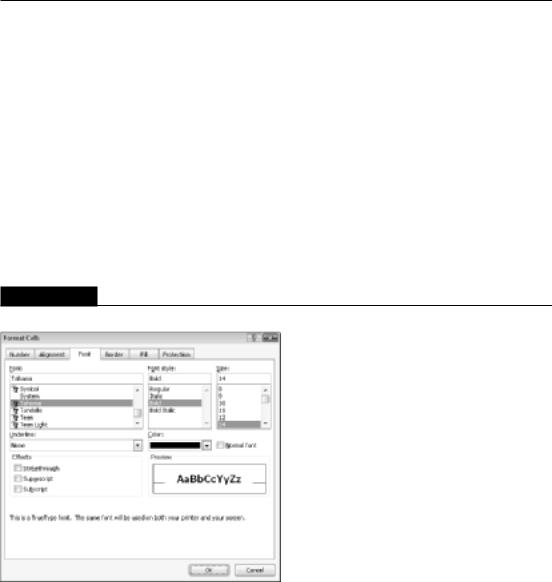
You also can use the Font tab in the Format Cells dialog box to choose fonts, as shown in Figure 6.3. This tab enables you to control several other font attributes that aren’t available elsewhere. Besides choosing the font, you can change the font style (bold, italic), underlining, color, and effects (strikethrough, superscript, or subscript). If you select the Normal Font check box, Excel displays the selections for the font defined for the Normal style. I discuss styles later in this chapter. See “Using Named Styles for Easier Formatting.”
FIGURE 6.3
The Font tab of the Format Cells dialog box gives you many additional font attribute options.
Figure 6.4 shows several different examples of font formatting. In this figure, gridlines were turned off to make the underlining more visible. Notice, in the figure, that Excel provides four different underlining styles. In the two non-accounting underline styles, only the cell contents are underlined. In the two accounting underline styles, the entire width of the cells is always underlined.
120

Chapter 6: Worksheet Formatting
FIGURE 6.4
You can choose many different font-formatting options for your worksheets.
If you prefer to keep your hands on the keyboard, you can use the following shortcut keys to format a selected range quickly:
•Ctrl+B: Bold
•Ctrl+I: Italic
•Ctrl+U: Underline
•Ctrl+5: Strikethrough
These shortcut keys act as a toggle. For example, you can turn bold on and off by repeatedly pressing Ctrl+B.
Note
Beginning with Excel 2007, the Document Themes feature attempts to assist nondesigners in creating attractive worksheets. I discuss document themes later in this chapter. See “Understanding Document Themes.” n
Using Multiple Formatting Styles in a Single Cell
If a cell contains text (as opposed to a value or a formula), Excel also enables you to format individual characters in the cell. To do so, switch to Edit mode (press F2, or double-click the cell) and then select the characters that you want to format. You can select characters either by dragging the mouse over them or by pressing the Shift key as you press the leftor right-arrow key.
After you select the characters for format, use any of the standard formatting techniques. The changes apply only to the selected characters in the cell. This technique doesn’t work with cells that contain values or formulas.
121