


Part I: Getting Started with Excel
•Creating graphics and diagrams: Use Shapes and the new SmartArt to create professional-looking diagrams.
•Automating complex tasks: Perform a tedious task with a single mouse click with Excel’s macro capabilities.
What’s New in Excel 2010?
When a new version of Microsoft Office is released, sometimes Excel gets lots of new features. And sometimes it gets very few new features. In the case of Office 2010, Excel got very few new features. Here’s a quick summary of what’s new in Excel 2010, relative to Excel 2007:
•64-bit version: If your hardware (and Windows version) supports it, you can install the 64-bit version, which lets you create larger workbooks. Most people do not require the 64-bit version, and using it might cause some add-ins to not function.
•Sparkline charts: Create small in-cell charts to summarize a range of data graphically. See Chapter 21.
•Slicers: A new way to filter and display data in pivot tables, by clicking buttons. See Chapter 35.
•New pivot table formatting options: You have more control over the appearance of pivot table reports. See Chapter 35.
•Office button changes: The big round Office button in Excel 2007 has been replaced by a File button/tab, displayed to the left of the tabs. Clicking it displays a screen that lets you perform various operations on your workbook. This view essentially replaces the traditional File and Print menus — plus quite a bit more.
•Conditional formatting enhancements: Data bar conditional formatting can display in a solid color, and the bars provide a more accurate display. See Chapter 20.
•Function enhancements: Some Excel worksheet financial and statistical functions have been improved in terms of numerical accuracy.
•Image editing enhancements: You have much more control over graphic images inserted into a workbook, including the ability to remove nonessential parts from the background of an image.
•Screen capture tool: You can easily capture a window from a different program and then insert the image on a worksheet.
•Paste preview: When you copy a range, the Paste command displays various options with a live preview so you can see how the paste operation will look.
4
Chapter 1: Introducing Excel
•Ribbon customization: You can customize the Ribbon by adding new tabs and groups.
•Equation editor: Create and display (noncalculating) mathematical equations and embed them on a worksheet. See Chapter 22.
•Faster: Microsoft made some improvements to the calculation engine, and files load a bit faster.
•New security features: Workbooks downloaded from the Internet or from e-mail attachments are opened in Protected View mode. Workbooks can be designated as “trusted,” and don’t need to reside in special trusted folders.
•Solver: Excel 2010 includes a new version of the Solver add-in, which is useful for solving some complex problems.
•Enhancements to VBA: Operations that used to require old XLM macros can now be performed directly using VBA macro commands. In addition, macro recording now works for operations such as chart shape formatting.
Understanding Workbooks
and Worksheets
The work you do in Excel is performed in a workbook file, which appears in its own window. You can have as many workbooks open as you need. By default, Excel 2010 workbooks use an .xlsx file extension.
Each workbook comprises one or more worksheets, and each worksheet is made up of individual cells. Each cell contains a value, a formula, or text. A worksheet also has an invisible draw layer, which holds charts, images, and diagrams. Each worksheet in a workbook is accessible by clicking the tab at the bottom of the workbook window. In addition, workbooks can store chart sheets. A chart sheet displays a single chart and is also accessible by clicking a tab.
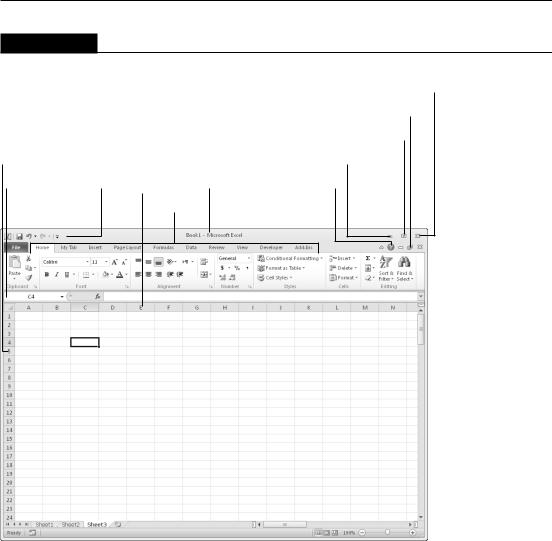
Newcomers to Excel are often intimidated by all the different elements that appear within Excel’s window. After you become familiar with the various parts, it all starts to make sense.
Figure 1.1 shows you the more important bits and pieces of Excel. As you look at the figure, refer to Table 1.1 for a brief explanation of the items shown in the figure.
5
Part I: Getting Started with Excel
FIGURE 1.1
The Excel screen has many useful elements that you will use often. |
|
||||
|
|
|
|
|
Application close |
|
|
|
|
Window maximize/restore |
|
|
|
|
|
Application maximize/restore |
|
Row number |
Quick Access |
Column |
Application minimize |
||
Name box |
Help |
|
|||
toolbar |
letter Title bar |
Window |
|||
|
|
|
|
|
|
|
|
|
|
|
|
File button |
|
Tab list |
Minimize the Ribbon |
minimize |
|
|
|
|
|
|
|
|
|
|
|
|
|
|
|
|
|
|
|
|
|
|
|
|
|
|
|
|
|
|
|
|
|
|
|
|
|
|
|
|
|
|
|
|
|
|
|
|
|
|
|
|
|
|
|
|
|
|
|
|
|
|
|
|
|
|
|
|
|
|
|
|
|
|
|
|
|
|
|
|
|
|
|
|
|
|
|
|
|
|
|
|
|
|
|
|
|
|
|
|
|
|
|
|
|
|
|
|
|
|
|
|
|
|
|
|
|
|
|
|
|
|
|
|
|
|
|
|
|
|
|
|
|
|
|
|
|
|
|
|
|
|
|
|
|
|
|
|
|
|
|
|
|
|
|
|
|
|
|
|
|
|
|
|
|
|
|
|
|
|
|
|
|
|
|
|
|
|
|
|
|
|
|
|
|
|
|
|
|
|
|
|
|
|
|
|
|
|
|
|
|
|
|
|
|
|
|
|
|
|
|
|
|
|
|
|
|
|
|
|
|
|
|
|
|
|
|
|
|
|
|
|
|
|
|
|
|
|
|
|
|
|
|
|
|
|
|
|
|
|
|
|
|
|
|
|
|
|
|
|
|
|
|
|
|
|
|
|
|
|
|
|
|
|
|
|
|
|
|
|
|
|
|
|
|
|
|
|
|
|
|
|
|
|
|
|
|
|
|
|
|
|
|
|
|
|
|
|
|
|
|
|
|
|
|
|
|
|
|
|
|
|
|
|
|
|
|
|
|
|
|
|
|
|
|
|
|
|
|
|
|
|
|
|
|
|
|
|
|
|
|
|
|
|
|
|
|
|
|
|
|
|
|
|
|
|
|
|
|
|
|
|
|
|
|
|
|
|
|
|
|
|
|
|
|
|
|
|
|
|
|
|
|
|
|
|
|
|
|
|
|
|
|
|
|
|
|
|
|
|
|
|
|
|
|
Active cell |
|
|
Formula bar |
|
|
|
|
|
|
|
|
|
|
|
|
Status bar |
|
|
|||||||||||
|
|
|
|
|
|
|
indicator |
|
|
|
|
|
|
|
|
|
|
|
|
|
|
|
|
|
|
|
|
|
|
|
|
|
|
|
||
|
|
|
Ribbon |
|
|
Page view buttons |
|
|
||||||||||||||||||||||||||||
|
|
|
|
|
|
|
|
|
|
|
|
|
|
|
|
|
||||||||||||||||||||
|
|
|
|
|
|
|
|
|
|
|
|
|
|
|
|
|
|
|
|
|
|
|
|
|
|
|
|
|
|
|
|
|
|
|
||
|
|
|
|
|
Macro recorder |
Insert Worksheet button |
Horizontal scrollbar Zoom control |
|
||||||||||||||||||||||||||||
|
|
|
|
|
|
|
|
|
|
|
|
|
|
|
|
|
|
|
|
|
|
|
|
|
|
|
|
|
|
|
|
|
|
|
||
Sheet tab scroll buttons |
|
|
|
Vertical scrollbar |
|
|
|
|
|
|
|
|
|
|
Window close |
|||||||||||||||||||||
6

Chapter 1: Introducing Excel
TABLE 1.1
Parts of the Excel Screen That You Need to Know
Name |
Description |
|
|
Active cell indicator |
This dark outline indicates the currently active cell (one of the |
|
17,179,869,184 cells on each worksheet). |
|
|
Application Close button |
Clicking this button closes Excel. |
|
|
Application Minimize button |
Clicking this button minimizes the Excel window. |
|
|
Column letters |
Letters range from A to XFD — one for each of the 16,384 columns in the |
|
worksheet. You can click a column heading to select an entire column of |
|
cells, or drag a column border to change its width. |
|
|
File button |
Click this button to open Back Stage view, which contains many options |
|
for working with your document (including printing), and setting Excel |
|
options. |
|
|
Formula bar |
When you enter information or formulas into a cell, it appears in this line. |
|
|
Help button |
Clicking this button displays the Excel Help system window. |
|
|
Horizontal scrollbar |
Use this tool to scroll the sheet horizontally. |
|
|
Macro recorder indicator |
Click to start recording a VBA macro. The icon changes while your actions |
|
are being recorded. Click again to stop recording. |
|
|
Minimize Ribbon button |
Clicking this button hides the Ribbon, giving you a bit more space |
|
onscreen. When you click a tab, the Ribbon reappears. |
|
|
Name box |
This field displays the active cell address or the name of the selected cell, |
|
range, or object. |
|
|
Page View buttons |
Change the way the worksheet is displayed by clicking one of these buttons. |
|
|
Quick Access toolbar |
This customizable toolbar holds commonly used commands. The Quick |
|
Access toolbar is always visible, regardless of which tab is selected. |
|
|
Ribbon |
This is the main location for Excel commands. Clicking an item in the tab |
|
list changes the Ribbon that displays. |
|
|
Row numbers |
Numbers range from 1 to 1,048,576 — one for each row in the worksheet. |
|
You can click a row number to select an entire row of cells. |
|
|
Sheet tabs |
Each of these notebook-like tabs represents a different sheet in the work- |
|
book. A workbook can have any number of sheets, and each sheet has its |
|
name displayed in a sheet tab. |
|
|
Insert Sheet button |
By default, each new workbook that you create contains three sheets. Add |
|
a new sheet by clicking the Insert Worksheet button (which is displayed |
|
after the last sheet tab). |
|
|
Sheet tab scroll buttons |
Use these buttons to scroll the sheet tabs to display tabs that aren’t visible. |
|
|
|
continued |
7