

Virtuoso XL Layout Editor User Guide
Preparing Your Connectivity Source for the Virtuoso XL Layout Editor
One-to-Many Assignment with the Update Device Correspondence
You can also map a single device in the schematic to multiple devices in the layout by using the Update-Device Correspondence command. You might want to do this if you need to map a device in the schematic to a flattened layout instance.
Note: You can map One-to-Many devices only between cellview pairs; that is, between the schematic and layout that correspond to each other and are on the same hierarchical level. For example, you cannot map an instance in the one to multiple instances accessed through a descend edit in the other.
To map an instance in the schematic to multiple instances in the layout, follow these steps.
1.From the layout Connectivity menu, choose Update – Device Correspondence.
The schematic window and the Command Interpreter Window (CIW) prompt you to choose one or more instances from the schematic.
2.Select the component from the schematic.
3.Press Return in the schematic window.
The layout window and the CIW prompt you to choose one or more instances from the layout window.
You can select more than one device by Shift click or by click and drag. You can deselect using Control click or by Control click and drag. Preselected components are considered part of the selection unless you specifically deselect them.
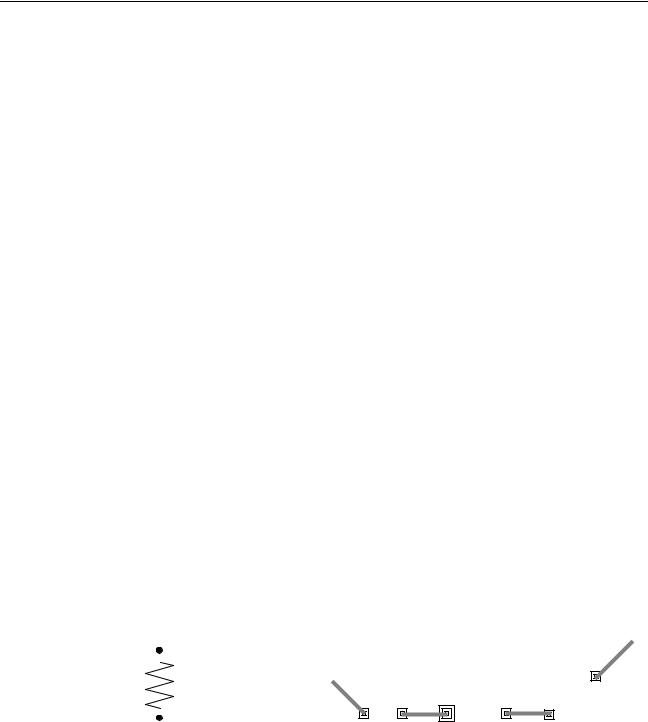
For example, in the diagram below, you can select the resistor A from the schematic to be mapped to the resistors R21, R22, and R6 in the layout.
|
Schematic |
|
|
|
|
Layout (showing incomplete nets) |
||||||||||||||||||||||||||||||||||
|
|
|
net1 |
|
|
|
|
|
|
|
|
|
|
|
|
|
|
|
|
|
|
|
|
|
|
|
|
|
|
|
|
|
|
|
|
|
|
|
net2 |
|
|
|
|
|
|
|
|
|
|
|
|
|
|
|
|
|
|
|
|
|
|
|
|
|
|
|
|
|
|
|
|
|
|
|
|
|
|
|
|
||
R = 8k |
|
|
A |
net1 |
|
|
|
|
|
|
|
|
|
|
|
|
|
|
|
|
|
|
|
|
R6 |
|||||||||||||||
|
|
|
|
|
|
|
|
|
|
|||||||||||||||||||||||||||||||
|
|
|
|
|
|
|
|
|
|
|||||||||||||||||||||||||||||||
|
|
|
|
|
|
|
|
|
|
|
|
|
|
|
|
|
|
|
|
|
|
|
|
|
|
|
|
|
|
|||||||||||
|
|
|
|
|
|
R21 |
|
|
|
|
|
|
|
R22 |
|
|
|
|
|
|
|
|
|
|
|
|
|
|
|
|
|
|
|
|
||||||
|
|
|
|
|
|
|
|
|
|
|
|
|
|
|
|
|
|
|
|
|
|
|
|
|
|
|
|
|
|
|
|
|
||||||||
|
|
|
|
|
|
|
|
|
|
|
|
|
|
|
|
|
|
|
|
|
|
|
|
|
|
|
|
|
|
|
|
|
|
|||||||
|
|
|
net2 |
|
|
|
|
|
|
|
|
|
|
|
|
|
|
|
|
|
|
|
|
|
|
|
|
|
|
|
|
|
|
|
|
|
|
|
|
|
|
|
|
|
|
|
|
r = 1k |
|
|
|
|
|
|
r = 2k |
|
|
|
|
|
|
|
|
|
r = 5k |
|
|||||||||||||||
|
|
|
|
|
|
|
|
|
|
|
|
|
|
|
|
|
|
|
|
|
|
|
|
|
|
|
|
|
|
|
|
|
|
|
|
|
|
|
|
|
4. When you have finished your selection, pressReturn.
December 2002 |
43 |
Product Version 5.0 |

Virtuoso XL Layout Editor User Guide
Preparing Your Connectivity Source for the Virtuoso XL Layout Editor
Virtuoso XL checks your selection for connectivity. If the number of external nets in the layout selection is less than the number of external nets in the schematic selection, the mapping is not set.
If the number of external nets in the layout selection is the same as or greater than the number of external nets in the schematic selection, a dialog box shows the nets that do not match and asks if you want to use Assign Nets to assign the nets of the layout components to nets corresponding to those in the schematic.
a.Choose Yes.
The Assign Nets function highlights all unmatched nets from the schematic and layout.
The CIW and layout window prompt you to select a pin within an instance to add to a net.
You can press F3 to see a list of the nets in the design.
b.Click on a pin in one of the instances in the layout that you want to correspond to the instance in the schematic.
The CIW and layout window prompt you to select a net to add the pin to.
c.Click on a net in the schematic or a path in the layout.
Assign Nets connects the pin to the net.
d.When you have finished assigning nets, clickCancel on the Assign Nets Form or press Escape to cancel the Assign Nets command.
The Assign Nets command is not canceled and the prompt to select a pin does not disappear until all the unassigned pins are connected to nets.
The Device Correspondence command checks to see that the components are all in one group.
If they are all in the same group, Virtuoso XL leaves them in the group and the CIW displays a message that mapping has been successful.
If only some of them are in a group, Virtuoso XL puts the rest in the group and the CIW displays a message that mapping has been successful.
If none of them is in a group, Virtuoso XL creates a new group and puts them all in. The CIW displays a message that mapping has been successful.
If they are in different groups, the CIW displays a message that mapping cannot be set because they are in different groups.
December 2002 |
44 |
Product Version 5.0 |