


Creating a query from files 39
•Power Platform: You can connect live to Power BI datasets already published in the Power BI service. You will have the ability to connect to already prepared and transformed queries with the Power BI dataflow connectors and perform additional steps without doing everything from scratch.
•Azure: You can connect to all Azure Data Services sources, such as Azure SQL Database, Azure Synapse, Azure Data Lake Storage, and to Azure open source services such as Azure Databricks and Azure HDInsight.
•Online Services: You can connect to a wide range of third-party services and use native connectors to the Dynamics platform, Salesforce, Google Analytics, and other services that are continuously updated and released.
•Other: This category collects more generic connectors, such as web connectors (used for getting data from websites, to make API calls, or to import files from the web), OData feeds, ODBC, and R and Python scripts. This set of connectors allows users to leverage some common connection logic that is used in other tools that can also be replicated with Power Query.
Users have to check what connectors are available in each version of Power Query – either the desktop or online version – and they have to research new connectors' availability. There are new ones both in beta (as shown in the following figure) and a general availability version with every release of Power Query. This list is constantly updated in the Microsoft documentation:
Figure 2.4 – Connector in the preview example
Creating a query from files
Power Query users (when they start to use and explore the tool) usually start by connecting to a local file. They can see from the start that the main file types are supported and each of these will display data in a readable format.
40 Connecting to Fetch Data
In this recipe, we will connect to an Excel file and see how to navigate and expand the different sheets and how to connect to cut-off text/CSV files.
Figure 2.5 – Get Data File section
Getting ready
In this recipe, in order to test different types of file connectors, you need to download the following files in a local folder:
•The AdventureWorksSales Excel file
•The FactResellerSales CSV file
In this example, we will refer to the C:\Data folder.

Creating a query from files 41
How to do it...
Once you have opened your Power BI Desktop application, perform the following steps: 1. Go to Get data and click on Excel workbook:
Figure 2.6 – Get data Excel connector
2. Navigate to your local folder where you saved the Excel file, select it, and open it:
Figure 2.7 – Local folder view
42 Connecting to Fetch Data
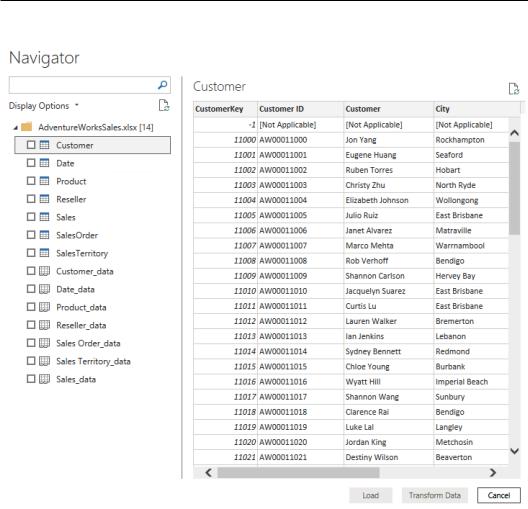
3. Once you open it, the following window will pop up:
Figure 2.8 – Excel data preview
Each item in the left pane matches an item in the Excel file. By only clicking on an item, you will see a preview of the data in the right pane and if you check it, you will include the item in the Power Query view. Therefore, flag the following queries:
Customer, Date, and Product. Click on Transform Data.
4.Each sheet will correspond to a query. From now on, you can perform all transformations as you would with any other data source type:

Creating a query from files 43
Figure 2.9 – Power Query interface
Let's add a connection to a CSV file:
1. Click on Get data and select the Text/CSV connector:
Figure 2.10 – Get data Text/CSV connector

44Connecting to Fetch Data
2.Navigate to the local folder where you saved the FactResellerSales CSV file. Select it and open it as in the previous section with the Excel file. The following window will pop up:
Figure 2.11 – CSV data preview

Creating a query from files 45
For each file, you can define the following:
a)File Origin: Define the file encoding (in this case, we will keep the default
Unicode UTF-8).
Figure 2.12 – Define the file encoding
b)Delimiter: Select the right delimiter (in this case, we will keep the default
Comma):
Figure 2.13 – Define the delimiter

46 Connecting to Fetch Data
c.) Data Type Detection: This will refer to the first applied step in Power Query when it detects data types for each column (in this case, we will detect data types based on the first 200 rows):
Figure 2.14 – Define Data Type Detection
3.On the bottom left of this window, you can also extract information from the CSV file by clicking on Extract Table Using Examples:
Figure 2.15 – Extract Table Using Examples button
The following section will appear:
Figure 2.16 – Extract Table Using Examples interface

Creating a query from files 47
4.You can define your columns and which data to extract by filling in the table at the bottom. Have a look at the following example: name the first column ResellerKey and write in the first row the value 676, which is the first ResellerKey value you see in the example, and click on Enter:
Figure 2.17 – Insert values example
5.If you look at row 5 in Figure 2.18 (the left image), you can see that a wrong value has been detected. In this case, you can click on it and insert the right one and you will observe how all values in the column will be corrected:
Figure 2.18 – Insert value detail example (left) and fill in missing or wrong values (right)

48Connecting to Fetch Data
6.You can add a second column and repeat the steps done with the first. Name the second column EmployeeKey and insert the first value. Click Enter and you will see the corresponding rows filled:
Figure 2.19 – Create a second column example
7.At the end, click on OK and you will see the CSV in the Power Query interface as shown in the following screenshot:
Figure 2.20 – Power Query interface