


182 Optimizing Power Query Performance
Technical requirements
For this chapter, you will be using the following:
•Power BI Desktop: https://www.microsoft.com/en-us/download/ details.aspx?id=58494
The minimum requirements for installation are the following:
•NET Framework 4.6 (Gateway release August 2019 and earlier)
•NET Framework 4.7.2 (Gateway release September 2019 and later)
•A 64-bit version of Windows 8 or a 64-bit version of Windows Server 2012 R2 with current TLS 1.2 and cipher suites
•4 GB disk space for performance monitoring logs
You can find the data resources referred to in this chapter at https://github.com/ PacktPublishing/Power-Query-Cookbook/tree/main/Chapter06.
Setting up parameters
You have the possibility to manage in a flexible way which data to load in the model. You can define parameters and use them in inputs for multiple transformations such as
filtering or enriching data. In this recipe, we will see how to define parameters and how to use them when adding a conditional column based on some threshold values where you want to add a flag for each value of an existing column.
Getting ready
For this recipe, you need to download the FactInternetSales CSV file. In this example, we will refer to the C:\Data folder.
Setting up parameters 183
How to do it…
Once you open your Power BI Desktop application, you are ready to perform the following steps:
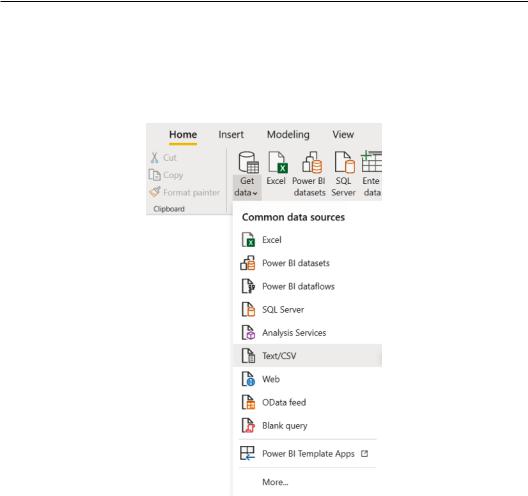
1. Click on Get data and select the Text/CSV connector:
Figure 6.1 – Text/CSV connector

184Optimizing Power Query Performance
2.Browse to your local folder where you downloaded the FactInternetSales CSV file and open it. The following window with a preview of the data will pop up. Click on Transform Data:
Figure 6.2 – CSV data preview
3. Browse to the Home tab and click on Manage Parameters:
Figure 6.3 – Manage Parameters button

Setting up parameters 185
4.Create two parameters, Parameter1 and Parameter2, and enter for each the information seen in the following screenshots, and then click on OK:
Figure 6.4 – (Left) Parameter1 creation. (Right) Parameter2 creation
5.You will see that two new elements, Parameter1 (3000) and Parameter2 (3500), are visible in the Power Query window in the Queries pane.
Figure 6.5 – Parameters in the Queries pane

186Optimizing Power Query Performance
6.Now, select the FactInternetSales query (above Parameter 1 (3000)), browse to the Add Column tab, and click on Conditional Column, as seen in the following screenshot:
Figure 6.6 – Adding a conditional column
7.Create a conditional column, SalesLevel, and enter the values for each condition, as shown in the following screenshot, and then click on OK:

Setting up parameters 187
Figure 6.7 – Add Conditional Column window
The conditional columns allow us to define three labels, High, Medium, or Low, for each SalesAmount value depending on the values of the parameters we define.
8.You will see a new column in the FactInternetSales query, called SalesLevel, with values that reflect different labels according to the value contained in the SalesAmount column, as in the following screenshot:
Figure 6.8 – New added column

188Optimizing Power Query Performance
9.Select Parameter2 and edit the value by entering 3350, and then press the Enter button on your keyboard.
Figure 6.9 – Editing the parameter value
10.Select the FactInternetSales query and browse to the SalesLevel column that you created in the previous steps. See how the labels have changed according to the value of Parameter2.
Figure 6.10 – Updated labels
Parameters are useful because, as you saw in this example, they allow us to dynamically change thresholds and to apply a transformation without the need for editing it manually with static values, but rather adapting it with parameters.