


304 Performance Tuning with Power BI Dataflows
Technical requirements
For this chapter, you will need the following:
•Power BI Desktop: https://www.microsoft.com/en-us/download/ details.aspx?id=58494
•A Power BI Pro license and access to the www.powerbi.com portal
•A Power BI Premium or Power BI Premium Per User license
The minimum requirements for installation are as follows:
•.NET Framework 4.6 (Gateway release August 2019 or earlier)
•.NET Framework 4.7.2 (Gateway release September 2019 or later)
•A 64-bit version of Windows 8 or a 64-bit version of Windows Server 2012 R2 with current TLS 1.2 and cipher suites
•4 GB of disk space for performance monitoring logs
You can find the data resources referred to in this chapter at the following link:
https://github.com/PacktPublishing/Power-Query-Cookbook/tree/ main/Chapter09
Using Power BI dataflows
You can easily access Power Query online through Power BI dataflows, a feature you can find in the Power BI portal once you have logged in. You can create dataflows in Power BI workspaces and manage user permissions as you would do with reports and Power BI datasets. In this recipe, we will see how the Power BI dataflows feature works and what the main concepts to learn about are to get the most out of it.
Getting ready
For this recipe, you need to have access to the Power BI portal, for which a Power BI Pro license is needed.

Using Power BI dataflows 305
How to do it...
After you log in to the Power BI portal, perform the following steps:
1.Create a new workspace, a place where you can collaborate with others, share and publish your content, and from where you can access Power Query online in the Power BI portal. You can do that by clicking on Workspaces and then on Create a workspace as shown in the screenshot:
Figure 9.1 – Workspace creation

306Performance Tuning with Power BI Dataflows
2.The following window will pop up on the right side of your browser, where you can enter your workspace name. In this recipe, we will call it Power Query Cookbook and enter this name in the Workspace name section:
Figure 9.2 – Workspace creation

Using Power BI dataflows 307
3.Then expand the Advanced section, right above the Save button, and flag Workspace admins under Contact list (which means that only workspace admins will receive notifications about problems in the workspace) and choose a licensing option available in your environment. In this case, select Pro as in the following screenshot:
Figure 9.3 – Workspace creation Advanced section

308Performance Tuning with Power BI Dataflows
4.Once you create the workspace, you will see this page from where you can start building content:
Figure 9.4 – Workspace page
Using Power BI dataflows 309
5. Click on New and then click on Dataflow as in the following screenshot:
Figure 9.5 – Dataflow creation
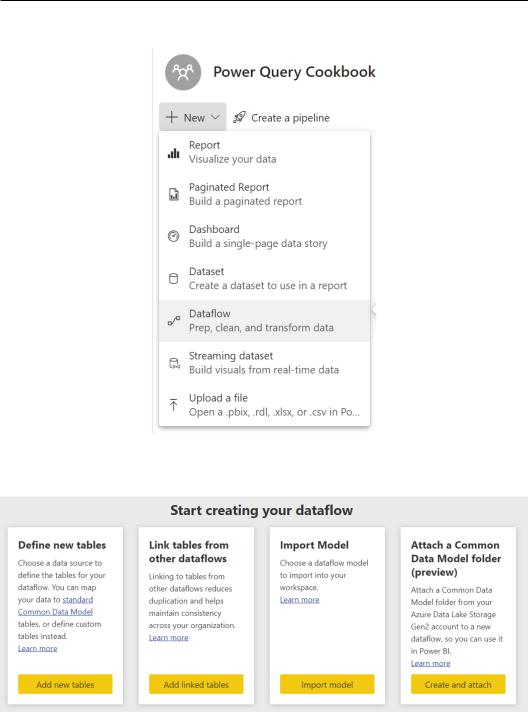
6. The following options will be presented to start using the dataflow features:
Figure 9.6 – Creating dataflow types
310 Performance Tuning with Power BI Dataflows
For this recipe, we will connect to an external source, and we will use the Define new tables option by clicking on Add new tables. Other options will be explored in the rest of the chapter.
7.We are now creating a new dataflow from scratch, and we need to select
a connector. A familiar section will appear from where you can select a data source to connect with (as you would do with Get Data in Power BI Desktop).
8.Select the Web API connector and enter the following URL to connect to
a CSV file loaded in the Power Query Cookbook GitHub repository: https://
github.com/PacktPublishing/Power-Query-Cookbook/blob/main/ Chapter09/FactInternetSales.csv. Click on Next to see a data preview:
Figure 9.7 – Web API connector
A data preview page will appear where you can define, as you would in the desktop version, File origin, the Delimiter type, and Data type detection. Leave the options detected by default and click on Transform data to access the next section, the Power Query online UI:

Using Power BI dataflows 311
Figure 9.8 – Power Query data preview
The Power Query UI will pop up and from here, you can perform transformations and model your data as you would usually do, browsing different tabs and monitoring the applied steps on the right side of the UI:
Figure 9.9 – Power Query online page

312Performance Tuning with Power BI Dataflows
9.Rename the query and type SalesData under the Query settings section on the right side of the UI:
Figure 9.10 – Query settings
10.Click on the Save & close button on the bottom-right side to create the dataflow that contains this query:
Figure 9.11 – The Save & close button
11.The Save your dataflow window will pop up, where you can enter a name and short description for the dataflow. In this case, we will call the new dataflow Sales and then click on Save:

Using Power BI dataflows 313
Figure 9.12 – Save your dataflow
12.You can see in the following screenshot all the tables, called entities, within the dataflow that you created:
Figure 9.13 – Entity view within the dataflow
13.You could edit the dataflow, add other tables, and apply many other advanced features. In this case, we will close this view with the top-right button, Close:
Figure 9.14 – Close dataflow view