


108Reshaping Your Data
•Parsing JSON or XML
•Exploring artificial intelligence insights
Technical requirements
For this chapter, you will be using the following:
•Power BI Desktop: https://www.microsoft.com/en-us/download/ details.aspx?id=58494
•Power BI Premium capacity or a Premium Per User license
The minimum requirements for installation are as follows:
•.NET Framework 4.6 (Gateway release August 2019 and earlier)
•.NET Framework 4.7.2 (Gateway release September 2019 and later)
•A 64-bit version of Windows 8 or a 64-bit version of Windows Server 2012 R2 with current TLS 1.2 and cipher suites
•4 GB disk space for performance monitoring logs
You can find the data resources referred to in this chapter at https://github.com/ PacktPublishing/Power-Query-Cookbook/tree/main/Chapter04.
Formatting data types
Data analysts and business intelligence users generally don't have editing permissions on data sources. You can't change data types directly on the database. Asking for custom changes may require time and it can be complex. In this sense, Power Query becomes a powerful tool because it helps you define and customize data types. In this recipe, we will see different options on how to change data types of specific columns or of entire tables.
Getting ready
For this recipe, you need to have Power BI Desktop running on your machine. You need to download the following files in a local folder:
•FactResellerSales CSV file
•FactInternetSales CSV file
In this example, we will refer to the C:\Data folder.

Formatting data types 109
How to do it
Once you open your Power BI Desktop application, you are ready to perform the following steps:
1. Click on Get data and select the Text/CSV connector:
Figure 4.1 – Text/CSV connector
110Reshaping Your Data
2.Browse to your local folder where you downloaded the FactInternetSales CSV file and open it. The following window with a preview of the data will pop up. Click on Transform Data:
Figure 4.2 – CSV data preview
3.The usual Power Query interface will appear with data displayed. Focus on the APPLIED STEPS pane and see that two steps were applied automatically:
a)Promoted Headers: The first row of the file is promoted as the columns' header.
b)Changed Type: For unstructured data sources such as CSV/TXT, this step is applied by default where Power Query detects the most adequate data type:

Formatting data types 111
Figure 4.3 – Changed data type step
If you focus on the selected column, ProductKey, you can see that the data type is displayed on the left of the column name as shown in the following screenshot:
Figure 4.4 – Data type
4. If you click on the data type icon, a wider selection of data types will expand:
Figure 4.5 – Data type selection

112 Reshaping Your Data
Click on Text in order to convert this column type from Whole Number to Text.
5.The Change Column Type window will pop up because we added a change type to the one generated by default:
Figure 4.6 – Change Column Type
You have different options to change data types for one or more columns:
•Replace current: You can replace the current step with the one defined in the previous section. You will cancel the data type detection performed by Power Query when you loaded the data and apply the step you defined for that single column. You will then have to define other columns' data types.
•Add new step: You can add a new step and keep the one defined automatically.
In this case, we will select the last one in order to keep the data types detected by the Changed Type step. Click on Add new step. This happens because when you are loading date/time values from a text file and you want to convert to date, Power Query will not do that directly; you have to first change from text to date/time (which is done automatically by data type detection) and as a new step, convert to date.

Formatting data types 113
Now let's see another example that shows how to manipulate and change data types as follows:
1. Click on File, Options and settings, and then on Options:
Figure 4.7 – Options
114Reshaping Your Data
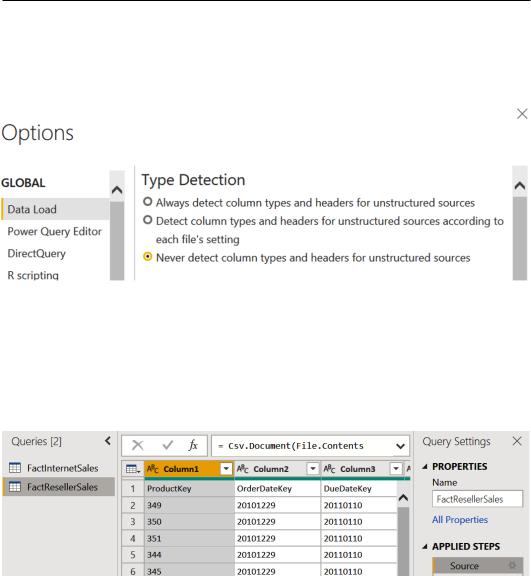
2.Focus on the Data Load tab and on the Type Detection section. You can disable or enable the automatic data type detection from this window. Flag the third option to disable the automatic detection as shown in the following screenshot and then click on OK:
Figure 4.8 – Data type detection setting
3.Click on Get Data and select the Text/CSV connector.
4.Browse to your local folder where you downloaded the FactResellerSales CSV file, open it, and click on OK.
5.You will see that in the Power Query interface, you won't see automatic applied steps because we disabled automatic data type detection:
Figure 4.9 – Table preview
6. Browse to the Transform tab and click on Use First Row as Headers:
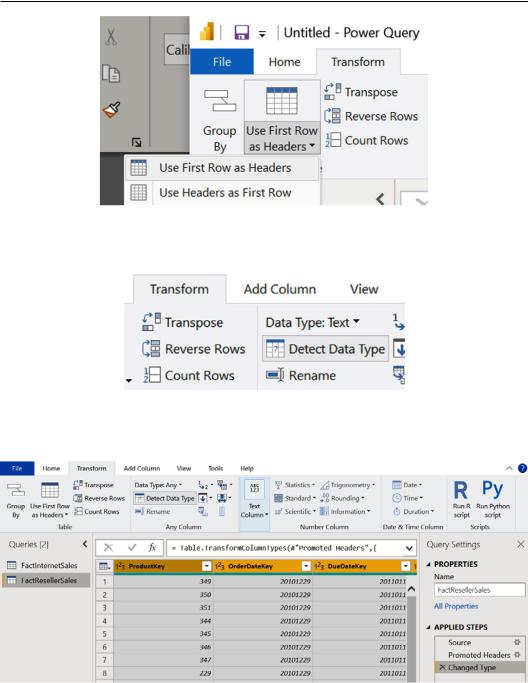
Formatting data types 115
Figure 4.10 – Use First Row as Headers
7. Then select all columns and click on Detect Data Type:
Figure 4.11 – Detect Data Type
8. You will see that data types were detected:
Figure 4.12 – Data types detected

116Reshaping Your Data
9.You will see that some values were not detected correctly because number values were detected as text:
Figure 4.13 – Data types not detected correctly
10.Select the columns you see in the preceding screenshot: ProductStandardCost,
TotalProductCost, SalesAmount, TaxAmt, and Freight. Right-click on one of the column names, click on Change Type, and then click on Using Locale… as you can see in the following screenshot:
Figure 4.14 – Using Locale data type

Formatting data types 117
11.A window will pop up where you can define local number formats. This feature is useful when you have to deal with the decimal separator, which has different formats according to the country settings set on the machine or at the tool level. Select Fixed decimal number as Data Type and Locale as English (Germany) since we want to use a comma as decimal separator, and click on OK:
Figure 4.15 – Define data type locale
12. Observe how the selected columns now show the correct data types:
Figure 4.16 – Data types corrected
There are different options on how to define data types. You can rely on automatic detection; you can customize each column and deal with customized formats. This flexibility can be achieved at the table or at column level by selecting single or subsets of columns.