


Installing a Power BI gateway 3
Installing a Power BI gateway
Power BI users often need to work with data from on-premises sources, such as filesystems, local files available on a PC, and databases not running on the cloud. In order to make this data securely available once the report is published to the web,
a Power BI gateway needs to be installed. Microsoft offers two different types of gateway for different scenarios, and their setup can be customized according to specific enterprise configuration requirements, such as proxy, service account, communication, and high availability settings. Users can choose one of the following two types:
•Standard (or enterprise) mode: This mode can be used to connect data sources to Power Platform services, Logic Apps, and Analysis Services by multiple users. It has to be run by users with admin rights and is meant for enterprise scenarios.
•Personal mode: This mode can be used by single users without the possibility of sharing the files. This version is available for Power BI only. If you want to quickly connect to an Excel file on your local machine and run tests without needing admin rights, this mode is for you. It is meant for testing purposes.
Customers need monitoring options and analysis to decide whether to scale up or scale down the gateway server to improve data movement performance. This recipe aims to help users to decide which type of gateway to install, and to assist with the configuration and monitoring options.
Getting ready
You can refer to this link to download a Power BI gateway: https://powerbi. microsoft.com/en-us/gateway/.
In this recipe, we are going to install the standard (enterprise) mode gateway on a local machine. It is recommended, though, to install the gateway on a server, especially in enterprise scenarios.
In this chapter, Power BI Desktop needs to be installed on a machine that has access to the data sources. Access to the Power BI service is also needed.
Download the data files on your local machine.

4 Getting Started with Power Query
How to do it…
Once you have downloaded the Power BI gateway, you are ready to start the setup:
1.Define the default path for your gateway resources, accept the terms, and run the installation. Revise the minimum requirements for the machine where the setup is going to be done:
Figure 1.1 – On-premises data gateway installation
2.Enter your work or school Microsoft Office 365 account. This account has to be in the Azure Active Directory tenant, the one shared with Power BI. By entering your organizational account, you will be able to manage gateways and add multiple data sources using the Power BI service portal:

Installing a Power BI gateway 5
Figure 1.2 – On-premises gateway email admin
3. Click on Register a new gateway on this computer:
Figure 1.3 – Register a new gateway

6Getting Started with Power Query
4.Give a name to the gateway and create a Recovery key. This key is needed if you want to create a gateway cluster (a group of gateways), to migrate your existing gateway, or to take over the gateway's ownership. Once you set the key, click on
Configure:
Figure 1.4 – Gateway recovery key definition
At this step, you can decide to change the default region to connect the gateway to cloud services. The default region is the one where your Power BI or Microsoft O365 tenant is located. If you want to change it, you'll select an Azure region, but make sure that the region is close to you.

Installing a Power BI gateway 7
5. Once the configuration is completed, you should end up with the following view:
Figure 1.5 – Running the gateway application interface
This will be the default view when you open the gateway application. You can monitor the health of the gateway and see what services can use the same gateway. This application allows the gateway admin to customize the configuration.

8 Getting Started with Power Query
Managing the data gateway on the Power BI portal
Once you have installed the gateway and it is running on the machine, you can access https://powerbi.com and log in to the Power BI portal with the credentials you use to sign in to the gateway application. When you are logged in, complete the following steps to see how to manage the data gateway:
1.Go to Manage gateways and access the section where you can find the running gateway you set up before:
Figure 1.6 – Power BI service: Settings section
2.You will now be able to see gateways settings and administrators:
a)Administrators: If you installed the gateway, you will be an admin by default. You can use these sections to add other administrators:

Installing a Power BI gateway 9
Figure 1.7 – Managing gateways: adding administrators
b)Gateway Cluster Settings: On the left side, you can see the gateway that you configured on your Windows machine. In the following screenshot, you can find a list of data sources that you registered. Click on the three dots and then click on
ADD DATA SOURCE:
Figure 1.8 – Managing gateways: cluster view
10 Getting Started with Power Query
Name the data source and select the File type (you can explore and add other types, such as SQL servers, folders, SAP, and ODBC). You can add on-premises data sources that can be accessed by the gateway installed on a server that belongs to the same data source domain:
Figure 1.9 – Adding data sources to the gateway

Installing a Power BI gateway 11
3.You will add one of the files that you downloaded. Add the Full path and enter the credentials to access the data source:
Figure 1.10 – Adding credentials for data sources
4.When you click on Apply, Power BI will check the connection and, if the connection succeeds, you will see a Connection Successful status:
Figure 1.11 – Data source connection outcome
12 Getting Started with Power Query
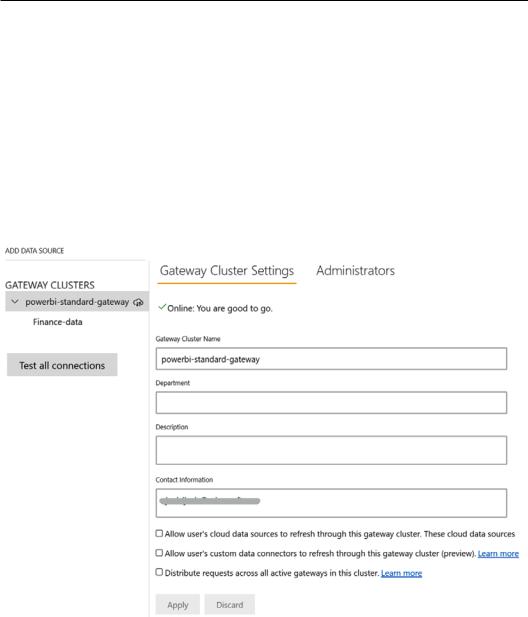
Once you have added data sources to be accessed through the gateway, you have three checkboxes at the end of the page that you can flag:
a)Allow user's cloud data sources to refresh through this gateway cluster: Check this box if you plan to perform append and merge operations between on-prem and cloud sources.
b)Allow user's custom data connectors to refresh through this gateway cluster: If you have a custom-developed connector built to use the gateway to access data sources, you need to flag this box to refresh data.
c)Distribute requests across all active gateways in this cluster: If you have other gateways configured within the same cluster, you can enable this feature to perform load balancing and distribute requests across all active clusters:
Figure 1.12 – Gateway Cluster Settings
5.Open Power BI Desktop, connect to one of the data sources you downloaded and that you added in the previous steps, create a report, and publish it on the Power BI service.

Installing a Power BI gateway 13
Follow these steps to check that your data source is used correctly with the gateway:
1.Once you have published the report and dataset in your workspace, click on the three dots next to the dataset and go to Settings:
Figure 1.13 – Settings section for datasets

14Getting Started with Power Query
2.Expand the Gateway connection section and check that the gateway is running successfully:
Figure 1.14 – Defining dataset sources
3.You can map the data sources included in the dataset to sources that you created in the Gateway Management view. Map to Finance-data and click on Apply. You could also do it the other way around: create a report, publish it, access
the following view, click on Add to gateway, and be redirected to the Gateway Management section, where you can add data sources to your gateway:
Figure 1.15 – Mapping a dataset to an existing gateway source