


Authentication to data sources 15
How it works
From now on, you can refresh your datasets manually or at scheduled times. The high flexibility is given by the fact that you can create single gateways or create clusters of gateways following this recipe in order to meet high availability and load balancing requirements. For each gateway or cluster of gateways, you can add or remove data sources that use those gateways to create a connection between on-premises environments and cloud services by allowing the following:
•A fast and secure connection
•A gateway that decrypts and uses stored credentials to access on-premises data sources handling authentication
•Easy-to-use and straightforward administration, management, and troubleshooting tools
Authentication to data sources
Power Query provides different connector types to a wide range of data sources. These will be widely explained in the following chapter, but in this recipe, we will concentrate on how authentication works for data sources.
Each connector provides different kinds of authentication. There are six main types of authentication:
•Anonymous
•Windows
•Basic
•Organizational account
•Microsoft account
•Database
Depending on the type of connector and the Power Query version used, different combinations of these options will be available for the user.
Once you connect to your data source and you perform Power Query transformations, you will be able to change the type of authentication and the data source without losing the work you have done.

16 Getting Started with Power Query
Getting ready
In this recipe, in order to test different types of connections, you need to have the following data sources to which you can connect:
•An Azure SQL Database with AdventureWorks data, database credentials, and access through Azure Active Directory Authentication (log in with your Microsoft account)
•A Parquet file named FactInternetSales in a local folder on your PC
How to do it…
Once you have opened your Power BI Desktop application, you are ready to follow these steps:
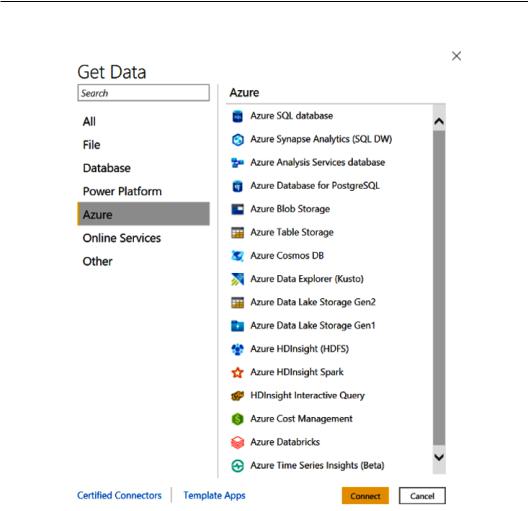
1. Go to Get data and click on More:
Figure 1.16 – Get data
Authentication to data sources 17
Search for the Azure SQL database connector and select it:
Figure 1.17 – Azure connectors section

18Getting Started with Power Query
2.Enter the name of the server where you have AdventureWorks data:
Figure 1.18 – SQL Server database connector
3.Click on Database, enter your database credentials in order to authenticate, and click on Connect:
Figure 1.19 – SQL Server authentication
4.Select the FactInternetSales table when you recreate the AdventureWorks database on your server and click on Transform Data:

Authentication to data sources 19
Figure 1.20 – Data source preview
5.A Power Query window pops up, and you are ready to perform some Power Query transformations:
Figure 1.21 – Data preview in Power Query
20Getting Started with Power Query
6.Open your Advanced Editor and paste the M code you find in MCodeChapter1. txt to reproduce the following Power Query Applied steps:
a)Remove columns
b)Subtraction between two columns
c)Custom column
In the file, you will have to fill in some information regarding your server and the name of your database. Then, all steps will be applied:
Figure 1.22 – Advanced Editor for FactInternetSales
The idea in this recipe is not to focus on the transformations, but to demonstrate that you can change data sources without doing everything from scratch and keeping your M code with your transformations.
Authentication to data sources 21
Change existing data source permissions
If you want to change permissions, such as switch from database credentials to Microsoft account authentication, you don't have to do everything from scratch, but you can do the following:
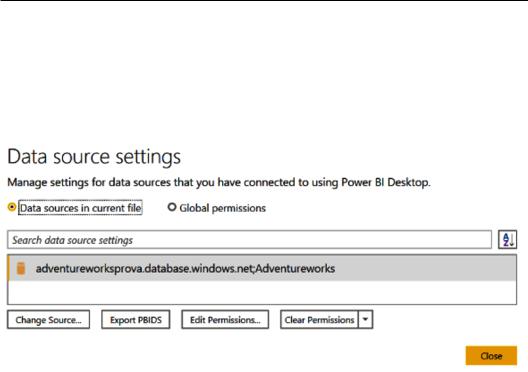
1. Click on Data source settings and the following window will pop up:
Figure 1.23 – Data source settings
2.From here, you can do the following:
a)Change Source: Click on this to change the name of the server. In this way, you will keep the connector type.

22Getting Started with Power Query
b)Edit Permissions: You can change the type of permission used to authenticate. Click on Edit, go to the Microsoft Account tab, and sign in with your account details:
Figure 1.24 – Data source settings: Edit Permissions
You can perform the authentication from the following window:
Figure 1.25 – Data source credentials

Authentication to data sources 23
c)Clear Permissions: You can click on this to delete permissions to connect to this data source. This can be useful when sharing the file with other users and you want to clear permissions. Be careful because once you clear it, you will need to re-connect and re-authenticate.
3.Click on Save and close Data source settings. You can see that nothing has changed, and you kept all your transformations.
Change connector type
What if you want to keep the same transformations, but change the type of connector? You can do it by using the Advanced Editor.
Complete the following steps to use a Parquet file as a data source. You can find
InternetSales.parquet in the GitHub folder:
1.From the Power Query view, go to Get Data and search for the Parquet connector. Paste the path where you downloaded this file on your local computer:
Figure 1.26 – Parquet connector
2. Click on OK and open Advanced Editor on the InternetSales query:
Figure 1.27 – Advanced Editor for InternetSales
24Getting Started with Power Query
3.Copy the following line of code and close Advanced Editor:
Source = Parquet.Document(File.Contents(«C:\Data\
InternetSales.parquet»))
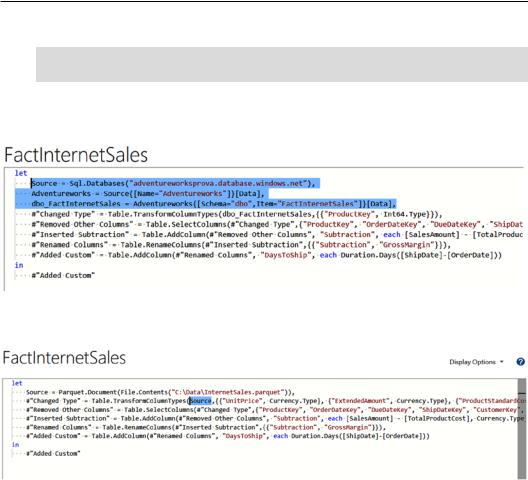
4.Select the FactInternetSales query and open Advanced Editor. Delete the first three lines of code, as shown in the following screenshot:
Figure 1.28 – Advanced Editor for FactInternetSales: code selection
Now, paste the code you copied in Step 3:
Figure 1.29 – Advanced Editor for FactInternetSales: code replaced
5.At #"Changed Type", replace dbo_FactInternetSales with Source in order to correctly recall the previous step in Power Query.
6.Close Advanced Editor and refresh the query. You will see that, even by changing the data source (from Azure SQL Database to a local Parquet file), the applied steps will be executed.