


CHAPTER 11 USING THE STORAGE APIS
As Web Storage becomes more widely implemented by the various browser vendors, expect both the capacity and tooling available to users and developers to expand rapidly.
Building an Application with Web Storage
Now, let’s put together what you’ve learned by integrating storage into a web application. As applications grow more complex, it becomes increasingly important to manage as much data as possible without server interaction. Keeping data local to the client reduces network traffic and increases responsiveness by fetching data from a local machine instead of a remote location.
One common problem developers grapple with is how to manage data as users move from page to page within an application. Traditionally, web applications achieve this by storing data on a server and moving it back and forth while the user navigates pages. Alternatively, the application may attempt to keep the user in a single page and update everything dynamically. However, users are prone to wander, and getting data back into the display quickly when a user returns to your application’s page is a great way to enhance the user experience.
In our sample application, we’ll show how to store temporary application data locally while the user moves from page to page on a web site and quickly load it from storage on each page. To accomplish this, we’ll build on the examples of previous chapters. In Chapter 5, we showed how easy it is to gather a user’s current location. Then, in Chapter 7, we demonstrated how to take location data and send it to a remote server so that it can be viewed by any number of interested users. Here, we will go one step further: we will listen for broadcasted location data delivered via a WebSocket and store it in local storage so that it is immediately available as users move from page to page.
Imagine that our running club has live location information from its race participants being broadcast from their mobile devices and shared via a WebSocket server. It would be simple for a web application to display the current position of every racer live and in real time, as the racers upload new position information during the race. And a smart web site would cache those race positions to display them quickly as a user navigated among the pages of the site. That’s exactly what we’re going to build.
In order to achieve this, we’ll need to introduce a demonstration web site that can save and restore our racer data. We’ve created a three-page example running race site and placed it in our online resources in the folder code/storage, but you can use any site of your choosing for your own demonstration. The key here is merely that you have multiple web pages that are easily traversed by a user. We will insert a bit of dynamic content into those pages to represent a live leader board, or a list of race participants and their current distance from the finish line. Figure 11-8 shows the three pages that make up the race site.
Figure 11-8. The example race website
Each of our web pages will contain a common section to display the leader board data. Each entry in the leader board will show the name of one of our racers and his or her current distance from the finish
275

CHAPTER 11 USING THE STORAGE APIS
line. When any of our pages is loaded, it will make a WebSocket connection to a race broadcast server and listen for messages indicating the position of a racer. The racers, in turn, will be sending their current position to the same broadcast server, causing the position data to stream down to the page in real time.
All of this has been covered in previous chapters related to Geolocation and WebSocket. In fact, much of the demonstration code here is shared with the examples from earlier in this book. However, there is one key difference in this example: when the data arrives in the page, we will store it in the session storage area for later retrieval. Then, whenever a user navigates to a new page, the stored data will be retrieved and displayed before making a new WebSocket connection. In this way, the temporary data is transferred from page to page without using any cookies or web server communication.
To keep our data feed small, we’ll send our racer location messages across the web in a simple format that is easy to read and parse. This format is a String that uses the semicolon character (;) as a delimiter separating the chunks of data: name, latitude, and longitude. For example, a racer named Racer X who is at latitude 37.20 and longitude –121.53 would be identified with the following string:
;Racer X;37.20;-121.53
Note A common technique is to use the JSON format to send object representations between client and server. We’ll show you how to do that in the section “Practical Extras” later in this chapter.
Now, let’s dig into the code itself. Each of our pages will contain identical JavaScript code to connect to the WebSocket server, process and display leader board messages, and save and restore the leader board using sessionStorage. As such, this code would be a prime candidate to include in a JavaScript library in a real application.
First, we’ll establish a few utility methods that you’ve seen before. To calculate the distance of any particular racer from the finish line, we need routines to calculate distance between two geolocation positions as shown in Listing 11-5.
Listing 11-5. Distance Calculation Routine
//functions for determining the distance between two
//latitude and longitude positions
function toRadians(num) { return num * Math.PI / 180;
}
function distance(latitude1, longitude1, latitude2, longitude2) { // R is the radius of the earth in kilometers
var R = 6371;
var deltaLatitude = toRadians((latitude2-latitude1)); var deltaLongitude = toRadians((longitude2-longitude1));
latitude1 = toRadians(latitude1), latitude2 = toRadians(latitude2);
var a = Math.sin(deltaLatitude/2) * Math.sin(deltaLatitude/2) + Math.cos(latitude1) *
276
CHAPTER 11 USING THE STORAGE APIS
Math.cos(latitude2) *
Math.sin(deltaLongitude/2) *
Math.sin(deltaLongitude/2);
var c = 2 * Math.atan2(Math.sqrt(a), Math.sqrt(1-a));
var d = R * c; return d;
}
// latitude and longitude for the finish line in the Lake Tahoe race var finishLat = 39.17222;
var finishLong = -120.13778;
In this familiar set of functions—used earlier in Chapter 5—we calculate the distance between two points with a distance function. The details are not of particular importance, nor are they the most accurate representation of distance along a racetrack, but they’ll do for our example.
In the final lines, we establish a latitude and longitude for the finish line location of the race. As you’ll see, we will compare these coordinates with incoming racer positions to determine the racers’ distance from the finish line, and thus, their ranks in the race.
Now, let’s look at a tiny snippet of the HTML markup used to display the page.
<h2>Live T216 Leaderboard</h2>
<p id="leaderboardStatus">Leaderboard: Connecting...</p> <div id="leaderboard"></div>
Although most of the page HTML is irrelevant to our demonstration, in these few lines, we declare some named elements with the IDs leaderboardStatus and leaderboard. The leaderboardStatus is where we will display the connection information for our WebSocket. And the leaderboard itself is where we will insert div elements to indicate the position information we are receiving from our WebSocket messages, using the utility function shown in Listing 11-6.
Listing 11-6. Position Information Utility Function
// display the name and distance in the page function displayRacerLocation(name, distance) {
//locate the HTML element for this ID
//if one doesn't exist, create it
var incomingRow = document.getElementById(name); if (!incomingRow) {
incomingRow = document.createElement('div'); incomingRow.setAttribute('id', name); incomingRow.userText = name;
document.getElementById("leaderboard").appendChild(incomingRow);
}
incomingRow.innerHTML = incomingRow.userText + " is " + Math.round(distance*10000)/10000 + " km from the finish line";
}
This utility is a simple display routine, which takes the racer’s name and distance from the finish line. Figure 11-9 shows what the leader board section looks like on the index.html page.
277

CHAPTER 11 USING THE STORAGE APIS
Figure 11-9. The race leader board
The name is used for two purposes; not only is it placed into the status message for that racer but it is also used to reference the unique div element where that racer’s status is stored. If a div for our racer already exists, we will find it when we look it up using the standard document.getElementById() routine. If a div does not already exist in the page for that racer, we will create one and insert it into the leaderboard area. Either way, we update the div element corresponding to that racer with the latest distance from the finish line, which will immediately update it in the display of the page. If you have already read Chapter 7, this will be familiar to you from the example application we created there.
Our next function is the message processor that will be called whenever data is returned from the broadcasting race WebSocket server, as shown in Listing 11-7.
Listing 11-7. WebSocket Message Processing Function
// callback when new position data is retrieved from the websocket function dataReturned(locationData) {
// break the data into ID, latitude, and longitude var allData = locationData.split(";");
var incomingId |
= allData[1]; |
||
var |
incomingLat |
= |
allData[2]; |
var |
incomingLong = |
allData[3]; |
|
// update the row text with the new values
var currentDistance = distance(incomingLat, incomingLong, finishLat, finishLong);
//store the incoming user name and distance in storage window.sessionStorage[incomingId] = currentDistance;
//display the new user data in the page displayRacerLocation(incomingId, currentDistance);
}
This function takes a string in the format described previously, a semicolon-separated message containing the name, latitude, and longitude of a racer. Our first step is to split it into its component parts using the JavaScript split() routine to produce the incomingId, incomingLat, and incomingLong, respectively.
278
CHAPTER 11 USING THE STORAGE APIS
Next, it passes the racer’s latitude and longitude, as well as the latitude and longitude of the finish line, to the distance utility method we defined earlier, storing the resulting distance in the currentDistance variable.
Now that we actually have some data worth storing, we can look at the call which exercises Web Storage.
// store the incoming user name and distance in storage window.sessionStorage[incomingId] = currentDistance;
In this line, we use the sessionStorage object on the window to store the current distance of the racer from the finish line as a value under the name and ID of the racer. In other words, we will set a value on the session storage with the key being the racer’s name and the value being that racer’s distance from the finish. As you will see momentarily, this data will be retrieved from storage as the user navigates from page to page on the web site. At the end of the function, we call the displayLocation() routine we previously defined to make sure that this most recent location update is displayed visually in the current page.
Now, on to our final function in our storage example—the load routine shown in Listing 11-8 that fires whenever visitors access the web page.
Listing 11-8. Initial Page Load Routine
// when the page loads, make a socket connection to the race broadcast server function loadDemo() {
// make sure the browser supports sessionStorage
if (typeof(window.sessionStorage) === "undefined") { document.getElementById("leaderboardStatus").innerHTML = "Your browser does
not support HTML5 Web Storage";
return;
}
var storage = window.sessionStorage;
//for each key in the storage database, display a new racer
//location in the page
for (var i=0; i < storage.length; i++) { var currRacer = storage.key(i);
displayRacerLocation(currRacer, storage[currRacer]);
}
// test to make sure that Web Sockets are supported if (window.WebSocket) {
// the location where our broadcast WebSocket server is located url = "ws://websockets.org:7999/broadcast";
socket = new WebSocket(url); socket.onopen = function() {
document.getElementById("leaderboardStatus").innerHTML = "Leaderboard:
Connected!";
}
socket.onmessage = function(e) { dataReturned(e.data);
}
}
}
279

CHAPTER 11 USING THE STORAGE APIS
This is a longer function than the others, and there is a lot going on. Let’s take it step by step. First, as shown in Listing 11-9, we do a basic error check to make sure that the browser viewing the page supports sessionStorage by checking for its presence on the window object. If sessionStorage is not accessible, we simply update the leaderboardStatus area to indicate as much, and then return out of the loading routine. We won’t be attempting to work around lack of browser storage in this example.
Listing 11-9. Checking for Browser Support
// make sure the browser supports sessionStorage
if (typeof(window.sessionStorage) === "undefined") { document.getElementById("leaderboardStatus").innerHTML = "Your browser does
not support HTML5 Web Storage";
return;
}
Note It is possible to rework this demonstration to simply forgo any persistence of data between page navigations and start each page load with a clean leader board if storage is not supported. However, our goal here is to show how storage optimizes the experience for both the user and the network.
The next thing we do on page load is to use the storage to retrieve any racer distance results that have already been served to this or other pages of our website. Recall that we are running an identical block of script code on every one of our site pages, so that the leader board follows the users as they browse around various locations. As such, the leader board may already have stored values into storage from other pages that will be retrieved and displayed here directly on load as shown in Listing 11-10. The previously saved values will follow the user during navigation, as long as the user does not close the window, tab, or browser, thus clearing out the session storage.
Listing 11-10. Displaying Stored Racer Data
var storage = window.sessionStorage;
//for each key in the storage database, display a new racer
//location in the page
for (var i=0; i < storage.length; i++) { var currRacer = storage.key(i);
displayRacerLocation(currRacer, storage[currRacer]);
}
This is an important section of code. Here, we query the session for its length—in other words, the number of keys the storage contains. Then, we grab each key using storage.key() and store it into the currRacer variable, later using that variable to reference the key’s corresponding value with storage[currRacer]. Together, the key and its value represent a racer and that racer’s distance, which were stored on a visit to a previous page.
Once we have a previously stored racer name and distance, we display them using the displayRacerLocation() function. This all happens very quickly on page load, causing the page to instantaneously fill its leader board with previously transmitted values.
280

CHAPTER 11 USING THE STORAGE APIS
Note Our sample application relies on being the only application that stores values into the session storage area. If your application needs to share the storage object with other data, you will need to use a more nuanced key strategy than simply storing the keys at root level. We’ll look at another storage strategy in the “Practical Extras” section.
Our last piece of load behavior is to hook up the page to the racer broadcast server using a simple WebSocket, as shown in Listing 11-11.
Listing 11-11. Connecting to the WebSocket Broadcast Service
// test to make sure that WebSocket is supported if (window.WebSocket) {
//the location where our broadcast WebSocket server is located
//for the sake of example, we’ll just show websockets.org
url = "ws://websockets.org:7999/broadcast"; socket = new WebSocket(url);
socket.onopen = function() { document.getElementById("leaderboardStatus").innerHTML = "Leaderboard:
Connected!";
}
socket.onmessage = function(e) { dataReturned(e.data);
}
}
As we did before in our WebSocket chapter, we first check to make sure that the browser supports WebSocket by checking for the existence of the window.WebSocket object. Once we have verified that it exists, we connect to the URL where our WebSocket server is running. This server broadcasts racer location messages of the semicolon-separated format listed previously, and whenever we receive one of those messages via the socket.onmessage callback, we call our previously discussed dataReturned() function to process and display it. We also use the socket.onopen callback to update our leaderboardStatus area with a simple diagnostic message to indicate that the socket opened successfully.
That’s it for our load routine. The final block of code we declare in our script block is the registration function, which requests that the loadDemo() function is called whenever page load is complete:
// add listeners on page load and unload window.addEventListener("load", loadDemo, true);
As you have seen many times before, this event listener requests that our loadDemo() function will be called when the window has completed loading.
But how do we get racer data transmitted from the trails to the broadcast WebSocket server and into our pages? Well, we could actually use the tracker example previously declared in the WebSocket chapter by simply pointing its connect URL to the broadcast server listed previously. However, we have also created a very simple racer broadcast source page, shown in Listing 11-12, which serves a similar purpose. This page would theoretically be run on the mobile devices of the race participants. Although it does not include any Web Storage code itself, it is a convenient way to transmit the properly formatted
281
CHAPTER 11 USING THE STORAGE APIS
data when run in a browser with both WebSocket and Geolocation support. The file racerBroadcast.html is available from the web site sample area provided for this book.
Listing 11-12. Contents of the File racerBroadcast.html
<!DOCTYPE html>
<html>
<head>
<title>Racer Broadcast</title>
<link rel="stylesheet" href="styles.css"> </head>
<body onload="loadDemo()">
<h1>Racer Broadcast</h1>
Racer name: <input type="text" id="racerName" value="Racer X"/> <button onclick="startSendingLocation()">Start</button>
<div><strong>Geolocation</strong>: <p id="geoStatus">HTML5 Geolocation not started.</p></div>
<div><strong>WebSocket</strong>: <p id="socketStatus">HTML5 Web Sockets are <strong>not</strong> supported in your browser.</p></div>
<script type="text/javascript">
// reference to the Web Socket var socket;
var lastLocation;
function updateSocketStatus(message) { document.getElementById("socketStatus").innerHTML = message;
}
function updateGeolocationStatus(message) { document.getElementById("geoStatus").innerHTML = message;
}
function handleLocationError(error) { switch(error.code)
{
case 0:
updateGeolocationStatus("There was an error while retrieving your location: " + error.message);
break; case 1:
updateGeolocationStatus("The user prevented this page from retrieving a location.");
break;
282
CHAPTER 11 USING THE STORAGE APIS
case 2:
updateGeolocationStatus("The browser was unable to determine your location: " + error.message);
break; case 3:
updateGeolocationStatus("The browser timed out before retrieving the location."); break;
}
}
function loadDemo() {
// test to make sure that Web Sockets are supported if (window.WebSocket) {
// the location where our broadcast WebSocket server is located url = "ws://websockets.org:7999/broadcast";
socket = new WebSocket(url); socket.onopen = function() {
updateSocketStatus("Connected to WebSocket race broadcast server");
}
}
}
function updateLocation(position) {
var latitude = position.coords.latitude; var longitude = position.coords.longitude; var timestamp = position.timestamp;
updateGeolocationStatus("Location updated at " + timestamp);
// Schedule a message to send my location via WebSocket
var toSend = ";" + document.getElementById("racerName").value + ";" + latitude + ";" + longitude;
setTimeout("sendMyLocation('" + toSend + "')", 1000);
}
function sendMyLocation(newLocation) { if (socket) {
socket.send(newLocation); updateSocketStatus("Sent: " + newLocation);
}
}
function startSendingLocation() { var geolocation; if(navigator.geolocation) {
geolocation = navigator.geolocation;
updateGeolocationStatus("HTML5 Geolocation is supported in your browser.");
}
else {
geolocation = google.gears.factory.create('beta.geolocation'); updateGeolocationStatus("Geolocation is supported via Google Gears");
283
CHAPTER 11 USING THE STORAGE APIS
}
// register for position updates using the Geolocation API geolocation.watchPosition(updateLocation,
handleLocationError,
{maximumAge:20000});
}
</script>
</body>
</html>
We won’t spend too much space covering this file in detail, as it is nearly identical to the tracker example in Chapter 7. The primary difference is that this file contains a text field for entering the racer’s name:
Racer name: <input type="text" id="racerName" value="Racer X"/>
The racer’s name is now sent to the broadcast server as part of the data string:
var toSend = ";" + document.getElementById("racerName").value + ";" + latitude + ";" + longitude;
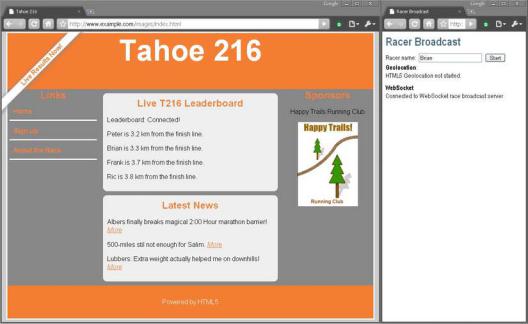
To try it out for yourself, open two windows in a browser that supports Web Storage, Geolocation, and WebSocket, such as Google Chrome. In the first, load the running club’s index.html page. You will see it connect to the race broadcast site using WebSocket and then await any racer data notifications. In the second window, open the racerBroadcast.html file. After this page, too, has connected to the WebSocket broadcast site, enter a name for your racer, and click the Start button. You’ll see that the racer broadcast has transmitted the location of your favorite racer, and it should show up in the leader board in your other browser window. Figure 11-10 shows what this looks like.
284
CHAPTER 11 USING THE STORAGE APIS
Figure 11-10. Race page and racerBroadcast.html side by side
Now, navigate to other racing club pages using the Signup and About the Race links on the left side of the page. Because all of these pages have been configured to load our script, they will immediately load and populate the leader board with the previous racer data, which was delivered while browsing other pages. Send more racer status notifications (from the broadcast page), and you’ll see them propagate through the club site pages as you navigate, as well.
Now that we’ve finished our code, let’s review what we’ve built. We’ve created a simple function block, suitable for inclusion in a shared JavaScript library, which connects to a WebSocket broadcast server and listens for racer updates. When an update is received, the script displays the position in the page and stores it using sessionStorage. When the page is loaded, it checks for any previously stored racer position values, thus maintaining the state as the user navigates the site. What are some of the benefits we gain from this approach?
•Reduced network traffic: Race information is stored locally in the browser. Once it arrives, it sticks around for every page load, rather than using cookies or server requests to fetch it again.
•Immediate display of values: The browser pages themselves can be cached rather than loaded from the network, because the dynamic parts of the page—the current leaderboard status—are local data. This data is rapidly displayed without any network load time.
•Transient storage: The race data isn’t very useful after the race has completed. Consequently, we store it in session storage area, meaning it is discarded when the window or tab is shut down, and it no longer consumes any space.
285