

CHAPTER 5 USING THE GEOLOCATION API
•Repeated updates:
navigator.geolocation.watchPosition(updateLocation, handleLocationError);
This simple change will cause the Geolocation service to call your updateLocation handler repeatedly as the user’s location changes, rather than one time. It acts as though your program is watching the location and will let you know whenever the location changes.
Why would you want to do this?
Consider a web page that gives turn-by-turn directions as the viewer moves around town. Or a page that constantly updates to show you the nearest gas station as you drive down the highway. Or even a page that records and sends your location so that you can retrace your steps. All these services become easy to build once the location updates flow into your application right as they are changing.
Turning off the updates is also simple. Should your application no longer need to receive regular updates about the user’s location, you need merely make a call to the clearWatch() function, as shown in the following example:
navigator.geolocation.clearWatch(watchId);
This function will inform the Geolocation service that you no longer want to receive updates on a user’s location. But what is the watchID and where did it come from? It is actually the return value from the watchPosition() call. It identifies the unique monitor request in order to allow us to cancel it later. So, if your application ever needs to stop receiving location updates, you would write some code, as shown in Listing 5-5.
Listing 5-5. Using watchPostion
var watchId = navigator.geolocation.watchPosition(updateLocation, handleLocationError);
//do something fun with the location updates!
//OK, now we are ready to stop receiving location updates navigator.geolocation.clearWatch(watchId);
Building an Application with Geolocation
So far, we’ve mainly focused on single-shot location requests. Let’s see how powerful the Geolocation API can really be by using its multirequest feature to build a small but useful application: a web page with a distance tracker.
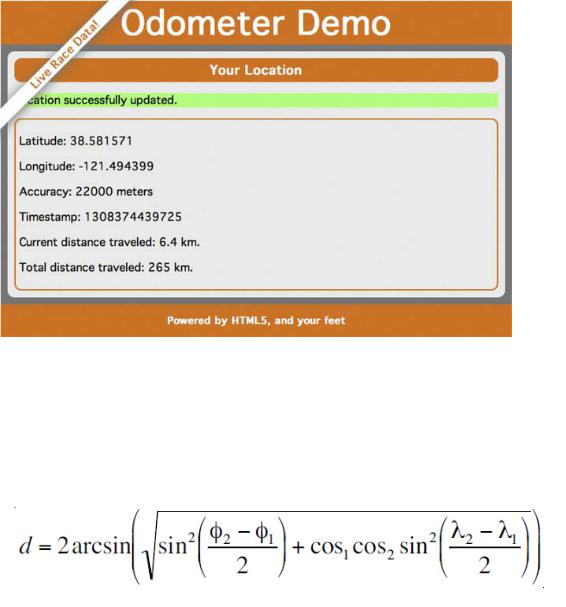
If you’ve ever wanted a quick way to determine how far you’ve traveled in a certain amount of time, you would normally use a dedicated device such as a GPS navigation system or a pedometer. Using the power of the Geolocation service, you can create a web page that tracks how far you have traveled from where the page was originally loaded. Although less useful on a desktop computer, this page is ideal for the millions of web-enabled phones that ship with Geolocation support today. Simply point your smartphone browser to this example page, grant the page permission to access your location, and every few seconds it will update with the distance you just traveled and add it to a running total (see Figure 5- 5).
120
CHAPTER 5 USING THE GEOLOCATION API
Figure 5-5. Our Geolocation example application in action
This sample works by using the watchPosition() capability we discussed in the last section. Every time a new position is sent to us, we will compare it to the last known position and calculate the distance traveled. This is accomplished using a well-known calculation known as the Haversine formula, which allows us to calculate distance between two longitude and latitude positions on a sphere. Listing 5-6 displays what the Haversine formula tells us.
Listing 5-6. The Haversine Formula
If you're hoping to learn how the Haversine formula works, you’ll be sorely disappointed. Instead, we’ll present you a JavaScript implementation of the formula, which allows anyone to use it to calculate the distance between two positions (see Listing 5-7).
121
CHAPTER 5 USING THE GEOLOCATION API
Listing 5-7. A JavaScript Haversine Implementation
Number.prototype.toRadians = function() { return this * Math.PI / 180;
}
function distance(latitude1, longitude1, latitude2, longitude2) { // R is the radius of the earth in kilometers
var R = 6371;
var deltaLatitude = (latitude2-latitude1).toRadians(); var deltaLongitude = (longitude2-longitude1).toRadians();
latitude1 = latitude1.toRadians(), latitude2 = latitude2.toRadians();
var a = Math.sin(deltaLatitude/2) * Math.sin(deltaLatitude/2) + Math.cos(latitude1) * Math.cos(latitude2) * Math.sin(deltaLongitude/2) * Math.sin(deltaLongitude/2);
var c = 2 * Math.atan2(Math.sqrt(a), Math.sqrt(1-a));
var d = R * c; return d;
}
If you want to know why or how this formula works, consult a teenager’s math textbook. For our purposes, we have written a conversion from degrees to radians, and we provided a distance() function to calculate the distance between two latitude and longitude position values.
If we check the user’s position and calculate the distance traveled at frequent and regular intervals, it gives a reasonable approximation of distance traveled over time. This assumes that the user is moving in a straight direction during each interval, but we’ll make that assumption for the sake of our example.
Writing the HTML Display
Let’s start with the HTML display. We kept it quite simple for this exercise because the real interest is in the script driving the data. We display a page with the pertinent Geolocation data. In addition, we’ll put a few status text indicators in place so that the user can see the summary of distance traveled (see Listing 5-8).
Listing 5-8. Code for the Distance Tracker HTML Page
<!DOCTYPE html> <html>
<head>
<meta charset="utf-8" > <title>Geolocation</title>
<link rel="stylesheet" href="geo-html5.css" > </head>
122
CHAPTER 5 USING THE GEOLOCATION API
<body onload="loadDemo()">
<header>
<h1>Odometer Demo</h1> <h4>Live Race Data!</h4>
</header>
<div id="container">
<section>
<article>
<header>
<h1>Your Location</h1> </header>
<p class="info" id="status">Geolocation is not supported in your browser.</p>
<div class="geostatus">
<p id="latitude">Latitude: </p> <p id="longitude">Longitude: </p> <p id="accuracy">Accuracy: </p> <p id="timestamp">Timestamp: </p>
<p id="currDist">Current distance traveled: </p> <p id="totalDist">Total distance traveled: </p>
</div>
</article>
</section>
<footer>
<h2>Powered by HTML5, and your feet!</h2> </footer>
</div>
.
.
.
</body>
</html>
These values are all defaulted for now and are populated once data starts flowing into the application.
Processing the Geolocation Data
Our first JavaScript code section should look familiar. We’ve set a handler—loadDemo()—that will execute as soon as the page completes loading. This script will detect if Geolocation is supported in the browser and use a status update functions to change the status message at the top of the page to indicate what it finds. It will then request a watch of the user’s position, as shown in Listing 5-9.
123
CHAPTER 5 USING THE GEOLOCATION API
Listing 5-9. Adding the loadDemo() and Status Update Functions
var totalDistance = 0.0; var lastLat;
var lastLong;
function updateErrorStatus(message) { document.getElementById("status").style.background = "papayaWhip"; document.getElementById("status").innerHTML = "<strong>Error</strong>: " + message;
}
function updateStatus(message) { document.getElementById("status").style.background = "paleGreen"; document.getElementById("status").innerHTML = message;
}
function loadDemo() { if(navigator.geolocation) {
document.getElementById("status").innerHTML = "HTML5 Geolocation is supported in your browser.";
navigator.geolocation.watchPosition(updateLocation, handleLocationError, {timeout:20000});
}
}
Note that we are setting a maximumAge option on our position watch: {maximumAge:20000}. This will tell the location service that we don’t want any cached location values that are greater than 20 seconds (or 20,000 milliseconds) old. Setting this option will keep our page updating at regular intervals, but feel free to adjust this number and experiment with larger and smaller cache sizes.
For error handling, we’ll use the same routine we identified earlier, as it is generic enough to work for our distance tracker. In it we’ll check the error code of any error we receive and update the status message on the page accordingly as shown in Listing 5-10.
Listing 5-10. Adding the Error Handling Code
function handleLocationError(error) { switch(error.code)
{
case 0:
updateErrorStatus("There was an error while retrieving your location. Additional details: " +
error.message);
break; case 1:
updateErrorStatus("The user opted not to share his or her location."); break;
case 2:
updateErrorStatus("The browser was unable to determine your location. Additional details: " +
error.message);
break;
124

CHAPTER 5 USING THE GEOLOCATION API
case 3:
updateErrorStatus("The browser timed out before retrieving the location."); break;
}
}
The bulk of our work will be done in our updateLocation() function. Here we will update the page with our most recent values and calculate the distance traveled, as shown in Listing 5-11.
Listing 5-11. Adding the updateLocation() Function
function updateLocation(position) {
var latitude = position.coords.latitude; var longitude = position.coords.longitude; var accuracy = position.coords.accuracy; var timestamp = position.timestamp;
document.getElementById("latitude").innerHTML = "Latitude: " + latitude; document.getElementById("longitude").innerHTML = "Longitude: " + longitude; document.getElementById("accuracy").innerHTML = "Accuracy: " + accuracy + " meters"; document.getElementById("timestamp").innerHTML = "Timestamp: " + timestamp;
As you might expect, the first thing we will do when we receive an updated set of position coordinates is to record all the information. We gather the latitude, longitude, accuracy, and timestamp, and then update the table values with the new data.
You might not choose to display a timestamp in your own application. The timestamp number used here is in a form primarily useful to computers, which won’t be meaningful to an end user. Feel free to replace it with a more user-friendly time indicator or remove it altogether.
The accuracy value is given to us in meters and might at first seem unnecessary. However, any data depends on its accuracy. Even if you don’t present the user with the accuracy values, you should take them into account in your own code. Presenting inaccurate values could give the user a skewed idea of his or her location. Therefore, we will throw out any position updates with an unreasonably low accuracy, as shown in Listing 5-12.
Listing 5-12. Ignoring Inaccurate Accuracy Updates
//sanity test... don't calculate distance if accuracy
//value too large
if (accuracy >= 30000) {
updateStatus("Need more accurate values to calculate distance."); return;
}
The Easiest Way to Travel
Brian says: “Keeping track of position accuracy is vital. As a developer, you won’t have access to the methodologies a browser uses to calculate position, but you will have access to the accuracy attribute. Use it!
125