

CHAPTER 7 USING THE WEBSOCKET API
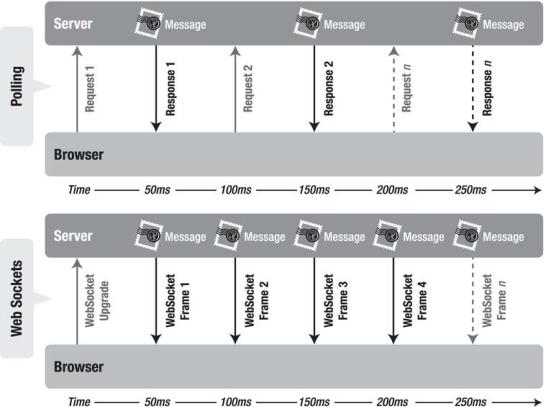
browser the moment they arrive. It still takes 50 ms for messages to travel from the server to the browser, but the WebSocket connection remains open so there is no need to send another request to the server.
Figure 7-5. Latency comparison between the polling and WebSocket applications
WebSocket provides an enormous step forward in the scalability of the real-time web. As you have seen in this chapter, WebSocket can provide a 500:1 or—depending on the size of the HTTP headers— even a 1000:1 reduction in unnecessary HTTP header traffic and 3:1 reduction in latency.
Writing a Simple Echo WebSocket Server
Before you can use the WebSocket API, you need a server that supports WebSocket. In this section we’ll take a look at how a simple WebSocket “echo” server is written. To run the examples for this chapter, we have included a simple WebSocket server written in Python. The sample code for the following examples is located in the WebSocket section of the book web site.
167

CHAPTER 7 USING THE WEBSOCKET API
WEBSOCKET SERVERS
There are lots of WebSocket server implementations out there already and even more under development. The following are just a few of the existing WebSocket servers:
•Kaazing WebSocket Gateway—a Java-based WebSocket Gateway
•mod_pywebsocket—a Python-based extension for the Apache HTTP Server
•Netty—a Java network framework which includes WebSocket support
•node.js—a server-side JavaScript framework on which multiple WebSocket servers have been written
Kaazing’s WebSocket Gateway includes full client-side WebSocket emulation support for browsers without native implementation of WebSocket, which allows you to code against the WebSocket API today and have your code work in all browsers.
To run the Python WebSocket echo server accepting connections at ws://localhost:8000/echo, open a command prompt, navigate to the folder that contains the file, and issue the following command:
python websocket.py
We have also included a broadcast server that accepts connections at ws://localhost:8080/broadcast. Contrary to the echo server, any WebSocket message sent to this particular server implementation will bounce back to everyone that is currently connected. It’s a very simple way to broadcast messages to multiple listeners. To run the broadcast server, open a command prompt, navigate to the folder that contains the file, and issue the following command:
python broadcast.py
Both scripts make use of the example WebSocket protocol library in websocket.py. You can add handlers for other paths that implement additional serverside behavior.
Note This is only a server for the WebSocket protocol, and it cannot respond to HTTP requests. The handshake parser is not fully HTTP compliant. However, because WebSocket connections begin with an HTTP request and rely on the Upgrade header, other servers can serve both WebSocket and HTTP on the same port.
Let’s see what happens when a browser tries to communicate with this server. When the browser makes a request to the WebSocket URL, the server sends back the headers that finish the WebSocket handshake. A WebSocket handshake response must contain an HTTP/1.1 101 status code and Upgrade connection headers. This informs the browser that the server is switching from the HTTP handshake to the WebSocket protocol for the remainder of the TCP session.
168
3
CHAPTER 7 USING THE WEBSOCKET API
Note If you are implementing a WebSocket server, you should refer to the protocol draft at the IETF at or the latest specification.
# write out response headers
self.send_bytes("HTTP/1.1 101 Switching Protocols\r\n") self.send_bytes("Upgrade: WebSocket\r\n") self.send_bytes("Connection: Upgrade\r\n") self.send_bytes("Sec-WebSocket-Accept: %s\r\n" % self.hash_key(key))
if "Sec-WebSocket-Protocol" in headers:
protocol = headers["Sec-WebSocket-Protocol"] self.send_bytes("Sec-WebSocket-Protocol: %s\r\n" % protocol)
WebSocket Framing
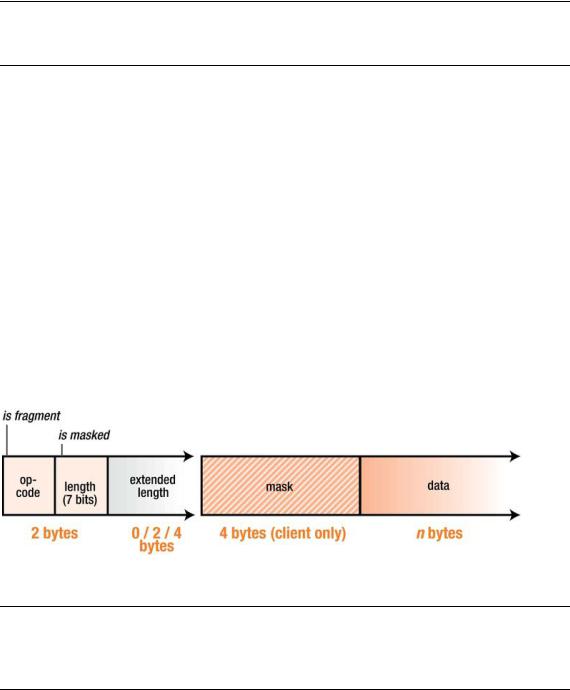
After the handshake, the client and server can send messages at any time. Each connection is represented in this server by a WebSocketConnection instance. The WebSocketConnection’s send function, shown in Figure 7-6, writes out a message according to the WebSocket protocol. The bytes preceding the data payload mark the frame length and type. Text frames are UTF-8 encoded. In this server, each WebSocket connection is an asyncore.dispatcher_with_send, which is an asynchronous socket wrapper with support for buffered sends.
Data sent from the browser to the server is masked. Masking is an unusual feature of the WebSocket protocol. Every byte of payload data is XORed with a random mask to ensure that WebSocket traffic does not look like other protocols. Like the Sec-WebSocket-Key hash, this is meant to mitigate an arcane form of cross-protocol attack against non-compliant network infrastructure.
Figure 7-6. Components of a WebSocket frame
Note There are many other asynchronous I/O frameworks for Python and other languages. Asyncore was chosen because it is included in the Python standard library. Note also that this implementation uses draft 10 of the protocol. This is a simple example designed for testing and illustration.
169
CHAPTER 7 USING THE WEBSOCKET API
WebSocketConnection inherits from asyncore.dispatcher_with_send and overrides the send method in order to frame text and binary messages.
def send(self, s):
if self.readystate == "open": self.send_bytes("\x00") self.send_bytes(s.encode("UTF8")) self.send_bytes("\xFF")
Handlers for WebSocketConnections in websocket.py follow a simplified dispatcher interface. The handler’s dispatch() method is called with the payload of each frame the connection receives. The EchoHandler sends back each message to the sender.
class EchoHandler(object):
"""
The EchoHandler repeats each incoming string to the same WebSocket.
"""
def __init__(self, conn): self.conn = conn
def dispatch(self, data): self.conn.send("echo: " + data)
The basic broadcast server broadcast.py works in much the same way, but in this case when the broadcast handler receives a frame, it sends it back on all connected WebSockets as shown in the following example:
class BroadcastHandler(object):
"""
The BroadcastHandler repeats incoming strings to every connected WebSocket.
"""
def __init__(self, conn): self.conn = conn
def dispatch(self, data):
for session in self.conn.server.sessions: session.send(data)
The handler in broadcast.py provides a lightweight message broadcaster that simply sends and receives any data. This is sufficient for the purposes of our example. Be aware that this broadcast service does not perform any input verification as would be desirable in a production message server. A production WebSocket server should, at the very least, verify the format of incoming data.
For completeness, Listings 7-5 and 7-6 provide the complete code for websocket.py and broadcast.py. Note that this is just an example server implementation; it is not suited for production deployment.
Listing 7-5. Complete Code for websocket.py
#!/usr/bin/env python
import asyncore import socket
170
CHAPTER 7 USING THE WEBSOCKET API
import struct import time
from hashlib import sha1
from base64 import encodestring
class WebSocketConnection(asyncore.dispatcher_with_send):
TEXT = 0x01
BINARY = 0x02
def __init__(self, conn, server): asyncore.dispatcher_with_send.__init__(self, conn)
self.server = server self.server.sessions.append(self) self.readystate = "connecting" self.buffer = ""
def handle_read(self): data = self.recv(1024) self.buffer += data
if self.readystate == "connecting": self.parse_connecting()
elif self.readystate == "open": self.parse_frame()
def handle_close(self): self.server.sessions.remove(self) self.close()
def parse_connecting(self):
"""
Parse a WebSocket handshake. This is not a full HTTP request parser!
"""
header_end = self.buffer.find("\r\n\r\n") if header_end == -1:
return else:
header = self.buffer[:header_end]
#remove header and four bytes of line endings from buffer self.buffer = self.buffer[header_end + 4:]
header_lines = header.split("\r\n") headers = {}
#validate HTTP request and construct location
method, path, protocol = header_lines[0].split(" ")
if method != "GET" or protocol != "HTTP/1.1" or path[0] != "/": self.terminate()
return
# parse headers
171
CHAPTER 7 USING THE WEBSOCKET API
for line in header_lines[1:]: key, value = line.split(": ") headers[key] = value
headers["Location"] = "ws://" + headers["Host"] + path
self.readystate = "open"
self.handler = self.server.handlers.get(path, None)(self)
self.send_server_handshake_10(headers)
def terminate(self): self.ready_state = "closed" self.close()
def send_server_handshake_10(self, headers):
"""
Send the WebSocket Protocol draft HyBi-10 handshake response
"""
key = headers["Sec-WebSocket-Key"]
# write out response headers
self.send_bytes("HTTP/1.1 101 Switching Protocols\r\n") self.send_bytes("Upgrade: WebSocket\r\n") self.send_bytes("Connection: Upgrade\r\n") self.send_bytes("Sec-WebSocket-Accept: %s\r\n" % self.hash_key(key))
if "Sec-WebSocket-Protocol" in headers: protocol = headers["Sec-WebSocket-Protocol"]
self.send_bytes("Sec-WebSocket-Protocol: %s\r\n" % protocol)
def hash_key(self, key):
guid = "258EAFA5-E914-47DA-95CA-C5AB0DC85B11" combined = key + guid
hashed = sha1(combined).digest() return encodestring(hashed)
def parse_frame(self):
"""
Parse a WebSocket frame. If there is not a complete frame in the buffer, return without modifying the buffer.
"""
buf = self.buffer payload_start = 2
# try to pull first two bytes
if len(buf) < 3: |
|
|
|
return |
|
|
|
b = ord(buf[0]) |
|
|
|
fin = b & 0x80 |
# 1st bit |
|
|
# next 3 |
bits reserved |
|
|
opcode = |
b & 0x0f |
# low 4 |
bits |
172
CHAPTER 7 USING THE WEBSOCKET API
b2 = ord(buf[1])
mask = b2 & 0x80 # high bit of the second byte length = b2 & 0x7f # low 7 bits of the second byte
# check that enough bytes remain if len(buf) < payload_start + 4:
return
elif length == 126:
length, = struct.unpack(">H", buf[2:4]) payload_start += 2
elif length == 127:
length, = struct.unpack(">I", buf[2:6]) payload_start += 4
if mask:
mask_bytes = [ord(b) for b in buf[payload_start:payload_start + 4]] payload_start += 4
#is there a complete frame in the buffer? if len(buf) < payload_start + length:
return
#remove leading bytes, decode if necessary, dispatch payload = buf[payload_start:payload_start + length] self.buffer = buf[payload_start + length:]
#use xor and mask bytes to unmask data
if mask:
unmasked = [mask_bytes[i % 4] ^ ord(b)
for b, i in zip(payload, range(len(payload)))] payload = "".join([chr(c) for c in unmasked])
if opcode == WebSocketConnection.TEXT: s = payload.decode("UTF8") self.handler.dispatch(s)
if opcode == WebSocketConnection.BINARY: self.handler.dispatch(payload)
return True
def send(self, s):
"""
Encode and send a WebSocket message
"""
message = ""
#always send an entire message as one frame (fin) b1 = 0x80
#in Python 2, strs are bytes and unicodes are strings if type(s) == unicode:
b1 |= WebSocketConnection.TEXT payload = s.encode("UTF8")
173
CHAPTER 7 USING THE WEBSOCKET API
elif type(s) == str:
b1 |= WebSocketConnection.BINARY payload = s
message += chr(b1)
# never mask frames from the server to the client b2 = 0
length = len(payload) if length < 126:
b2 |= length message += chr(b2)
elif length < (2 ** 16) - 1: b2 |= 126
message += chr(b2)
l = struct.pack(">H", length) message += l
else:
l = struct.pack(">Q", length) b2 |= 127
message += chr(b2) message += l
message += payload
if self.readystate == "open": self.send_bytes(message)
def send_bytes(self, bytes): try:
asyncore.dispatcher_with_send.send(self, bytes) except:
pass
class EchoHandler(object):
"""
The EchoHandler repeats each incoming string to the same WebSocket.
"""
def __init__(self, conn): self.conn = conn
def dispatch(self, data): try:
self.conn.send(data)
except: pass
class WebSocketServer(asyncore.dispatcher):
174
CHAPTER 7 USING THE WEBSOCKET API
def __init__(self, port=80, handlers=None): asyncore.dispatcher.__init__(self) self.handlers = handlers
self.sessions = [] self.port = port
self.create_socket(socket.AF_INET, socket.SOCK_STREAM) self.set_reuse_addr()
self.bind(("", port)) self.listen(5)
def handle_accept(self): conn, addr = self.accept()
session = WebSocketConnection(conn, self)
if __name__ == "__main__":
print "Starting WebSocket Server" WebSocketServer(port=8080, handlers={"/echo": EchoHandler}) asyncore.loop()
You may have noticed an unusual key calculation in the WebSocket handshake. This is intended to prevent cross-protocol attacks. In short, this should stop malicious WebSocket client code from spoofing connections to non-WebSocket servers. Hashing a GUID and a random value is enough to positively identify that the responding server understands the WebSocket protocol.
Listing 7-6. Complete Code for broadcast.py
#!/usr/bin/env python
import asyncore
from websocket import WebSocketServer
class BroadcastHandler(object):
"""
The BroadcastHandler repeats incoming strings to every connected WebSocket.
"""
def __init__(self, conn): self.conn = conn
def dispatch(self, data):
for session in self.conn.server.sessions: session.send(data)
if __name__ == "__main__":
print "Starting WebSocket broadcast server" WebSocketServer(port=8080, handlers={"/broadcast": BroadcastHandler}) asyncore.loop()
175