

CHAPTER 2 USING THE CANVAS API
Applying Transformations to Drawings
Now let’s look at another wayto draw on the canvas using transformation. In the following example, the result is identical to the previous example, but the code used to draw the diagonal line is different. For this simple example, you could argue that the use of transformation adds unnecessary complexity. However, you can think of using transformation as a best practice for more complex canvas operations. You’ll see that we’ll use it a lot throughout the remaining examples, and it is critical to understanding the Canvas API’s complex capabilities.
Perhaps the easiest way to think of the transformation system—at least, the easiest way that does not involve a great amount of mathematical formulae and hand-waving—is as a modification layer that sits between the commands you issue and the output on the canvas display. This modification layer is always present, even if you choose not to interact with it.
Modifications, or transformations in the parlance of drawing systems, can be applied sequentially, combined, and modified at will. Every drawing operation is passed through the modification layer to be modified before it appears on the canvas. Although this adds an extra layer of complexity, it also adds tremendous power to the drawing system. It grants access to the powerful modifications that modern image-editing tools support in real time, yet in an API that is only as complex as it absolutely needs to be.
Don’t be fooled into thinking that you are optimizing performance if you don’t use transformation calls in your code. The canvas implementation uses and applies transformations implicitly in its rendering engine, whether or not you call them directly. It is wiser to understand the system up front because it will be crucial to know if you step outside the most basic drawing operations.
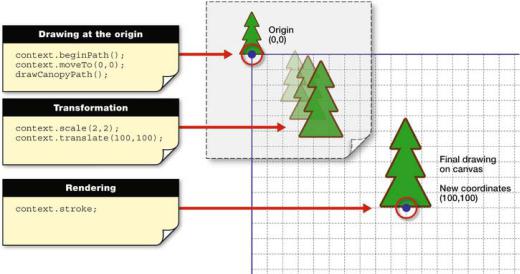
A key recommendation for reusable code is that you usually want to draw at the origin (coordinate 0,0) and apply transformations—scale, translate, rotate, and so forth—to modify your drawing code into its final appearance, as shown in Figure 2-4.
Figure 2-4. Overview of transformation and drawing at the origin
Listing 2-7 shows this best practice in action using the simplest transform: translate.
30
CHAPTER 2 USING THE CANVAS API
Listing 2-7. Using Translation to Create a Diagonal Line on a Canvas
<script>
function drawDiagonal() {
var canvas = document.getElementById('diagonal'); var context = canvas.getContext('2d');
//Save a copy of the current drawing state context.save();
//Move the drawing context to the right, and down context.translate(70, 140);
//Draw the same line as before, but using the origin as a start context.beginPath();
context.moveTo(0, 0); context.lineTo(70, -70); context.stroke();
//Restore the old drawing state
context.restore();
}
window.addEventListener("load", drawDiagonal, true); </script>
Let’s examine the JavaScript code used to create this second, translated diagonal line.
1.First, you access the canvas object by referencing its ID value (in this case, diagonal).
2.You then retrieve a context variable by calling the canvas object’s getContext function.
3.Next, you want to save the still unmodified context so you can get back to its original state at the end of the drawing and transformation operation. If you do not save the state, the modifications you’re making during the operation (translate, scale, and so on) will continue to be applied to the context in future operations, and that might not be desirable. Saving the context state before transforming it will allow us to restore it later.
4.The next step is to apply the translate method to the context. With this operation, the translation coordinates you supply will be added to the eventual drawing coordinates (the diagonal line) at the time any drawing is rendered, thus moving the line to its final location, but only after the drawing operation is complete.
5.After the translation has been applied, you can perform the normal drawing operations to create the diagonal line. In this case, you can create the diagonal line by calling three methods—beginPath, moveTo, and lineTo—this time drawing at the origin (0,0) instead of coordinates 70,140.
31
CHAPTER 2 USING THE CANVAS API
6.After the line has been sketched, you can render it to the canvas (for example, draw the line) by calling the context.stroke method.
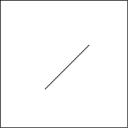
7.Finally, you restore the context to its clean original state, so that future canvas operations are performed without the translation that was applied in this operation. Figure 2-5 shows the diagonal line created with the example code.
Figure 2-5. Translated diagonal line on a canvas
Even though your new line looks remarkably like the old one, you created it using the power of transformations, something that will become more apparent as we progress through the rest of this chapter.
Working with Paths
Although we could offer many more exciting examples for drawing lines, we are ready now to progress to something a bit more complex: paths. Paths in the HTML5 Canvas API represent any shape you care to render. Our original line example was a path, as you might have gathered from the conspicuous beginPath call used to start it off. But paths can be as complicated as you desire, with multiple line and curve segments and even subpaths. If you are looking to draw almost any shape on a canvas, the path API will be your focus point.
When embarking on any routine to draw a shape or path, the first call you make is beginPath. This simple function takes no arguments, but it signals to the canvas that you wish to start a new shape description. This function is mostly useful to the canvas so that it can calculate the interior and exterior of the shape you are creating for later fills and strokes.
A path always tracks the concept of a current location, which defaults to the origin. The canvas internally tracks the current location, but you will modify it with your drawing routines.
Once the shape is begun, you can use a variety of functions on the context to plot the layout of your shape. You’ve already seen the simplest context pathing functions in action:
•moveTo(x, y): moves the current location to a new destination of (x, y) without drawing.
•lineTo(x, y): moves the current location to a new destination of (x, y) drawing a straight line from the current position to the new one.
Essentially, the difference between these two calls is that the first is akin to lifting a drawing pen and moving to a new location, whereas the second tells the canvas to leave the pen on the paper and move it in a straight line to the new destination. However, it is worth pointing out again that no actual drawing occurs until you stroke or fill the path. At present, we are merely defining the positions in our path so that it can be drawn later.
32
4
CHAPTER 2 USING THE CANVAS API
The next special pathing function is a call to closePath. This command is very similar in behavior to the lineTo function, with the difference being that the destination is automatically assumed to be the origination of the path. However, the closePath also informs the canvas that the current shape has closed or formed a completely contained area. This will be useful for future fills and strokes.
At this point, you are free to continue with more segments in your path to create additional subpaths. Or you can beginPath at any time to start over and clear the path list entirely.
As with most complex systems, it is often better to see them in action. Let’s depart from our line examples and use the Canvas API to start to create a new scene that illustrates a forest with a trailrunning path. This scene will serve as a logo of sorts for our race event. And as with any picture, we will start with a basic element, which in this case is the canopy of a simple pine tree. Listing 2-8 shows how to draw the pine tree’s canopy.
Listing 2-8. Function That Creates a Path for a Tree Canopy
function createCanopyPath(context) { // Draw the tree canopy context.beginPath();
context.moveTo(-25, -50); context.lineTo(-10, -80); context.lineTo(-20, -80); context.lineTo(-5, -110); context.lineTo(-15, -110);
// Top of the tree context.lineTo(0, -140);
context.lineTo(15, -110); context.lineTo(5, -110); context.lineTo(20, -80); context.lineTo(10, -80); context.lineTo(25, -50);
// Close the path back to its start point context.closePath();
}
As you can see from the code, we used the same move and line commands from before, but more of them. These lines form the branches of a simple tree shape, and we close the path back at the end. Our tree will leave a notable gap at the bottom, and we will use this in future sections to draw the trunk. Listing 2-9 shows how to use that canopy drawing function to actually render our simple tree shape onto a canvas.
Listing 2-9. Function That Draws a Tree on the Canvas
function drawTrails() {
var canvas = document.getElementById('trails'); var context = canvas.getContext('2d');
context.save(); context.translate(130, 250);
33