

CHAPTER 3 WORKING WITH SCALABLE VECTOR GRAPHICS
<g id="Tree">
<use xlink:href="#Trunk" fill="url(#TrunkGradient)" /> <use xlink:href="#Trunk" fill="url(#CanopyShadow)" /> <use xlink:href="#Canopy" fill="none" stroke="#663300" stroke-linejoin="round" stroke-width="4px" />
<use xlink:href="#Canopy" fill="#339900" stroke="none" /> </g>
<g id="TreeShadow">
<use xlink:href="#Trunk" fill="#000" />
<use xlink:href="#Canopy" fill="000" stroke="none" /> </g>
</defs>
<g transform="translate(-10, 350)" stroke-width="20" stroke="url(#GravelPattern)" stroke-linejoin="round">
<path d="M0,0 Q170,-50 260, -190 Q310, -250 410,-250" fill="none" />
</g>
<text y=60 x=200 font-family="impact" font-size="60px" fill="#996600" text-anchor="middle" > Happy Trails!
</text>
<use xlink:href="#TreeShadow"
transform="translate(130, 250) scale(1, .6) skewX(-18)" opacity="0.4" />
<use xlink:href="#Tree" transform="translate(130,250)" />
<use xlink:href="#TreeShadow"
transform="translate(260, 500) scale(2, 1.2) skewX(-18)" opacity="0.4" />
<use xlink:href="#Tree" transform="translate(260, 500) scale(2)" /> </svg>
Building an Interactive Application with SVG
In this section, we’ll expand on the static example. We will add HTML and JavaScript to make the document interactive. We will take advantage of the capabilities of SVG in an application that would require considerably more code to implement with the canvas API.
74
CHAPTER 3 WORKING WITH SCALABLE VECTOR GRAPHICS
Adding Trees
We need just a single button element in this interactive application. The click handler for the button adds a new tree at a random location within the 600x400 pixel SVG region. The new tree is also randomly scaled by an amount between 50% and 150%. Each new tree is actually a <use> element referencing the “Tree” group containing multiple paths. The code uses the namespaced document.createElementNS() call to create a <use> element. It links it with the xlink:href attribute to the previously defined Tree group. It then appends the new element to the SVG element tree (see Listing 3-11).
Listing 3-11. Add Tree Function
document.getElementById("AddTreeButton").onclick = function() { var x = Math.floor(Math.random() * 400);
var y = Math.floor(Math.random() * 600); var scale = Math.random() + .5;
var translate = "translate(" +x+ "," +y+ ") ";
var tree = document.createElementNS("http://www.w3.org/2000/svg", "use"); tree.setAttributeNS("http://www.w3.org/1999/xlink", "xlink:href", "#Tree"); tree.setAttribute("transform", translate + "scale(" + scale + ")"); document.querySelector("svg").appendChild(tree);
updateTrees();
}
Elements are rendered in the order they appear in the DOM. This function always adds trees as new child nodes at the end of the SVG element’s list of child nodes. That means that newer trees will appear on top of older trees.
This function ends with a call to updateTrees(), which we will see next.
Adding the updateTrees Function
The updateTrees function runs when the document initially loads as well as any time trees are added or removed. It is responsible for updating the text that displays the number of trees in the forest. It also attaches a click handler function to each tree (see Listing 3-12).
Listing 3-12 updateTrees Function
function updateTrees() {
var list = document.querySelectorAll("use"); var treeCount = 0;
for (var i=0; i<list.length; i++) { if(list[i].getAttribute("xlink:href")=="#Tree") {
treeCount++;
list[i].onclick = removeTree;
}
}
var counter = document.getElementById("TreeCounter"); counter.textContent = treeCount + " trees in the forest";
}
75
CHAPTER 3 WORKING WITH SCALABLE VECTOR GRAPHICS
An important thing to note about this code is that it keeps no state in JavaScript regarding the tree count. Every time an update occurs, this code selects and filters all of the trees from the live document to get the latest count.
Adding the removeTree Function
Now, let’s add the function that removes trees when they are clicked (see Listing 3-13).
Listing 3-13. removeTree Function
function removeTree(e) { var elt = e.target;
if (elt.correspondingUseElement) { elt = elt.correspondingUseElement;
}
elt.parentNode.removeChild(elt);
updateTrees();
}
The first thing we do here is check the target of the click event. Due to differences in DOM implementations, the event target could be either the tree group or a use element linked to that group. Either way, this function simply removes that element from the DOM and calls the updateTrees() function.
If you remove a tree that is on top of another tree, you don’t have to do anything to redraw the lower content. This is one of the benefits of developing against a retained-mode API. You simply manipulate the tree (no pun intended) of elements, and the browser takes care of drawing the necessary pixels. Similarly, when the text updates to display the latest tree count, it stays below the trees. If you want the text to appear above the trees, you will have to append the trees to the document before the text element.
Adding the CSS Styles
To make the interaction more discoverable, we will add some CSS that changes the appearance of the tree beneath the mouse cursor:
g[id=Tree]:hover { opacity: 0.9; cursor: crosshair;
}
Whenever you hover over an element with an id attribute equal to “Tree,” that element will become partially transparent, and the mouse cursor will change to a crosshair.
The one pixel black border around the entire SVG element is also defined in CSS.
svg {
border: 1px solid black;
}
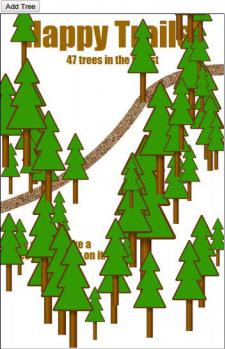
And that’s it! Now you have an interactive application using inline SVG in HTML5 (see Figure 3-12).
76
CHAPTER 3 WORKING WITH SCALABLE VECTOR GRAPHICS
Figure 3-12. The final document with a few trees added
The Final Code
For completeness, Listing 3-14 provides the entire trails-dynamic.html file. It contains all of the SVG from the static version as well as the script that makes it interactive.
Listing 3-14. The Entire trails-dynamic.html Code
<!doctype html>
<title>Happy Trails in SVG</title>
<style> svg {
border: 1px solid black;
}
g[id=Tree]:hover { opacity: 0.9; cursor: crosshair;
}
</style>
<div>
<button id="AddTreeButton">Add Tree</button>
77
CHAPTER 3 WORKING WITH SCALABLE VECTOR GRAPHICS
</div>
<svg width="400" height="600">
<defs>
<pattern id="GravelPattern" patternUnits="userSpaceOnUse" x="0" y="0" width="100" height="67" viewBox="0 0 100 67">
<image x=0 y=0 width=100 height=67 xlink:href="gravel.jpg" /> </pattern>
<linearGradient id="TrunkGradient">
<stop offset="0%" stop-color="#663300" /> <stop offset="40%" stop-color="#996600" /> <stop offset="100%" stop-color="#552200" />
</linearGradient>
<rect x="-5" y="-50" width=10 height=50 id="Trunk" /> <path d="M-25, -50
L-10, -80
L-20, -80
L-5, -110
L-15, -110 L0, -140 L15, -110 L5, -110 L20, -80 L10, -80 L25, -50 Z"
id="Canopy"
/>
<linearGradient id="CanopyShadow" x=0 y=0 x2=0 y2=100%> <stop offset="0%" stop-color="#000" stop-opacity=".5" /> <stop offset="20%" stop-color="#000" stop-opacity="0" />
</linearGradient> <g id="Tree">
<use xlink:href="#Trunk" fill="url(#TrunkGradient)" /> <use xlink:href="#Trunk" fill="url(#CanopyShadow)" /> <use xlink:href="#Canopy" fill="none" stroke="#663300"
stroke-linejoin="round" stroke-width="4px" />
<use xlink:href="#Canopy" fill="#339900" stroke="none" /> </g>
</defs>
<g transform="translate(-10, 350)" stroke-width="20" stroke="url(#GravelPattern)" stroke-linejoin="round">
<path d="M0,0 Q170,-50 260, -190 Q310, -250 410,-250" fill="none" />
</g>
78
CHAPTER 3 WORKING WITH SCALABLE VECTOR GRAPHICS
<text y=60 x=200 font-family="impact" font-size="60px" fill="#996600" text-anchor="middle" > Happy Trails!
</text>
<text y=90 x=200 font-family="impact" font-size="20px" fill="#996600"
text-anchor="middle" id="TreeCounter"> </text>
<text y=420 x=20 font-family="impact" font-size="20px" fill="#996600" text-anchor="left">
<tspan>You can remove a</tspan>
<tspan y=440 x=20>tree by clicking on it.</tspan> </text>
<use xlink:href="#Tree" transform="translate(130,250)" />
<use xlink:href="#Tree" transform="translate(260, 500) scale(2)" /> </svg>
<script>
function removeTree(e) { var elt = e.target;
if (elt.correspondingUseElement) { elt = elt.correspondingUseElement;
}
elt.parentNode.removeChild(elt);
updateTrees();
}
document.getElementById("AddTreeButton").onclick = function() { var x = Math.floor(Math.random() * 400);
var y = Math.floor(Math.random() * 600); var scale = Math.random() + .5;
var translate = "translate(" +x+ "," +y+ ") ";
var tree = document.createElementNS("http://www.w3.org/2000/svg", "use"); tree.setAttributeNS("http://www.w3.org/1999/xlink", "xlink:href", "#Tree"); tree.setAttribute("transform", translate + "scale(" + scale + ")"); document.querySelector("svg").appendChild(tree);
updateTrees();
}
function updateTrees() {
var list = document.querySelectorAll("use");
79

CHAPTER 3 WORKING WITH SCALABLE VECTOR GRAPHICS
var treeCount = 0;
for (var i=0; i<list.length; i++) { if(list[i].getAttribute("xlink:href")=="#Tree") {
treeCount++;
list[i].onclick = removeTree;
}
}
var counter = document.getElementById("TreeCounter"); counter.textContent = treeCount + " trees in the forest";
}
updateTrees();
</script>
SVG TOOLS
Frank says: “Because of SVG’s long history as a standard format for vector graphics, there are many useful tools for working with SVG images. There is even an open-source editor called SVG-edit that runs in the browser. You can embed it in your own applications! On the desktop, Adobe Illustrator and Inkscape are two powerful vector graphics applications that can both import and export SVG. I’ve found Inkscape to be very useful for creating new graphics (see Figure 3-13).
SVG tools tend to work with standalone .svg files, not SVG embedded in HTML, so you may need to convert between the two formats.”
80