

CHAPTER 2 USING THE CANVAS API
Working with Pixel Data
One of the most useful—albeit nonobvious—aspects of the Canvas API is the ability for developers to easily get access to the underlying pixels in the canvas. This access works in both directions: it is trivial to get access to the pixel values as a numerical array, and it is equally easy to modify those values and apply them back to the canvas. In fact, it is entirely possible to manipulate the canvas entirely through the pixel value calls and forgo the rendering calls we’ve discussed in this chapter. This is made possible by the existence of three functions on the context API.
First up is context.getImageData(sx, sy, sw, sh). This function returns a representation of the current state of the canvas display as a collection of integers. Specifically, it returns an object containing three properties:
•width: The number of pixels in each row of the pixel data
•height: The number of pixels in each column of the pixel data
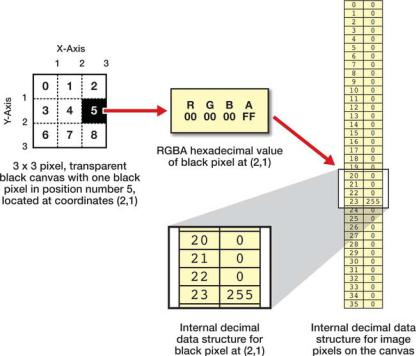
•data: A one-dimensional array containing the actual RGBA values for each pixel retrieved from the canvas. This array contains four values for each pixel—a red, green, blue, and alpha component—each with a value from 0 to 255. Therefore, each pixel retrieved from the canvas becomes four integer values in the data array. The data array is populated by pixels from left to right and top to bottom (for example, across the first row, then across the second row, and so on), as shown in Figure 2-19.
Figure 2-19. Pixel data and the internal data structure that represents it
52
CHAPTER 2 USING THE CANVAS API
The data returned by the call to getImageData is limited to the region defined by the four parameters. Only canvas pixels contained in the rectangular region surrounded by the source x, y, width, and height parameters will be retrieved. Therefore, to access all pixel values as data, you should pass in getImageData(0, 0, canvas.width, canvas.height).
Because there are four image data values representing each pixel, it can be a little tricky to calculate exactly which index represents the values for a given pixel. The formula is as follows.
For any pixel at coordinate (x,y) in a canvas with a given width and height, you can locate the component values:
•Red component: ((width * y) + x) * 4
•Green component: ((width * y) + x) * 4 + 1
•Blue component: ((width * y) + x) * 4 + 2
•Alpha component: ((width * y) + x) * 4 + 3
Once you have access to the object with image data, it is quite easy to modify the pixel values in the data array mathematically, because they are each simply integers from 0 to 255. Changing the red, green, blue, or alpha values for one or more pixels makes it easy to update the canvas display by using the second function: context.putImageData(imagedata, dx, dy).
putImageData allows you to pass in a set of image data in the same format as it was originally retrieved; that’s quite handy because you can modify the values the canvas originally gave you and put them back. Once this function is called, the canvas will immediately update to reflect the new values of the pixels you passed in as the image data. The dx and dy parameters allow you to specify an offset for where to start applying your data array into the existing canvas, should you choose to use one.
Finally, if you want to start from scratch with a set of blank canvas data, you can call context.createImageData(sw, sh) to create a new set of image data tied to the canvas object. This set of data can be programmatically changed as before, even though it does not represent the current state of the canvas when retrieved.
There is yet another way to get data out of a canvas: the canvas.toDataURL API. This function gives you a programmatic way to retrieve the current rendering data of a canvas in a text format, but in this case the format is a standard representation of the data that browsers can interpret as images.
A data URL is a string containing the data of an image—such as a PNG—that a browser can display just like a normal image file. The format of a data URL is best illustrated with an example:
data:image/png;base64, WCAYAAABkY9jZxn…
This example shows that the format is the string data: followed by a MIME type (such as image/png), followed by a flag indicating whether or not the data is encoded in base64 format, and then the text representing the data itself.
Don’t worry about the format, as you won’t be generating it yourself. The important point is that with a simple call, you can get the content of a canvas delivered to you in one of these special URLs. When you call canvas.toDataURL(type), you can pass in a type of image you would like the canvas data generated in, such as image/png (the default) or image/jpeg. The data URL returned to you can be used as the source of image elements in a page or CSS styles, as shown in Listing 2-25.
Listing 2-25. Creating an Image from a Canvas
var myCanvas = document.getElementById("myCanvas");
// draw operations into the canvas...
53
CHAPTER 2 USING THE CANVAS API
//get the canvas data as a data URL var canvasData = myCanvas.toDataURL();
//set the data as the source of a new image var img = new Image();
img.src = canvasData;
You don’t have to use a data URL right away. You could even store the URL in your browser’s local storage for later retrieval and manipulation. Browser storage will be covered later in this book.
Implementing Canvas Security
There is an important caveat to using pixel manipulation, as described in the previous section. Although most developers would use pixel manipulation for legitimate means, it is quite possible that the ability to fetch and update data from a canvas could be used for nefarious purposes. For this reason, the concept of an origin-clean canvas was specified, so that canvases that are tainted with images from origins other than the source of the containing page cannot have their data retrieved.
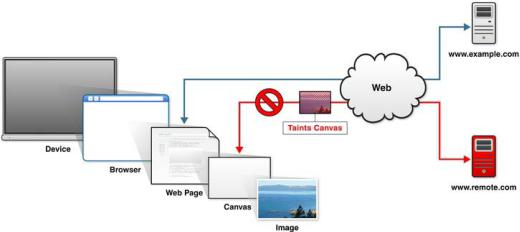
As shown in Figure 2-20, if a page served up from http://www.example.com contains a canvas element, it is entirely possible that the code in the page could try to render an image from http://www.remote.com inside the canvas. After all, it is perfectly acceptable to render images from remote sites inside any given web page.
Figure 2-20. Local and remote image sources
However, before the arrival of the Canvas API, it was not possible to programmatically retrieve the pixel values of a downloaded image. Private images from other sites could be displayed in a page but not read or copied. Allowing scripts to read image data from other origins would effectively share users' photographs and other sensitive online image file with the entire web.
In order to prevent this, any canvas that contains images rendered from remote origins will throw a security exception if the getImageData or toDataURL functions are called. It is perfectly acceptable to render remote images into a canvas from another origin as long as you (or any other scriptwriter) do not attempt to fetch the data from that canvas after it has been tainted. Be aware of this limitation and practice safe rendering.
54