

CHAPTER 5 USING THE GEOLOCATION API
Dealing with Location Information
Location data is sensitive information, so when you receive it, you must be careful about handling, storing, and retransmitting the data. Unless users give permission to store data, you should always dispose of the data after the task for which it was required is complete.
Therefore, if you retransmit the location data, it is recommended that you first encrypt the data. Regarding the collection of geolocation data, your application should prominently show the following:
•That you are collecting location data
•Why you are collecting location data
•How long the location data is kept
•How you are securing the data
•How and with whom the location data is shared (if it is)
•How users can check and update their location data
Using the Geolocation API
In this section, we’ll explore the use of the Geolocation API in more detail. For the sake of illustration, we’ve created a simple browser page—geolocation.html. Remember that you can download all the code from the book's page on apress.com or on the companion website http://prohtml5.com.
Checking for Browser Support
Before you call the Geolocation API functions, you will want to make sure that there is support in the browser for what you’re about to do. This way, you can provide some alternate text, prompting the users of your application to dump their dinosaur-like browsers or install a plugin such as Gears, which augments the existing browser functionality. Listing 5-1 shows one way you can use to test for browser support.
Listing 5-1. Checking for Browser Support
function loadDemo() { if(navigator.geolocation) {
document.getElementById("support").innerHTML = "Geolocation supported.";
} else {
document.getElementById("support").innerHTML = "Geolocation is not supported in your browser.";
}
}
In this example, you test for browser support in the loadDemo function, which might be called when the application’s page is loaded. A call to navigator.geolocation (you can also use Modernizr) will return the Geolocation object if it exists, or trigger the failure case if it does not. In this case, the page is updated to reflect whether there is browser support or not by updating a previously defined support element on the page with a suitable message.
114
CHAPTER 5 USING THE GEOLOCATION API
Position Requests
There are two types of position requests:
•One-shot position request
•Repeated position updates
One-Shot Position Requests
In many applications, it will be acceptable to retrieve the user’s location only once, or only by request. For example, if someone is looking for the nearest movie theater showing today’s popular movie in the next hour, the simplest form of the Geolocation API shown in Listing 5-2 can be used.
Listing 5-2. One-Shot Position Request
void getCurrentPosition(in PositionCallback successCallback,
in optional PositionErrorCallback errorCallback, in optional PositionOptions options);
Let’s take a look at this core function call in more detail.
First, this is a function that is available on the navigator.geolocation object, so you will need to have already retrieved this object in your script. As noted previously, make sure that you have a good fallback handler if your browser does not support Geolocation.
The function takes one required parameter, and two optional ones.
•The successCallback function parameter tells the browser which function you want called when the location data is made available. This is important because operations such as fetching location data may take a long time to complete. No user wants the browser to be locked up while the location is retrieved, and no developer wants his program to pause indefinitely—especially because fetching the location data will often be waiting on a user to grant permission. The successCallback is where you will receive the actual location information and act on it.
•However, as in most programming scenarios, it is good to plan for failure cases. It is quite possible that the request for location information may not complete for reasons beyond your control, and for those cases you will want to provide an errorCallback function that can present the user with an explanation, or perhaps make an attempt to try again. While optional, it is recommended that you provide one.
•Finally, an options object can be provided to the Geolocation service to fine-tune the way it gathers data. This is an optional parameter that we will examine later.
Let’s say that you’ve created a JavaScript function on our page named updateLocation() in which you update the contents of the page with the new location data. Similarly, you’ve created a handleLocationError() function to handle the error cases. We’ll examine the details of those functions next, but that means that your core request to access the user’s position would look something like this:
navigator.geolocation.getCurrentPosition(updateLocation, handleLocationError);
115
CHAPTER 5 USING THE GEOLOCATION API
The updateLocation() Function
So, what happens in our updateLocation() call? It’s actually quite simple. As soon as the browser has access to the location information, it will call updateLocation() with a single parameter: a position object. The position will contain coordinates—as the attribute coords—and a timestamp for when the location data was gathered. While you may or may not need the timestamp, the coords attribute contains the crucial values for the location.
The coordinates always have multiple attributes on them, but it is up to the browser and the hardware of the user’s device whether they will have meaningful values. The following are the first three attributes:
•latitude
•longitude
•accuracy
These attributes are guaranteed to have values and are fairly self-explanatory. latitude and longitude will contain the Geolocation service’s best determined value of the user’s location specified in decimal degrees. accuracy will contain a value in meters that specifies how close the latitude and longitude values are to the actual location, with a 95% confidence level. It can therefore be used to display a proximity radius around the location to give people a visual clue about the accuracy. Due to the nature of Geolocation implementations, approximation will be common and coarse. Make sure to check the accuracy of the returned values before you present them with any certainty. Recommending a user to visit a “nearby” shoe store that is actually hours away could have unintended consequences.
The other attributes of the coordinates are not guaranteed to be supported, but they will return a null value if they are not available (for example, if you’re on a desktop computer, you’re unlikely to have access to this information):
•altitude—the height of the user’s location, in meters
•altitudeAccuracy—once again in meters, or null if no altitude is provided
•heading—direction of travel, in degrees relative to true north
•speed—ground speed in meters per second
Unless you are sure that your users have devices with access to such information, it is recommended that you not rely on them as critical to your application. While global positioning devices are likely to provide this level of detail, simple network triangulation will not.
Now let’s take a look at a code implementation of our updateLocation() function that performs some trivial updates with the coordinates (see Listing 5-3).
Listing 5-3. Example of Using the updateLocation() Function
function updateLocation(position) {
var latitude = position.coords.latitude; var longitude = position.coords.longitude; var accuracy = position.coords.accuracy; var timestamp = position.timestamp;
document.getElementById("latitude").innerHTML = latitude; document.getElementById("longitude").innerHTML = longitude;
116
CHAPTER 5 USING THE GEOLOCATION API
document.getElementById(“accuracy”).innerHTML = accuracy document.getElementById("timestamp").innerHTML = timestamp;•
}
In this example, the updateLocation() callback is used to update the text in different elements of our page; we put the value of the longitude attribute in the longitude element, the latitude attribute in the latitude element, and accuracy and timestamp in their corresponding fields.
The handleLocationError() Function
Handling errors is very important for a Geolocation application because there are many moving parts and therefore many possibilities for the location calculation services to go awry. Fortunately, the API defines error codes for all the cases you will need to handle, and it sets them on the error object passed to your error handler as the code attribute. Let’s look at them in turn:
•PERMISSION_DENIED (error code 1)—The user chose not to let the browser have access to the location information.
•POSITION_UNAVAILABLE (error code 2)—The technique used to determine the user’s location was attempted, but failed.
•TIMEOUT (error code 3)—A timeout value was set as an option, and the attempt to determine the location exceeded that limit.
In these cases, you will probably want to let the user know that something went wrong. You may want to retry getting the values in the case of an unavailable or timed-out request.
Listing 5-4 shows an example of an error handler in action.
Listing 5-4. Using an Error Handler
function handleLocationError(error) { switch(error.code){
case 0:
updateStatus("There was an error while retrieving your location: " + error.message);
break; case 1:
updateStatus("The user prevented this page from retrieving a location."); break;
case 2:
updateStatus("The browser was unable to determine your location: " + error.message);
break; case 3:
updateStatus("The browser timed out before retrieving the location."); break;
}
}
The error codes are accessed from the code attribute of the provided error object, while the message attribute will give access to a more detailed description of what went wrong. In all cases, we call our own routine to update the status of the page with the necessary info.
117

CHAPTER 5 USING THE GEOLOCATION API
Optional Geolocation Request Attributes
With both the normal and error cases handled, you should turn your attention to the three optional attributes that you can pass to the Geolocation service in order to fine-tune how it gathers its data. Note that these three attributes can be passed using shorthand object notation, making it trivial to add them to your Geolocation request calls.
•enableHighAccuracy—This is a hint to the browser that, if available, you would like the Geolocation service to use a higher accuracy-detection mode. This defaults to false, but when turned on, it may not cause any difference, or it may cause the machine to take more time or power to determine location. Use with caution.
Note Curiously, the high accuracy setting is only a toggle switch: true or false. The API was not created to allow the accuracy to be set to various values or a numeric range. Perhaps this will be addressed in future versions of the specification.
•timeout—This optional value, provided in milliseconds, tells the browser the maximum amount of time it is allowed to calculate the current location. If the calculation does not complete in this amount of time, the error handler is called instead. This value defaults to Infinity, or no limit.
•maximumAge—This value indicates how old a location value can be before the browser must attempt to recalculate. Again, it is a value in milliseconds. This value defaults to zero, meaning that the browser must attempt to recalculate a value immediately.
Note You might be wondering what the difference is between the timeout and maximumAge options. Although similarly named, they do have distinct uses. The timeout value deals with the duration needed to calculate the location value, while maximumAge refers to the frequency of the location calculation. If any single calculation takes longer than the timeout value, an error is triggered. However, if the browser does not have an up-to-date location value that is younger than maximumAge, it must refetch another value. Special values apply here: setting the maximumAge to “0” requires the value to always be re-fetched, while setting it to Infinity means it should never be refetched.
The Geolocation API does not allow you to tell the browser how often to recalculate the position. This is left entirely up to the browser implementation. All we can do is tell the browser what the maximumAge is of the value it returns. The actual frequency is a detail we cannot control.
Let’s update our location request to include an optional parameter using shorthand notation, as shown in the following example:
navigator.geolocation.getCurrentPosition(updateLocation,handleLocationError,
{timeout:10000});
118
CHAPTER 5 USING THE GEOLOCATION API
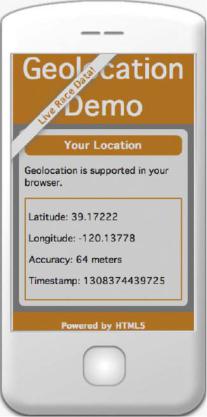
This new call ensures that any request for location that takes longer than 10 seconds (10,000 milliseconds) should trigger an error, in which case the handleLocationError function will be called with the TIMEOUT error code. We can combine the Geolocation calls that we discussed so far and display the relevant data on a page as shown in Figure 5-4.
Figure 5-4. Geolocation data displayed on a mobile device
Repeated Position Updates
Sometimes you have to make repeated position requests. Thankfully, the designers of the Geolocation API made it trivial to switch from an application that requests a user location one time to one that requests the location at regular intervals. In fact, it’s largely as trivial as switching the request call, as shown in the following examples:
•One-shot update: navigator.geolocation.getCurrentPosition(updateLocation, handleLocationError);
119