


C H A P T E R 7
Using the WebSocket API
In this chapter, we’ll explore what you can do with the most powerful communication feature in the HTML5 specification: WebSocket, which defines a full-duplex communication channel that operates through a single socket over the web. WebSocket is not just another incremental enhancement to conventional HTTP communications; it represents a large advance, especially for real-time, eventdriven web applications.
WebSocket provides such an improvement from the old, convoluted “hacks” that are used to simulate a full-duplex connection in a browser that it prompted Google’s Ian Hickson—the HTML5 specification lead—to say:
“Reducing kilobytes of data to 2 bytes…and reducing latency from 150ms to 50ms is
far mor e th an marginal . In fac t, these tw o f actors alon e ar e enough to mak e WebSocket seriously interesting to Google.”
—www.ietf.org/mail-archive/web/hybi/current/msg00784.html
We’ll show you in detail just why WebSocket provides such a dramatic improvement, and you’ll see how—in one fell swoop—WebSocket makes all the old Comet and Ajax polling, long-polling, and streaming solutions obsolete.
Overview of WebSocket
Let’s take a look at how WebSocket can offer a reduction of unnecessary network traffic and latency by comparing HTTP solutions to full duplex “real time” browser communication with WebSocket.
Real-Time and HTTP
Normally when a browser visits a web page, an HTTP request is sent to the web server that hosts that page. The web server acknowledges this request and sends back the response. In many cases—for example, for stock prices, news reports, ticket sales, traffic patterns, medical device readings, and so on—the response could be stale by the time the browser renders the page. If you want to get the most up-to-date real-time information, you can constantly refresh that page manually, but that’s obviously not a great solution.
Current attempts to provide real-time web applications largely revolve around polling and other server-side push technologies, the most notable of which is “Comet”, which delays the completion of an HTTP response to deliver messages to the client.
159

CHAPTER 7 USING THE WEBSOCKET API
With polling, the browser sends HTTP requests at regular intervals and immediately receives a response. This technique was the first attempt for the browser to deliver real-time information. Obviously, this is a good solution if the exact interval of message delivery is known, because you can synchronize the client request to occur only when information is available on the server. However, realtime data is often not that predictable, making unnecessary requests inevitable and as a result, many connections are opened and closed needlessly in low-message-rate situations.
With long-polling, the browser sends a request to the server and the server keeps the request open for a set period of time. If a notification is received within that period, a response containing the message is sent to the client. If a notification is not received within the set time period, the server sends a response to terminate the open request. It is important to understand, however, that when you have a high message-volume, long-polling does not provide any substantial performance improvements over traditional polling.
With streaming, the browser sends a complete request, but the server sends and maintains an open response that is continuously updated and kept open indefinitely (or for a set period of time). The response is then updated whenever a message is ready to be sent, but the server never signals to complete the response, thus keeping the connection open to deliver future messages. However, since streaming is still encapsulated in HTTP, intervening firewalls and proxy servers may choose to buffer the response, increasing the latency of the message delivery. Therefore, many streaming solutions fall back to long-polling in case a buffering proxy server is detected. Alternatively, TLS (SSL) connections can be used to shield the response from being buffered, but in that case the setup and tear down of each connection taxes the available server resources more heavily.
Ultimately, all of these methods for providing real-time data involve HTTP request and response headers, which contain lots of additional, unnecessary header data and introduce latency. On top of that, full-duplex connectivity requires more than just the downstream connection from server to client. In an effort to simulate full-duplex communication over half-duplex HTTP, many of today’s solutions use two connections: one for the downstream and one for the upstream. The maintenance and coordination of these two connections introduces significant overhead in terms of resource consumption and adds lots of complexity. Simply put, HTTP wasn’t designed for real-time, full-duplex communication as you can see in the Figure 7-1, which shows the complexities associated with building a web application that displays real-time data from a back-end data source using a publish/subscribe model over half-duplex HTTP.
Figure 7-1. The complexity of real-time HTTP applications
160
CHAPTER 7 USING THE WEBSOCKET API
It gets even worse when you try to scale out those solutions. Simulating bidirectional browser communication over HTTP is error-prone and complex and all that complexity does not scale. Even though your end users might be enjoying something that looks like a real-time web application, this “real-time” experience has a high price tag. It’s a price that you will pay in additional latency, unnecessary network traffic and a drag on CPU performance.
Understanding WebSocket
WebSocket was first defined as “TCPConnection” in the Communications section of the HTML5 specification by Ian Hickson (lead writer of the HTML5 specification). The specification evolved and changed to WebSocket, which is now an independent specification (just like Geolocation, Web Workers and so on), to keep the discussion focused.
Both TCPConnection and WebSocket are names that refer to lower-level networking interfaces. TCP is a fundamental transport protocol for the Internet. WebSocket is a transport protocol for web applications. It provides a bidirectional stream of data that arrives in order, much like TCP. As with TCP, higher-level protocols can run over WebSocket. To be part of the Web, rather than connecting to an Internet host and port, WebSocket connects to URLs.
WHAT DO WEBSOCKET AND MODEL TRAINS HAVE IN COMMON?
Peter says: “Ian Hickson is quite the model train enthusiast; he has been planning ways to control trains from computers ever since 1984 when Marklin first came out with a digital controller, long before the web even existed.
At that time, Ian added TCPConnection to the HTML5 specification, he was working on a program to control a model train set from a browser and he was using the prevalent pre-WebSocket “hanging GET” and XHR techniques to achieve browser to train communication. The train-controller program would have been a lot easier to build if there was a way to have socket communication in a browser—much like traditional asynchronous client/server communication model that is found in “fat” clients. So, inspired by what could be possible, the (train) wheels had been set in motion and the WebSocket train had left the station. Next stop: the real-time web.”
The WebSocket Handshake
To establish a WebSocket connection, the client and server upgrade from the HTTP protocol to the WebSocket protocol during their initial handshake, as shown in Figure 7-2. Note that this connection description represents draft 17 of the protocol.
161
CHAPTER 7 USING THE WEBSOCKET API
Figure 7-2. The WebSocket Upgrade handshake
Listing 7-1. The WebSocket Upgrade Handshake
From client to server:
GET /chat HTTP/1.1
Host: example.com
Connection: Upgrade
Sec-WebSocket-Protocol: sample
Upgrade: websocket
Sec-WebSocket-Version: 13
Sec-WebSocket-Key: 7cxQRnWs91xJW9T0QLSuVQ==
Origin: http://example.com
[8-byte security key]
From server to client:
HTTP/1.1 101 WebSocket Protocol Handshake
Upgrade: websocket
Connection: Upgrade
Sec-WebSocket-Accept: 7cxQRnWs91xJW9T0QLSuVQ==
WebSocket-Protocol: sample
Once established, WebSocket messages can be sent back and forth between the client and the server in full-duplex mode. This means that text-based messages can be sent full-duplex, in either direction at the same time. On the network each message starts with a 0x00 byte, ends with a 0xFF byte, and contains UTF-8 data in between.
162
CHAPTER 7 USING THE WEBSOCKET API
The WebSocket Interface
Along with the definition of the WebSocket protocol, the specification also defines the WebSocket interface for use in JavaScript applications. Listing 7-2 shows the WebSocket interface.
Listing 7-2. The WebSocket Interface
[Constructor(DOMString url, optional DOMString protocols), Constructor(DOMString url, optional DOMString[] protocols)]
interface WebSocket : EventTarget { readonly attribute DOMString url;
// ready state
const unsigned short CONNECTING = 0; const unsigned short OPEN = 1;
const unsigned short CLOSING = 2; const unsigned short CLOSED = 3;
readonly attribute unsigned short readyState; readonly attribute unsigned long bufferedAmount;
// networking
[TreatNonCallableAsNull] attribute Function? onopen; [TreatNonCallableAsNull] attribute Function? onerror; [TreatNonCallableAsNull] attribute Function? onclose; readonly attribute DOMString extensions;
readonly attribute DOMString protocol;
void close([Clamp] optional unsigned short code, optional DOMString reason);
// messaging
[TreatNonCallableAsNull] attribute Function? onmessage; attribute DOMString binaryType;
void send(DOMString data); void send(ArrayBuffer data); void send(Blob data);
};
Using the WebSocket interface is straightforward. To connect a remote host, just create a new WebSocket instance, providing the new object with a URL that represents the end-point to which you wish to connect. Note that a ws:// and wss:// prefix indicates a WebSocket and a secure WebSocket connection, respectively.
A WebSocket connection is established by upgrading from the HTTP protocol to the WebSocket protocol during the initial handshake between the client and the server, over the same underlying TCP/IP connection. Once established, WebSocket data frames can be sent back and forth between the client and the server in full-duplex mode. The connection itself is exposed via the message event and send method defined by the WebSocket interface. In your code, you use asynchronous event listeners to handle each phase of the connection life cycle.
myWebSocket.onopen = function(evt) { alert("Connection open ..."); }; myWebSocket.onmessage = function(evt) { alert( "Received Message: " + evt.data); }; myWebSocket.onclose = function(evt) { alert("Connection closed."); };
163
CHAPTER 7 USING THE WEBSOCKET API
A Dramatic Reduction in Unnecessary Network Traffic and Latency
So how efficient can WebSocket be? Let’s compare a polling application and a WebSocket application side by side. To illustrate polling, we will examine a web application in which a web page requests realtime stock data from a web server using a traditional polling model. It does this by polling a Java Servlet that is hosted on a web server. A message broker receives data from a fictitious stock price feed with continuously updating prices. The web page connects and subscribes to a specific stock channel (a topic on the message broker) and uses an XMLHttpRequest to poll for updates once per second. When updates are received, some calculations are performed and the stock data is displayed as shown in Figure 7-3.
Figure 7-3. Example JavaScript stock ticker application
It all sounds great, but a look under the hood reveals there are some serious issues with this application. For example, in Mozilla Firefox with Firebug, you can see that GET requests hammer the server at one-second intervals. Looking at the HTTP headers reveals the shocking amount of overhead that is associated with each request. Listings 7-3 and 7-4 show the HTTP header data for just a single request and response.
164
CHAPTER 7 USING THE WEBSOCKET API
Listing 7-3. HTTP Request Header
GET /PollingStock//PollingStock HTTP/1.1 Host: localhost:8080
User-Agent: Mozilla/5.0 (Windows; U; Windows NT 5.1; en-US; rv:1.9.1.5) Gecko/20091102 Firefox/3.5.5
Accept: text/html,application/xhtml+xml,application/xml;q=0.9,*/*;q=0.8 Accept-Language: en-us
Accept-Encoding: gzip,deflate
Accept-Charset: ISO-8859-1,utf-8;q=0.7,*;q=0.7 Keep-Alive: 300
Connection: keep-alive
Referer: http://www.example.com/PollingStock/
Cookie: showInheritedConstant=false; showInheritedProtectedConstant=false; showInheritedProperty=false; showInheritedProtectedProperty=false; showInheritedMethod=false; showInheritedProtectedMethod=false; showInheritedEvent=false; showInheritedStyle=false; showInheritedEffect=false
Listing 7-4. HTTP Response Header
HTTP/1.x 200 OK
X-Powered-By: Servlet/2.5
Server: Sun Java System Application Server 9.1_02
Content-Type: text/html;charset=UTF-8
Content-Length: 21
Date: Sat, 07 Nov 2009 00:32:46 GMT
Just for fun (ha!), we can count all the characters. The total HTTP request and response header information overhead contains 871 bytes and that does not even include any data. Of course, this is just an example and you can have less than 871 bytes of header data, but there are also common cases where the header data exceeded 2,000 bytes. In this example application, the data for a typical stock topic message is only about 20 characters long. As you can see, it is effectively drowned out by the excessive header information, which was not even required in the first place.
So, what happens when you deploy this application to a large number of users? Let’s take a look at the network overhead for just the HTTP request and response header data associated with this polling application in three different use cases.
•Use case A: 1,000 clients polling every second: Network traffic is (871 × 1,000) = 871,000 bytes = 6,968,000 bits per second (6.6 Mbps)
•Use case B: 10,000 clients polling every second: Network traffic is (871 × 10,000) = 8,710,000 bytes = 69,680,000 bits per second (66 Mbps)
•Use case C: 100,000 clients polling every 1 second: Network traffic is
(871 × 100,000) = 87,100,000 bytes = 696,800,000 bits per second (665 Mbps)
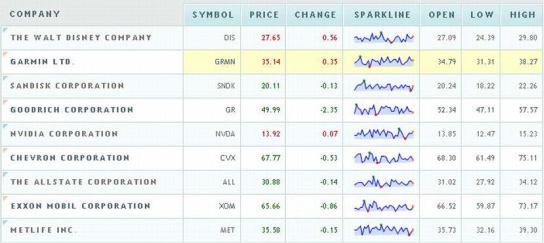
That’s an enormous amount of unnecessary network overhead. Consider if we rebuilt the application to use WebSocket, adding an event handler to the web page to asynchronously listen for stock update messages from the message broker (more on that in just a little bit). Each of these messages is a WebSocket frame that has as little as two bytes of overhead (instead of 871). Take a look at how that affects the network overhead in our three use cases.
165
CHAPTER 7 USING THE WEBSOCKET API
•Use case A: 1,000 clients receive 1 message per second: Network traffic is (2 × 1,000) = 2,000 bytes = 16,000 bits per second (0.015 Mbps)
•Use case B: 10,000 clients receive 1 message per second: Network traffic is (2 × 10,000) = 20,000 bytes = 160,000 bits per second (0.153 Mbps)
•Use case C: 100,000 clients receive 1 message per second: Network traffic is (2 × 100,000) = 200,000 bytes = 1,600,000 bits per second (1.526 Mbps)
As you can see in Figure 7-4, WebSocket provides a dramatic reduction of unnecessary network traffic compared to the polling solution.
Figure 7-4. Comparison of the unnecessary network overhead between the polling WebSocket traffic
And what about the reduction in latency? Take a look at Figure 7-5. In the top half, you can see the latency of the half-duplex polling solution. If we assume, for this example, that it takes 50 milliseconds for a message to travel from the server to the browser, then the polling application introduces a lot of extra latency, because a new request has to be sent to the server when the response is complete. This new request takes another 50ms and during this time the server cannot send any messages to the browser, resulting in additional server memory consumption.
In the bottom half of the figure, you see the reduction in latency provided by the WebSocket solution. Once the connection is upgraded to WebSocket, messages can flow from the server to the
166