

CHAPTER 2 USING THE CANVAS API
//Create the shape for our canopy path createCanopyPath(context);
//Stroke the current path context.stroke(); context.restore();
}
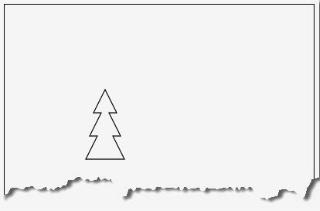
All the calls in this routine should be familiar to you already. We fetch the canvas context, save it for future reference, translate our position to a new location, draw the canopy, stroke it onto the canvas, and then restore our state. Figure 2-6 shows the results of our handiwork, a simply line representation of a tree canopy. We’ll expand on this as we go forward, but it’s a good first step.
Figure 2-6. A simple path of a tree canopy
Working with Stroke Styles
The Canvas API wouldn’t be powerful or popular if developers were stuck using simple stick drawings and black lines. Let’s use the stroke styling capabilities to make our canopy a little more tree-like. Listing 2-10 shows some basic commands that can modify the properties of the context in order to make the stroked shape look more appealing.
Listing 2-10. Using a Stroke Style
//Increase the line width context.lineWidth = 4;
//Round the corners at path joints context.lineJoin = 'round';
//Change the color to brown context.strokeStyle = '#663300';
//Finally, stroke the canopy context.stroke();
34
CHAPTER 2 USING THE CANVAS API
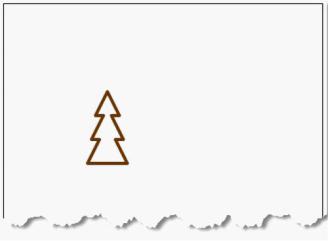
By adding the above properties before stroking, we change the appearance of any future stroked shapes—at least until we restore the context back to a previous state.
First, we increase the width of the stroked lines to four pixels.
Next, we set the lineJoin property to round, which causes the joints of our shape’s segments to take on a more rounded corner shape. We could also set the lineJoin to bevel or miter (and the corresponding context.miterLimit value to tweak it) to choose other corner options.
Finally, we change the color of the stroke by using the strokeStyle property. In our example, we are setting the color to a CSS value, but as you will see in later sections, it is also possible to set the strokeStyle to be an image pattern or a gradient for fancier displays.
Although we are not using it here, we could also set the lineCap property to be either butt, square, or round to specify how lines should display at the endpoints. Alas, our example has no dangling line ends. Figure 2-7 shows our spruced-up tree canopy, nowstroked with a wider, smoother, brown line instead of the flat black line from before.
Figure 2-7. Stylish stroked tree canopy
Working with Fill Styles
As you might expect, stroking is not the only way to affect the appearance of canvas shapes. The next common way to modify a shape is to specify how its paths and subpaths are filled. Listing 2-11 shows how simple it is to fill our canopy with a pleasant, green color.
Listing 2-11. Using a Fill Style
// Set the fill color to green and fill the canopy context.fillStyle = '#339900';
context.fill();
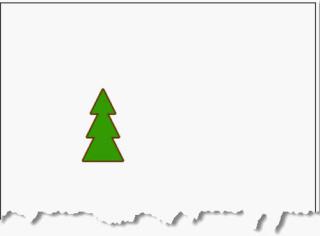
First, we set the fillStyle to the appropriate color. As we will see later, it is also possible to set the fill to be a gradient or an image pattern. Then, we simply call the context’s fill function to let the canvas fill all the pixels inside all the closed paths of our current shape, as shown in Figure 2-8.
35
CHAPTER 2 USING THE CANVAS API
Figure 2-8. Filled tree canopy
Because we stroked our canopy before filling it, the fill covers part of the stroked path. This is due to the fact that the wide stroke—in our case, four pixels wide—is centered along the line of the path shape. The fill applies to all pixels on the interior of the shape, and as such it will cover half of the stroked line pixels. Should you prefer the full stroke to appear, you can simply fill before stroking the path.
Filling Rectangular Content
Every tree deserves a strong foundation. Thankfully, we left space for our tree trunk in the original shape path. Listing 2-12 shows how we can add the simplest rendering of a tree trunk by using the fillRect convenience function.
Listing 2-12. Using the fillRect Convenience Function
//Change fill color to brown context.fillStyle = '#663300';
//Fill a rectangle for the tree trunk context.fillRect(-5, -50, 10, 50);
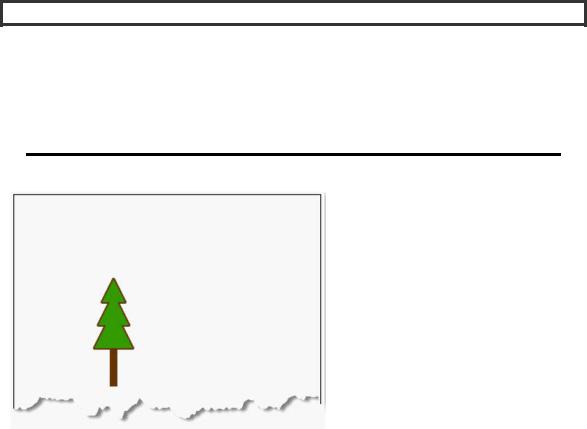
Here, we once again set a brown fill style. But instead of explicitly drawing the corners of our trunk rectangle using the lineTo ability, we will draw the entire trunk in one step by using fillRect. The fillRect call takes the x and y location, as well as the width and height, and then immediately fills it with the current fill style.
Although we are not using them here, corresponding functions exist to strokeRect and clearRect. The former will draw the outline of the rectangle based on a given position and dimension, while the latter will remove any content from the rectangular area and reset it to its original, transparent color.
36
CHAPTER 2 USING THE CANVAS API
Canvas Animations
Brian says: “The ability to clear rectangles in the canvas is core to creating animations and games using the Canvas API. By repeatedly drawing and clearing sections of the canvas, it is possible to present the illusion of animation, and many examples of this already exist on the Web. However, to create animations that perform smoothly, you will need to utilize clipping features and perhaps even a secondary buffered canvas to minimize the flickering caused by frequent canvas clears. Although animations are not the focus of this book, check out the ‘Practical Extra’ sections of this chapter for some tips on using HTML5 to animate your pages.”
Figure 2-9 shows our simple, flatly filled tree trunk attached to our previous canopy path.
Figure 2-9. Tree with filled rectangular trunk
Drawing Curves
The world, particularly the natural world, is not filled with straight lines and rectangles. Fortunately, the canvas provides a variety of functions for creating curves in our paths. We will demonstrate the simplest option—a quadratic curve—to form a path through our virtual forest. Listing 2-13 demonstrates the addition of two quadratic curves.
Listing 2-13. Drawing a Curve
// Save the canvas state and draw the path context.save();
context.translate(-10, 350); context.beginPath();
// The first curve bends up and right
37
CHAPTER 2 USING THE CANVAS API
context.moveTo(0, 0); context.quadraticCurveTo(170, -50, 260, -190);
//The second curve continues down and right context.quadraticCurveTo(310, -250, 410,-250);
//Draw the path in a wide brown stroke context.strokeStyle = '#663300'; context.lineWidth = 20; context.stroke();
//Restore the previous canvas state context.restore();
As before, one of the first things we will do is save our canvas context state, because we will be modifying the translation and stroke options here. For our forest path, we will start by moving back to the origin and drawing a first quadratic curve up and to the right.
As shown in Figure 2-10, the quadraticCurveTo function begins at the current drawing location and takes two x, y point locations as its parameters. The second one is the final stop in our curve. The first one represents a control point. The control point sits to the side of the curve (not on it) and acts almost as a gravitational pull for the points along the curve path. By adjusting the location of the control point, you can adjust the curvature of the path you are drawing. We draw a second quadratic curve up and to the right to complete our path; then stroke it just as we did for our tree canopy before (only wider).
Figure 2-10. Quadratic curve start, end, and control points
Other options for curves in the HTML5 Canvas API include the bezierCurveTo, arcTo, and arc functions. These curves take additional control points, a radius, or angles to determine the
38