


CHAPTER 2 USING THE CANVAS API
Using Background Patterns
Direct rendering of images has many uses, but in some cases it is beneficial to use an image as a background tile, similar to the capability available in CSS. We’ve already seen how it is possible to set a stroke or fill style to be a solid color. The HTML5 Canvas API also includes an option to set an image as a repeatable pattern for either a path stroke or fill.
To make our forest trail appear a bit more rugged, we will demonstrate the capability by replacing the previous stroked trail curve with one that uses a background image fill. In doing so, we’ll swap out our now-unused bark image for a gravel image that we will put to use here. Listing 2-18 shows we replace the call to drawImage with a call to createPattern.
Listing 2-18. Using a Background Pattern
//Replace the bark image with
//a trail gravel image
var gravel = new Image(); gravel.src = "gravel.jpg"; gravel.onload = function () {
drawTrails();
}
//Replace the solid stroke with a repeated
//background pattern
context.strokeStyle = context.createPattern(gravel, 'repeat'); context.lineWidth = 20;
context.stroke();
As you can see, we are still calling stroke() for our path. However, this time we have set a strokeStyle property on the context first, passing in the result of a call to context.createPattern. Oh, and once again the image needs to be previously loaded in order for the canvas to perform the operation. The second argument is a repetition pattern that can be one of the choices shown in Table 2- 1.
Table 2-1. Repetition Patterns
Repeat |
Value |
repeat |
(Default) The image is repeated in both directions |
repeat-x |
The image is repeated only in the X dimension |
repeat-y |
The image is repeated only in the Y dimension |
no-repeat |
The image is displayed once and not repeated |
|
|
Figure 2-14 shows the result of the use of a background image rather than an explicitly drawn image to represent our trail.
43

CHAPTER 2 USING THE CANVAS API
Figure 2-14. A trail with a repeating background pattern
Scaling Canvas Objects
What kind of forest has only one tree? Let’s fix that right away. To make this a little easier, we will adjust our code sample to isolate the tree drawing operations to a single routine, called drawTree, as shown in Listing 2-19.
Listing 2-19. Function to Draw the Tree Object
// Move tree drawing into its own function for reuse function drawTree(context) {
var trunkGradient = context.createLinearGradient(-5, -50, 5, -50); trunkGradient.addColorStop(0, '#663300'); trunkGradient.addColorStop(0.4, '#996600'); trunkGradient.addColorStop(1, '#552200');
context.fillStyle = trunkGradient; context.fillRect(-5, -50, 10, 50);
var canopyShadow = context.createLinearGradient(0, -50, 0, 0); canopyShadow.addColorStop(0, 'rgba(0, 0, 0, 0.5)'); canopyShadow.addColorStop(0.2, 'rgba(0, 0, 0, 0.0)'); context.fillStyle = canopyShadow;
context.fillRect(-5, -50, 10, 50); createCanopyPath(context);
context.lineWidth = 4; context.lineJoin = 'round'; context.strokeStyle = '#663300';
44
CHAPTER 2 USING THE CANVAS API
context.stroke();
context.fillStyle = '#339900'; context.fill();
}
As you can see, the drawTree function contains all the code we previously created to draw the canopy, trunk, and trunk gradient. Now we will use one of the transformation routines— context.scale—to draw a second tree at a new location and with a larger size, as shown in Listing 2-20.
Listing 2-20. Drawing the Tree Objects
//Draw the first tree at X=130, Y=250 context.save();
context.translate(130, 250); drawTree(context); context.restore();
//Draw the second tree at X=260, Y=500 context.save();
context.translate(260, 500);
//Scale this tree twice normal in both dimensions context.scale(2, 2);
drawTree(context);
context.restore();
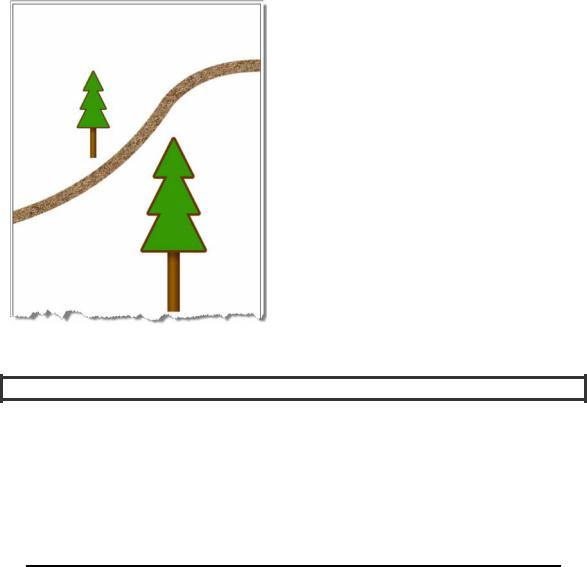
The scale function takes two factors for the x and y dimensions as its arguments. Each factor tells the canvas implementation how much larger (or smaller) to make the size in that dimension; an X factor of 2 would make all subsequent draw routines twice as wide, while a Y factor of 0.5 would make all subsequent operations half as tall as before. Using these routines, we now have an easy way to create a second tree in our trails canvas, as shown in Figure 2-15.
45
CHAPTER 2 USING THE CANVAS API
Figure 2-15. Tree with a larger scale
Always Perform Shape and Path Routines at the Origin
Brian says (and really means it, this time): “This example illustrates one of the reasons why it is a good idea to perform shape and path routines at the origin; then translate them when complete, as we do here in our code. The reason is that transforms such as scale and rotate operate from the origin.
If you perform a rotate transform to a shape drawn off origin, a rotate transform will rotate the shape around the origin rather than rotating in place. Similarly, if you performed a scale operation to shapes before translating them to their proper position, all locations for path coordinates would also be multiplied by the scaling factor. Depending on the scale factor applied, this new location could even be off the canvas altogether, leaving you wondering why your scale operation just ‘deleted’ the image.”
Using Canvas Transforms
Transform operations are not limited to scales and translates. It is also possible to rotate the drawing context using the context.rotate(angle) function or even to modify the underlying transform directly for more advanced operations such as shearing of the rendered paths. If you wanted to rotate the display of an image, you would merely need to call the series of operations shown in Listing 2-21.
46
CHAPTER 2 USING THE CANVAS API
Listing 2-21. A Rotated Image
context.save();
// rotation angle is specified in radians context.rotate(1.57); context.drawImage(myImage, 0, 0, 100, 100);
context.restore();
In Listing 2-22, however, we will show how you can apply an arbitrary transform to the path coordinates to radically alter the display of our existing tree path in order to create a shadow effect.
Listing 2-22. Using a Transform
//Create a 3 stop gradient horizontally across the trunk
//Save the current canvas state for later context.save();
//Create a slanted tree as the shadow by applying
//a shear transform, changing X values to increase
//as Y values increase
//With this transform applied, all coordinates are
//multiplied by the matrix.
context.transform(1, 0,-0.5, 1, 0, 0);
//Shrink the shadow down to 60% height in the Y dimension context.scale(1, 0.6);
//Set the tree fill to be black, but at only 20% alpha context.fillStyle = 'rgba(0, 0, 0, 0.2)'; context.fillRect(-5, -50, 10, 50);
//Redraw the tree with the shadow effects applied createCanopyPath(context);
context.fill();
//Restore the canvas state
context.restore();
Modifying the context transform directly as we’ve done here is something you should attempt only if you are familiar with the matrix mathematics underpinning two-dimensional drawing systems. If you check the math behind this transform, you will see that we are shifting the X values of our drawing by a factor of the corresponding Y values in order to shear the gray tree being used as a shadow. Then, by applying a scale factor of 60%, the sheared tree is decreased in size.
Note that the sheared “shadow” tree is rendered first, so that the actual tree appears above it in Z- order (the order in which the canvas objects overlap). Also, the shadow tree is drawn using the CSS notation for RGBA, which allows us to set the alpha value to only 20% of normal. This creates the light, semitransparent look for the shadow tree. Once applied to our scaled trees, the output renders as shown in Figure 2-16.
47