

CHAPTER 5 USING THE GEOLOCATION API
// calculate distance
if ((lastLat != null) && (lastLong != null)) {
var currentDistance = distance(latitude, longitude, lastLat, lastLong);
document.getElementById("currDist").innerHTML =
"Current distance traveled: " + currentDistance.toFixed(2) + " km";
totalDistance += currentDistance; document.getElementById("totalDist").innerHTML =
"Total distance traveled: " + currentDistance.toFixed(2) + " km"; updateStatus("Location successfully updated.");
}
lastLat = latitude; lastLong = longitude;
}
function handleLocationError(error) { switch(error.code)
{
case 0:
updateErrorStatus("There was an error while retrieving your location. Additional details: " + error.message);
break; case 1:
updateErrorStatus("The user opted not to share his or her location."); break;
case 2:
updateErrorStatus("The browser was unable to determine your location. Additional details: " + error.message);
break; case 3:
updateErrorStatus("The browser timed out before retrieving the location."); break;
}
}
</script>
</body>
</html>
Practical Extras
Sometimes there are techniques that don’t fit into our regular examples, but which nonetheless apply to many types of HTML5 applications. We present to you some short, common, and practical extras here.
129
CHAPTER 5 USING THE GEOLOCATION API
What’s My Status?
You might have already noticed that a large portion of the Geolocation API pertains to timing values. This should not be too surprising. Techniques for determining location—cell phone triangulation, GPS, IP lookup, and so on—can take a notoriously long time to complete, if they complete at all. Fortunately, the API gives a developer plenty of information to create a reasonable status bar for the user.
If a developer sets the optional timeout value on a position lookup, she is requesting that the geolocation service notify her with an error if the lookup takes longer than the timeout value. The side effect of this is that it is entirely reasonable to show the user a status message in the user interface while the request is underway. The start of the status begins when the request is made, and the end of the status should correspond to the timeout value, whether or not it ends in success or failure.
In Listing 5-15, we’ll kick off a JavaScript interval timer to regularly update the status display with a new progress indicator value.
Listing 5-15. Adding a Status Bar
function updateStatus(message) { document.getElementById("status").innerHTML = message;
}
function endRequest() { updateStatus("Done.");
}
function updateLocation(position) { endRequest();
// handle the position data
}
function handleLocationError(error) { endRequest();
// handle any errors
}
navigator.geolocation.getCurrentPosition(updateLocation,
handleLocationError,
{timeout:10000});
// 10 second timeout value
updateStatus(“Requesting Geolocation data…”);
Let’s break that example down a little. As before, we’ve got a function to update our status value on the page, as shown in the following example.
function updateStatus(message) { document.getElementById("status").innerHTML = message;
}
Our status here will be a simple text display, although this approach applies equally well for more compelling graphical status displays (see Listing 5-16).
130
CHAPTER 5 USING THE GEOLOCATION API
Listing 5-16. Showing the Status
navigator.geolocation.getCurrentPosition(updateLocation,
handleLocationError,
{timeout:10000});
// 10 second timeout value
updateStatus(“Requesting location data…”);
Once again, we use the Geolocation API to get the user’s current position, but with a set timeout of ten seconds. Once ten seconds have elapsed, we should either have a success or failure due to the timeout option.
We immediately update the status text display to indicate that a position request is in progress. Then, once the request completes or ten seconds elapses—whichever comes first—you use the callback method to reset the status text, as shown in Listing 5-17.
Listing 5-17. Resetting the Status Text
function endRequest() { updateStatus("Done.");
}
function updateLocation(position) { endRequest();
// handle the position data
}
A simple extra, but easy to extend.
This technique works well for one-shot position lookups because it is easy for the developer to determine when a position lookup request starts. The request starts as soon as the developer calls getCurrentPosition(), of course. However, in the case of a repeated position lookup via watchPosition(), the developer is not in control of when each individual position request begins.
Furthermore, the timeout does not begin until the user grants permission for the geolocation service to access position data. For this reason, it is impractical to implement a precise status display because the page is not informed during the instant when the user grants permission.
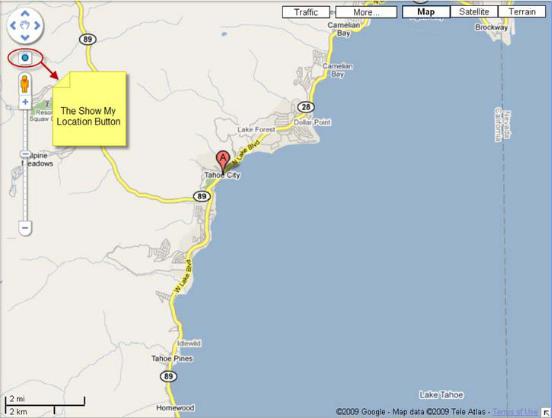
Show Me on a Google Map
One very common request for geolocation data is to show a user’s position on a map, such as the popular Google Maps service. In fact, this is so popular that Google itself built support for Geolocation into its user interface. Simply press the Show My Location button (see Figure 5-6); Google Maps will use the Geolocation API (if it is available) to determine and display your location on the map.
131
CHAPTER 5 USING THE GEOLOCATION API
Figure 5-6. Google Map’s Show My Location button
However, it is also possible to do this yourself. Although the Google Map API is beyond the scope of this book, it has (not coincidentally) been designed to take decimal latitude and longitude locations. Therefore, you can easily pass the results of your position lookup to the Google Map API, as shown in Listing 5-18. You can read more on this subject in Beginning Google Maps Applications, Second Edition (Apress, 2010).
Listing 5-18. Passing a Position to the Google Map API
//Include the Google maps library
<script src="http://maps.google.com/maps/api/js?sensor=false"></script>
// Create a Google Map… see Google API for more detail
var map = new google.maps.Map(document.getElementById("map"));
function updateLocation(position) {
//pass the position to the Google Map and center it
132