

CHAPTER 8 USING THE FORMS API
Once again, the choice here is yours. The HTML5 Forms API provides you with the flexibility to achieve a customized API or to fall back to default browser behavior.
Turning Off Validation
In spite of the power behind the validation API, there are… (ahem) valid reasons why you might want to turn off validation on a control or an entire form. The most common reason is that you might choose to submit the temporary contents of a form to be saved or retrieved for later, even if the contents aren’t quite valid yet.
Imagine the case of a user who is entering a complex order entry form, but needs to run an errand midway through the process. Ideally, you might present the user with a “save” button which stores the values of the form by submitting them to the server. However, if the form was only partially completed, validation rules might prevent the content from being submitted. The user would be very displeased if she had to complete or abandon the form due to an unexpected interruption.
To handle this, a form itself can be programmatically set with the attribute noValidate, which will cause it to forego any validation logic otherwise present and simply submit the form. Naturally, this attribute can be set either via script or original markup.
A more useful way to turn off validation is to set a formNoValidate attribute on a control such as a form submit button. Take the following submit button, set up as a “save” button, for example:
<input type="submit" formnovalidate name="save" value="Save current progress"> <input type="submit" name="process" value="Process order">
This snippet will create a two normal looking submit buttons. The second will submit the form, as usual. However, the first button is marked with the noValidate attribute, causing all validation to be bypassed when it is used. This allows the data to be submitted to the server without checking for correctness. Of course, your server will need to be set up to handle unvalidated data, but best practices dictate that this should be the case at all times.
Building an Application with HTML5 Forms
Now, let’s use the tools we’ve described in this chapter to create a simple signup page which showcases new features in HTML5 Forms. Turning back to our familiar Happy Trails Running Club, we’ll create a page for race registration that incorporates new form elements and validation.
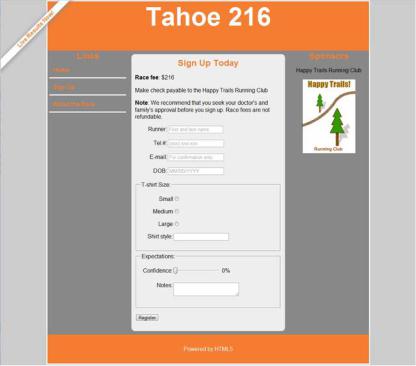
As always, the source code for the demo files we show here is available in the code/forms folder. Therefore, we’ll spend less attention on the CSS and peripheral markup, and more on the core of the page itself. That being said, let’s start with a look at the finished page shown in Figure 8-4, then break it down into sections to tackle one-by-one.
209
CHAPTER 8 USING THE FORMS API
Figure 8-4. Example page with race signup form
This signup page demonstrates many of the elements and APIs we’ve explored in this chapter, including validation. Although the actual display may look somewhat different on your browser, it should degrade gracefully even if the browser does not support a particular feature.
On to the code!
The header, navigation, and footer have all been seen before on our previous examples. The page now contains a <form> element.
<form name="register">
<p><label for="runnername">Runner:</label>
<input id="runnername" name="runnername" type="text" placeholder="First and last name" required></p>
<p><label for="phone">Tel #:</label>
<input id="phone" name="phone" type="tel" placeholder="(xxx) xxx-xxx"></p>
<p><label for="emailaddress">E-mail:</label>
<input id="emailaddress" name="emailaddress" type="email" placeholder="For confirmation only"></p>
<p><label for="dob">DOB:</label>
<input id="dob" name="dob" type="date" placeholder="MM/DD/YYYY"></p>
210
CHAPTER 8 USING THE FORMS API
In this first section, we see the markup for the four primary inputs: name, phone, email, and birthday. For each, we’ve set a <label> with descriptive text and tied it to the actual control using the for attribute. We’ve also set placeholder text to show a description to the user of just what type of content belongs there.
For the runner name text field, we’ve made it a required value by setting the required attribute. This will cause form validation to kick in with a valueMissing constraint if nothing is entered. On the phone input, we’ve declared it to be of type tel. Your browser may or may not display this field differently or provide optimized keyboards.
Similarly, the e-mail field has been marked of type e-mail. Any specific handling is up to the browser. Some browsers will throw a typeMismatch constraint if they detect that the entered value is not a valid email.
Finally, the date-of-birth field is declared as type date. Not many browsers support this yet, but when they do, they will automatically render a date picking control on this input.
<fieldset>
<legend>T-shirt Size: </legend>
<p><input id="small" type="radio" name="tshirt" value="small"> <label for="small">Small</label></p>
<p><input id="medium" type="radio" name="tshirt" value="medium"> <label for="medium">Medium</label></p>
<p><input id="large" type="radio" name="tshirt" value="large"> <label for="large">Large</label></p>
<p><label for="style">Shirt style:</label>
<input id="style" name="style" type="text" list="stylelist" title="Years of participation"></p>
<datalist id="stylelist">
<option value="White" label="1st Year"> <option value="Gray" label="2nd - 4th Year">
<option value="Navy" label="Veteran (5+ Years)"> </datalist>
</fieldset>
In our next section, we set out the controls to be used to T-shirt selection. The first few controls are a standard set of radio buttons for selecting a shirt size.
The next section is more interesting. Here, we exercise the list attribute and its corresponding <datalist> element. In the <datalist>, we declare a set of types that should be displayed for this list with distinct values and labels, representing the types of T-shirts available based on veteran status.
Although this list is quite simple, the same technique can be used for lengthy lists of dynamic elements.
<fieldset>
<legend>Expectations:</legend>
<p>
<label for="confidence">Confidence:</label> <input id="confidence" name="level" type="range"
onchange="confidenceDisplay.value=(value +'%')" min="0" max="100" step="5" value="0">
<output id="confidenceDisplay">0%</output></p> <p><label for="notes">Notes:</label>
<textarea id="notes" name="notes" maxLength="140"></textarea></p> </fieldset>
In our final section of controls, we create a slider for the user to express his or her confidence in completing the race. For this, we use an input of type range. Since our confidence is measured in
211
CHAPTER 8 USING THE FORMS API
percentages, we set a minimum, a maximum, and step value on the input. These force a constraint within normal percentage ranges. Additionally, we constrain the movement of the value to 5% step increments, which you will be able to observe if your browser supports a range slider interface control. Although it should not be possible to trigger them through simple control interactions, there are possible validation constraints on this control for rangeUnderflow, rangeOverflow, and stepMismatch.
Because a range control does not show a textual representation of its value by default, we will add an <output> to our application for that purpose. The confidenceDisplay will be manipulated through the onchange handler of the range control, but we’ll see that in action in just a minute.
Finally, we add a <textarea> to contain any extra notes from the registrant. By setting a maxLength constraint on the notes control, we allow it to achieve a tooLong constraint, perhaps if a lengthy value is pasted into the field.
<p><input type="submit" name="register" value="Register"></p> </form>
We finish off our control section with a submit button that will send in our form registration. In this default example, the registration is not actually being sent to any server.
There are a few scripts we still need to describe: how we will override the browser’s built-in form validation feedback and how we will listen for events. Although you might find the browser’s default handling of form errors to be acceptable, it is always good to know your options.
<script type="text/javascript">
function invalidHandler(evt) {
// find the label for this form control
var label = evt.srcElement.parentElement.getElementsByTagName("label")[0];
//set the label's text color to red label.style.color = 'red';
//stop the event from propagating higher evt.stopPropagation();
//stop the browser's default handling of the validation error evt.preventDefault();
}
function loadDemo() {
//register an event handler on the form to
//handle all invalid control notifications document.register.addEventListener("invalid", invalidHandler, true);
}
window.addEventListener("load", loadDemo, false);
</script>
This script shows how we override the handling of validation errors. We start by registering event listeners for the special event type invalid. In order to capture invalid events on all form controls, we register the handler on the form itself, making sure to register for event capture so that events will arrive at our handler.
// register an event handler on the form to
212