


CHAPTER 2
Creating Bigger Projects with the Arduino
For simple applications, what you learned about the Arduino IDE in the preceding chapter is sufficient. But soon your projects will get more ambitious, and then it will be handy to split them into separate files that you can manage as a whole. So in this chapter, you’ll learn how to stay in control of bigger projects with the Arduino IDE.
Usually, bigger projects need not only more software, but also more hard- ware—you will rarely use the Arduino board in isolation. You will use many more sensors than you might imagine, and you’ll have to transmit the data they measure back to your computer. To exchange data with the Arduino, you’ll use its serial port. This chapter explains everything you need to know about serial communication. To make things more tangible, you’ll learn how to turn your computer into a very expensive light switch that lets you control an LED using the keyboard.
What You Need
To try this chapter’s examples, you need only a few things:
1.An Arduino board, such as the Uno, Duemilanove, or Diecimila
2.A USB cable to connect the Arduino to your computer
3.An LED (optional)
4.A software serial terminal such as PuTTY (for Windows users) or screen for Linux and Mac OS X users (optional)
report erratum • discuss

Chapter 2. Creating Bigger Projects with the Arduino • 24
Managing Projects and Sketches
Modern software developers can choose from a variety of development tools that automate repetitive and boring tasks. That’s also true for embedded systems like the Arduino. You can use integrated development environments (IDEs) to manage your programs, too. The most popular one has been created by the Arduino team.
The Arduino IDE manages all files belonging to your project. It also provides convenient access to all the tools you need to create the binaries that will run on your Arduino board. Conveniently, it does so unobtrusively.
Organizing all the files belonging to a project automatically is one of the most important features of an IDE. Under the hood, the Arduino IDE creates a directory for every new project, storing all the project’s files in it. To add new files to a project, click the Tabs button on the right to open the Tabs pop-up menu, and then choose New Tab (Figure 7, The Tabs menu in action, on page 25). To add an existing file, use the Sketch > Add File menu item.
As you might have guessed from the names of the menu items, the Arduino IDE calls projects sketches. If you create a new sketch, the IDE gives it a name starting with sketch_. You can change the name whenever you like using the Save As command. If you do not save a sketch explicitly, the IDE stores it in a predefined folder you can look up in the Preferences menu. Whenever you get lost, you can check what folder the current sketch is in using the Sketch > Show Sketch Folder menu item.
Since Arduino 1.0, sketches have the extension ino. Older IDE versions used pde. Arduino 1.0 still supports pde files, but it will update them to ino when you save the sketch. (You can disable this behavior in the Preferences menu.)
report erratum • discuss

Managing Projects and Sketches • 25
Figure 7—The Tabs menu in action
Not only can you create your own sketches using the IDE, but it also comes with many example sketches that you can use as a basis for your own experiments. Get to them via the File > Examples menu. Take some time to browse through them, even if you don’t understand anything you see right now.
Note that many libraries come with examples, too. Whenever you install a new library (you’ll learn how to do this later), you should have a look at the File > Examples menu again. It will probably contain new entries.
The Arduino IDE makes your life easier by choosing reasonable defaults for many settings. But it also allows you to change most of these settings, and you’ll see how in the next section.
report erratum • discuss
Chapter 2. Creating Bigger Projects with the Arduino • 26
Changing Preferences
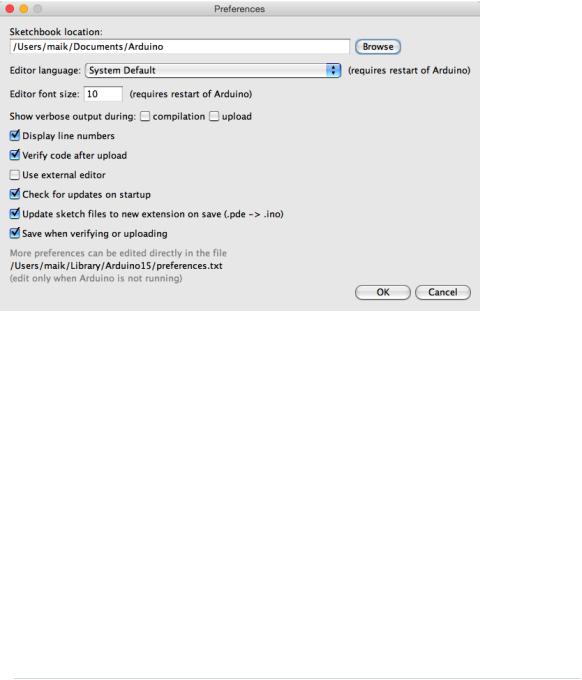
For your early projects, the IDE’s defaults might be appropriate, but sooner or later you’ll want to change some things. As you can see in the following figure, the IDE lets you change only a few preferences directly.
The dialog box refers to a file named preferences.txt containing more preferences. This file is a Java properties file consisting of key/value pairs. Here you see a few of them:
...
preproc.web_colors=true editor.font=Monaco,plain,10 update.check=true build.verbose=true upload.verbose=true
...
Most of these properties control the user interface; that is, they change fonts, colors, and so on. But they can also change the application’s behavior. You can enable more verbose output for operations such as compiling or uploading a sketch. Before Arduino 1.0, you had to edit preferences.txt and set both build.verbose and upload.verbose to true to achieve this. Today, you can change the verbose settings from the Preferences dialog box. Make sure that verbose output is enabled for compilation and upload. Also, it’s helpful to enable the
“Display line numbers” option.
report erratum • discuss

Changing Preferences • 27
Load the blinking LED sketch from Chapter 1, Welcome to the Arduino, on page 3, and compile it again. The output in the message panel should look like this:
Note that the IDE updates some of the Preferences values when it shuts down. So before you change any preferences directly in the preferences.txt file, you have to stop the Arduino IDE.
Now that you’re familiar with the Arduino IDE, let’s do some programming. We’ll make the Arduino talk to the outside world.
report erratum • discuss