


Working with Graphics in TVout • 139
Next, we output the current temperature as text. We use TVout’s select_font, set_cursor, and print methods to output the text “Current Temperature” in a font that is 6 pixels wide and 8 pixels high. After that, we output the current temperature in degrees Celsius using the 8x8 font. The TVout library doesn’t define a symbol for degrees Celsius, so we use the draw_circle method in line 21 to draw a small circle to simulate a degrees symbol.
We’re done! That’s all the code we need to make the TV thermometer work. The only thing I haven’t explained in detail is how outputting the thermometer image works. You’ll learn more about that in the next section.
Working with Graphics in TVout
In TvThermometer.ino we’ve included the thermometer.h file without explaining what
it contains. Here’s how it looks:
Video/TvThermometer/thermometer.h
#ifndef THERMOMETER_H #define THERMOMETER_H
extern const unsigned char thermometer[]; #endif
Quite disappointing, isn’t it? The file declares only a single variable named thermometer. This variable is an array of unsigned character values, and the extern keyword tells the compiler that we only want to declare the variable. That is, we can refer to it in our program, but we still have to define it to allocate some memory.
We actually define the thermometer variable in thermometer.cpp (we’ve skipped a few lines for brevity):
Video/TvThermometer/thermometer.cpp
Line 1 #include <Arduino.h>
-#include <avr/pgmspace.h>
-#include "thermometer.h"
-PROGMEM const unsigned char thermometer[] = { 5 20, 94,
-B00000000, B11110000, B00000000,
-B00000001, B00001000, B00000000,
-B00000010, B00000100, B00000000,
-B00000010, B00000100, B00000000,
10 B00000010, B00000100, B00000000,
-B00000010, B00000111, B10000000, // 40.0
-B00000010, B00000100, B00000000,
-B00000010, B00000100, B00000000,
-B00000010, B00000100, B00000000,
15 B00000010, B00000100, B00000000,
-B00000010, B00000100, B00000000,
report erratum • discuss

Chapter 8. Generating Video Signals with an Arduino • 140
-B00000010, B00000100, B00000000,
-B00000010, B00000100, B00000000,
-B00000010, B00000100, B00000000, 20 B00000010, B00000100, B00000000,
-// ...
-B00000010, B00000100, B00000000, // 5.5
-B00000111, B11111110, B00000000,
-B00001111, B11111111, B00000000,
25 B00011111, B11111111, B10000000,
-B00111111, B11111111, B11000000,
-B01111111, B11111111, B11100000,
-B01111111, B11111111, B11100000,
-B11111111, B11111111, B11110000, 30 B11111111, B11111111, B11110000,
-B11111111, B11111111, B11110000,
-B11111111, B11111111, B11110000,
-B11111111, B11111111, B11110000,
-B11111111, B11111111, B11110000, 35 B01111111, B11111111, B11100000,
-B01111111, B11111111, B11100000,
-B00111111, B11111111, B11000000,
-B00011111, B11111111, B10000000,
-B00001111, B11111111, B00000000, 40 B00000111, B11111110, B00000000,
-B00000001, B11111000, B00000000,
-B00000001, B11111000, B00000000,
-};
This file looks weird at first, but it’s really simple. First, we include Arduino.h because we’ll need to declare binary constants later. After that, we include avr/pgmspace.h because we want to store our image data in the Arduino’s flash RAM. Eventually, we include thermometer.h because we need the declaration of our thermometer image data.
In line 4, we eventually define the thermometer variable we declared in thermometer.h. The definition differs slightly from the declaration because it contains the PROGMEM directive.5 This directive tells the compiler to copy the data stored in the thermometer variable to the Arduino’s flash memory. Usually, when you define a variable in an Arduino program, it occupies memory in the SRAM. Most Arduinos don’t have a lot of SRAM (the Arduino Uno only has 2 KB), so it’s a valuable resource and you shouldn’t waste it. As a rule of thumb, you should store all constant data in the Arduino’s flash RAM. Use SRAM only for information that might change during program execution.
5.http://arduino.cc/en/Reference/PROGMEM
report erratum • discuss

Working with Graphics in TVout • 141
Image data like our thermometer usually doesn’t change, so you should always store it in flash RAM using the PROGMEM directive. TVout expects image data in raw format. The first two bytes contain the width and height of an image. The data that follows contains the image data line by line. In thermometer.cpp, each line of image data contains three bytes, because the image is 20 pixels wide, and 20 pixels occupy three bytes. Consequently, the file contains 94 lines each representing a single line of the thermometer image. Because we’ve used binary literals to encode the image data, you can actually see how the image looks when reading the source code. A 1 represents a white pixel, and a 0 represents a black pixel.
Drawing Images for Your Arduino Programs
You can draw simple images directly in the source code by editing binary numbers. As soon as your images get more complex, you need some tool support. For graphics that are still fairly simple but that are too complex to edit the binary numbers in the source code, you can use any drawing program, of course, but most modern tools are way too complicated for this job.
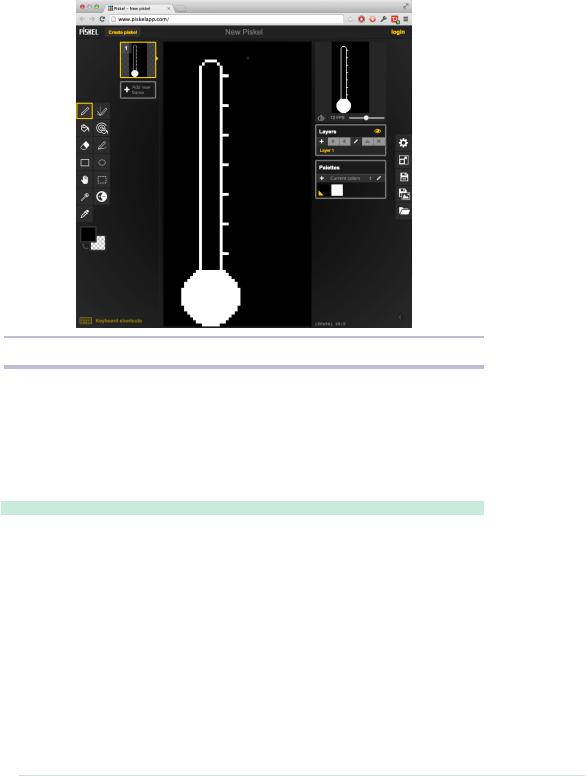
I’ve created the thermometer image with a fairly simple online tool named
Piskel.6 It’s open source, it’s easy to use, and it feels just right for creating Arduino graphics. You can see it in action in Figure 25, You can find good online editors for pixel graphics, on page 142.
Applications like Piskel really help to create images for your Arduino programs, but they usually store these images in .gif or .png files. In the next section, you’ll learn how to convert these files into source code.
Turning Pixels into C++ Code
After you’ve finished your pixel art, you still have to convert it into a C/C++ file. You could do it manually, but that wouldn’t be very pragmatic, would it? It’d be much better to write a small program that does the conversion automatically.
You could write such a program in any modern programming language; we’ll use Ruby here. Processing graphics in Ruby is easy thanks to the rmagick library. This library is a binding to ImageMagick,7 a powerful tool for transforming images. Before you can install rmagick, you have to install ImageMagick.
6.http://www.piskelapp.com/
7.http://www.imagemagick.org/
report erratum • discuss
Chapter 8. Generating Video Signals with an Arduino • 142
Figure 25—You can find good online editors for pixel graphics.
When ImageMagick is available on your system, you can install the rmagick
|
library using the following command: |
|
maik> gem install rmagick |
|
Now you can use rmagick in your Ruby programs. We’ll use it to convert a |
|
graphics file into a C++ file: |
|
Video/img2cpp.rb |
Line 1 |
require 'RMagick' |
- |
include Magick |
- |
|
- |
image = Image::read(ARGV[0]).first |
5 |
|
-puts '#include "thermometer.h"'
-puts 'PROGMEM const unsigned char thermometer[] = {'
-puts " #{image.columns}, #{image.rows},"
-
10 (0..image.rows).each do |y| - print ' B'
-(0..image.columns).each do |x|
-pixel = image.pixel_color(x, y)
-print pixel.red == 0 ? '0' : '1' 15 print ', B' if (x + 1) % 8 == 0
report erratum • discuss