


CHAPTER 1
Welcome to the Arduino
The Arduino was originally built for designers and artists—people with little technical expertise. Even if they didn’t have programming experience, the Arduino enabled them to create sophisticated design prototypes and some amazing interactive artwork. So, it should come as no surprise that the first steps with the Arduino are very easy, even more so for people with a strong technical background.
But it’s still important to get the basics right. You’ll get the most out of working with the Arduino if you familiarize yourself with the Arduino board itself, with its development environment, and with techniques such as serial communication.
One thing to understand before getting started is physical computing. If you have worked with computers before, you might wonder what this means. After all, computers are physical objects, and they accept input from physical keyboards and mice. They output sound and video to physical speakers and displays. So, isn’t all computing physical computing in the end?
In principle, regular computing is a subset of physical computing: keyboard and mouse are sensors for real-world inputs, and displays or printers are actuators. But controlling special sensors and actuators using a regular computer is very difficult. Using an Arduino, it’s a piece of cake to control sophisticated and sometimes even weird devices. In the rest of this book, you’ll learn how, and in this chapter you’ll get started with physical computing by learning how to control the Arduino, what tools you need, and how to install and configure them. Then we’ll quickly get to the fun part: you’ll develop your first program for the Arduino.
report erratum • discuss
Chapter 1. Welcome to the Arduino • 4
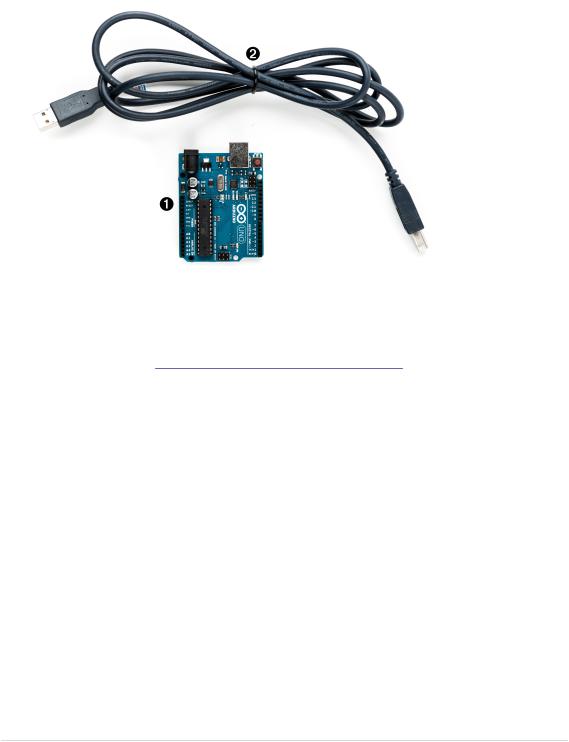
What You Need
1.An Arduino board, such as the Uno, Duemilanove, or Diecimila.
2.A USB cable to connect the Arduino to your computer.
3.The Arduino IDE (see Installing the Arduino IDE, on page 10). You will need it in every chapter, so after this chapter I’ll no longer mention it explicitly.
You’ll find photos such as this in most of the following chapters. The numbers in the photo correspond to the numbers in the parts list. In later chapters the photos do not show standard parts, such as the Arduino board or a USB cable.
What Exactly Is an Arduino?
Beginners often get confused when they discover the Arduino project. When looking for the Arduino, they hear and read strange names such as Uno, Duemilanove, Diecimila, LilyPad, or Seeeduino. The problem is that there is no such thing as “the Arduino.”
A couple of years ago, the Arduino team designed a microcontroller board and released it under an open-source license. You could buy fully assembled
report erratum • discuss

What Exactly Is an Arduino? • 5
boards in a few electronics shops, but people interested in electronics could also download its schematic1 and build it themselves.
Over the years, the Arduino team improved the board’s design and released several new versions. They usually had Italian names, such as Uno, Duemilanove, or Diecimila; you can find online a list of all boards ever created by the Arduino team.2
Here’s a small selection of Arduinos. They may differ in their appearance, but they have a lot in common, and you can program them all with the same tools and libraries.
Although they’re the same in principle, they differ in some details. The Arduino Due3 has many more IO pins than most of the other Arduinos and uses a powerful 32-bit ARM core microcontroller, while the Arduino Nano4 was designed to be used on a breadboard, so it doesn’t have any sockets. From my experience, beginners should start with one of the “standard” boards—that is, with an Uno, for example.
1.http://arduino.cc/en/uploads/Main/arduino-uno-schematic.pdf
2.See http://arduino.cc/en/Main/Boards and http://arduino.cc/en/Main/Products.
3.http://arduino.cc/en/Main/ArduinoBoardDue
4.http://arduino.cc/en/Main/ArduinoBoardNano
report erratum • discuss
Chapter 1. Welcome to the Arduino • 6
The Arduino team didn’t only constantly improve the hardware design, they also invented new designs for special purposes. For example, they created the Arduino LilyPad5 to embed a microcontroller board into textiles. You can use it to build interactive T-shirts.
In addition to the official boards, you can find countless Arduino clones on the Web. Everybody is allowed to use and change the original board design, and many people created their very own version of Arduino-compatible boards. Among many others, you can find the Freeduino, Seeeduino, Boarduino, and the amazing Paperduino,6 an Arduino clone without a printed circuit board. All of its parts are attached to an ordinary piece of paper.
Arduino is a registered trademark—only the official boards are named
“Arduino”—so clones usually have names ending with “duino.” You can use every clone that is fully compatible with the original Arduino to build all of the book’s projects.
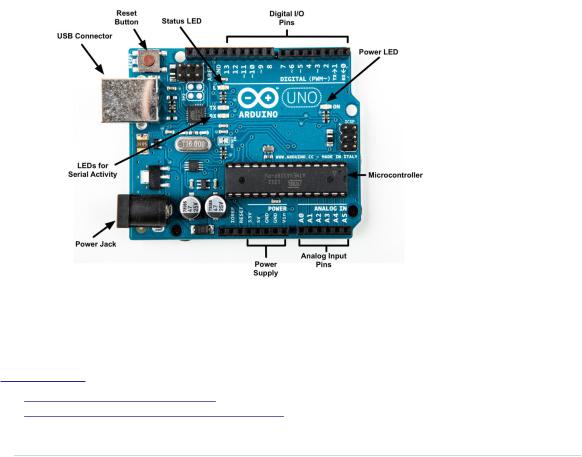
Exploring the Arduino Board
The photo shows an Arduino Uno board and its most important parts. I’ll explain them one by one. Let’s start with the USB connector. To connect an Arduino to your computer, you just need a USB cable. The type of the USB cable depends on the type of Arduino board you’re using. The Arduino Uno
5.http://arduino.cc/en/Main/ArduinoBoardLilyPad
6.http://lab.guilhermemartins.net/2009/05/06/paperduino-prints/
report erratum • discuss

Exploring the Arduino Board • 7
comes with the big standard-B plug, while other boards, such as the Arduino Leonardo or the Arduino Due, have the small micro-B plugs.
You can use the USB connection for various purposes:
•Upload new software to the board. (You’ll see how to do this in Compiling and Uploading Programs, on page 19.)
•Communicate with the Arduino board and your computer. (You’ll learn that in Using Serial Ports, on page 28.)
•Supply the Arduino board with power.
As an electronic device, the Arduino needs power. One way to power it is to connect it to a computer’s USB port, but that isn’t a good solution in some cases. Some projects don’t necessarily need a computer, and it would be overkill to use a whole computer just to power the Arduino. Also, the USB port delivers only 5 volts, and sometimes you need more.
In these situations, the best solution usually is an AC adapter supplying 9 volts. (The recommended range is 7V to 12V.)7 You need an adapter with a 2.1mm barrel tip and a positive center. (You don’t need to understand what that means; just ask for it in your
local electronics store.) Plug it into the Arduino’s power jack, and it
will start immediately, even if it
isn’t connected to a computer. By the way, even if you connect the Arduino to a USB port, it will use the external power supply if available.
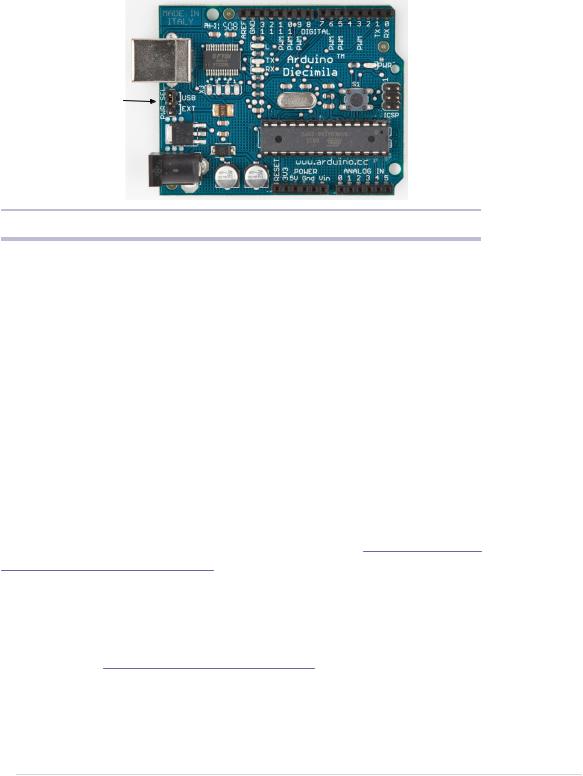
Please note that older versions of the Arduino board (Arduino NG and Diecimila) don’t switch automatically between an external power supply and a USB supply. They come with a power selection jumper labeled PWR_SEL, and you manually have to set it to EXT or USB, respectively. (See Figure 2, Older Arduinos have a power source selection jumper, on page 8.)
Now you know two ways to supply the Arduino with power. But the Arduino isn’t greedy and happily shares its power with other devices. At the bottom of the board shown in Exploring the Arduino Board, on page 6, you can see
7.http://www.arduino.cc/playground/Learning/WhatAdapter
report erratum • discuss
Chapter 1. Welcome to the Arduino • 8
Jumper
Figure 2—Older Arduinos have a power source selection jumper.
several sockets (sometimes I’ll also call them pins, because internally they
are connected to pins in the microcontroller) related to power supply:
•Using the pins labeled 3V3 and 5V, you can power external devices connected to the Arduino with 3.3 volts or 5 volts.
•Two ground pins labeled GND allow your external devices to share a common ground with the Arduino.
•Some projects need to be portable, so they’ll use a portable power supply, such as batteries. You connect an external power source, such as a battery pack, to the Vin and GND sockets.
If you connect an AC adapter to the Arduino’s power jack, you can access the adapter’s voltage through the Vin pin.
On the lower right of the board, you see six analog input pins named A0–A5. You can use them to connect analog sensors to the Arduino. They take sensor data and convert it into a number between 0 and 1023. In Chapter 5, Sensing the World Around Us, on page 77, we’ll use them to connect a temperature sensor to the Arduino.
At the board’s top are 14 digital IO pins named D0–D13. Depending on your needs, you can use these pins for both digital input and digital output, so you can read the state of a pushbutton or switch to turn on and off an LED. (We’ll do this in Working with Buttons, on page 48.) Six of them (D3, D5, D6, D9, D10, and D11) can also act as analog output pins. In this mode, they convert values from 0 to 255 into analog voltages.
report erratum • discuss
Exploring the Arduino Board • 9
 Analog and Digital Signals
Nearly all physical processes are analog. Whenever you observe a natural phenomenon, such as electricity or sound, you’re actually receiving an analog signal. One of the most important properties of these analog signals is that they are continuous. For every given point in time, you can measure the strength of the signal, and in principle you could register even the tiniest variation of the signal.
But although we live in an analog world, we are also living in the digital age. When the first computers were built a few decades ago, people quickly realized that it’s much easier to work with real-world information when it’s represented as numbers and not as an analog signal, such as voltage or volume. For example, it’s much easier to manipulate sounds using a computer when the sound waves are stored as a sequence of numbers. Every number in this sequence could represent the signal’s loudness at a certain point in time.
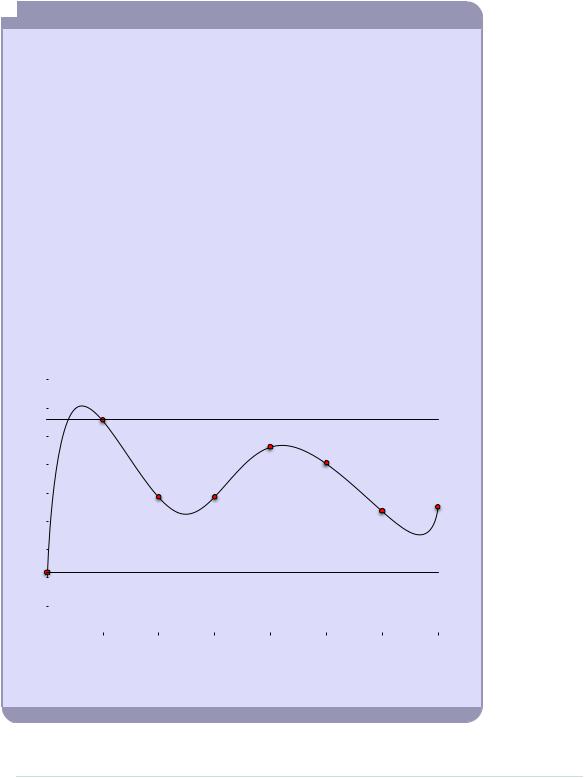
So instead of storing the complete analog signal (as is done on records), we measure the signal only at certain points in time (see the following figure). We call this process sampling, and the values we store are called samples. The frequency we use to determine new samples is called the sampling rate. For an audio CD, the sampling rate is 44.1 kHz: we gather 44,100 samples per second.
We also have to limit the samples to a certain range. On an audio CD, every sample uses 16 bits. In the following figure, the range is denoted by two dashed lines, and we had to cut off a peak at the beginning of the signal.
|
|
|
|
|
|
|
|
|
|
|
|
|
|
|
|
|
|
0 |
1 |
2 |
3 |
4 |
5 |
6 |
7 |
|
Although you can connect both analog and digital devices to the Arduino, you usually don’t have to think much about it. The Arduino automatically performs the conversion from analog to digital for you.
report erratum • discuss