


Chapter 5. Sensing the World Around Us • 84
With only three wires and a few lines of code, we have built a first version of a digital metering rule. At the moment, it outputs only centimeter distances in whole numbers, but we’ll increase its accuracy tremendously in the next section by changing our software and adding more hardware.
Increasing Precision Using Floating-Point Numbers
According to the specification, the PING))) sensor is accurate for objects that are between 2 centimeters and 3 meters away. (By the way, the reason for this is the length of the pulse that is generated. Its minimum length is 115 microseconds, and the maximum length is 18.5 milliseconds.) With our current approach, we don’t fully benefit from its precision because all calculations are performed using integer values. We can only measure distances with an accuracy of a centimeter. To enter the millimeter range, we have to use floating-point numbers.
Normally it’s a good idea to use integer operations, because compared to regular computers the Arduino’s memory and CPU capacities are severely limited and calculations containing floating-point numbers are often expensive. But sometimes it’s useful to enjoy the luxury of highly accurate floating-point numbers, and the Arduino supports them well. We’ll use them to improve our project now:
InputDevices/Ultrasonic/Float/Float.ino
Line 1 const unsigned int PING_SENSOR_IO_PIN = 7;
-const unsigned int BAUD_RATE = 9600;
-const float MICROSECONDS_PER_CM = 29.155;
-const float MOUNTING_GAP = 0.2;
5 |
const float SENSOR_OFFSET = MOUNTING_GAP * MICROSECONDS_PER_CM * 2; |
- |
|
-void setup() {
-Serial.begin(BAUD_RATE);
-}
10 void loop() {
-const unsigned long duration = measure_distance();
-if (duration == 0)
-Serial.println("Warning: We did not get a pulse from sensor.");
-else
15 |
output_distance(duration); |
- |
} |
- |
|
-const float microseconds_to_cm(const unsigned long microseconds) {
-const float net_distance = max(0, microseconds - SENSOR_OFFSET); 20 return net_distance / MICROSECONDS_PER_CM / 2;
-}
-
-
report erratum • discuss

Increasing Precision Using Floating-Point Numbers • 85
-const unsigned long measure_distance() { 25 pinMode(PING_SENSOR_IO_PIN, OUTPUT);
-digitalWrite(PING_SENSOR_IO_PIN, LOW);
-delayMicroseconds(2);
-digitalWrite(PING_SENSOR_IO_PIN, HIGH);
-delayMicroseconds(5);
30 |
digitalWrite(PING_SENSOR_IO_PIN, LOW); |
- |
pinMode(PING_SENSOR_IO_PIN, INPUT); |
- |
return pulseIn(PING_SENSOR_IO_PIN, HIGH); |
- |
} |
- |
|
35 |
void output_distance(const unsigned long duration) { |
-Serial.print("Distance to nearest object: ");
-Serial.print(microseconds_to_cm(duration));
-Serial.println(" cm");
-}
This program doesn’t differ much from our first version. First, we use the more accurate value 29.155 for the number of microseconds it takes sound to travel 1 centimeter. In addition, the distance calculation now takes a potential gap between the sensor and the case into account. If you plug the sensor into a breadboard, usually a small gap between the sensor and the breadboard’s edge exists. This gap is defined in line 5, and it will be used in the distance calculation later on. The gap is measured in centimeters, and it gets multiplied by two because the sound travels out and back.
The loop method looks much cleaner now, because the program’s main functionality has been moved to separate functions. The whole sensor control logic lives in the measure_distance method, and output_distance takes care of outputting values to the serial port. The big changes happened in the microseconds_to_cm function. It returns a float value now, and it subtracts the sensor gap from the measured duration. To make sure we don’t get negative values, we use the max function.
Compile and upload the program, and you should see something like the following in your serial monitor window:
Distance to nearest object: 17.26 cm
Distance to nearest object: 17.93 cm
Distance to nearest object: 17.79 cm
Distance to nearest object: 18.17 cm
Distance to nearest object: 18.65 cm
Distance to nearest object: 18.85 cm
This not only looks more accurate than our previous version, it actually is more accurate. If you have worked with floating-point numbers in any programming language before, you might ask yourself why the Arduino rounds
report erratum • discuss

Chapter 5. Sensing the World Around Us • 86
them automatically to two decimal digits. The secret lies in the print method of the Serial class. In recent versions of the Arduino platform, it works for all possible data types, and when it receives a float variable, it rounds it to two decimal digits before it gets output. You can specify the number of decimal digits. For example, Serial.println(3.141592, 4); prints 3.1416.
Only the output is affected by this; internally it is still a float variable. By the way, on most Arduinos, float and double values are the same at the moment. Only on the Arduino Due is double more accurate than float.
So, what does it actually cost to use float variables? Their memory consumption is 4 bytes—that is, they consume as much memory as long variables. On the other hand, floating-point calculations are fairly expensive and should be avoided in time-critical parts of your software. The biggest costs are the additional library functions that have to be linked to your program for float support. Serial.print(3.14) might look harmless, but it increases your program’s size tremendously.
Comment line 37 out and recompile the program to see the effect. It will no longer work properly, but we can see how this statement affects the program size. With my current setup, it needs 3,002 bytes without float support for
Serial.print and 5,070 bytes otherwise. That’s a difference of 2,068 bytes!
In some cases, you can still get the best of both worlds: float support without paying the memory tax. You can save a lot of space by converting the float values to integers before sending them over a serial connection. To transfer values with a precision of two digits, multiply them by 100, and don’t forget to divide them by 100 on the receiving side. We’ll use this trick (including rounding) later.
Increasing Precision Using a Temperature Sensor
Support for floating-point numbers is an improvement, but it mainly increases the precision of our program’s output. We could’ve achieved a similar effect using some integer math tricks. But now we’ll add an even better improvement that cannot be imitated using software: a temperature sensor.
When I told you that sound travels through air at 343 m/s, I wasn’t totally accurate, because the speed of sound isn’t constant—among other things, it depends on the air’s temperature. If you don’t take temperature into account, the error can grow up to a quite significant 12 percent. We calculate the actual speed of sound C with a simple formula:
C = 331.5 + (0.6 * t)
report erratum • discuss
Increasing Precision Using a Temperature Sensor • 87
To use it, we only have to determine the current temperature t in Celsius. We will use the TMP36 voltage output temperature sensor from Analog Devices.3
It’s cheap and easy to use.
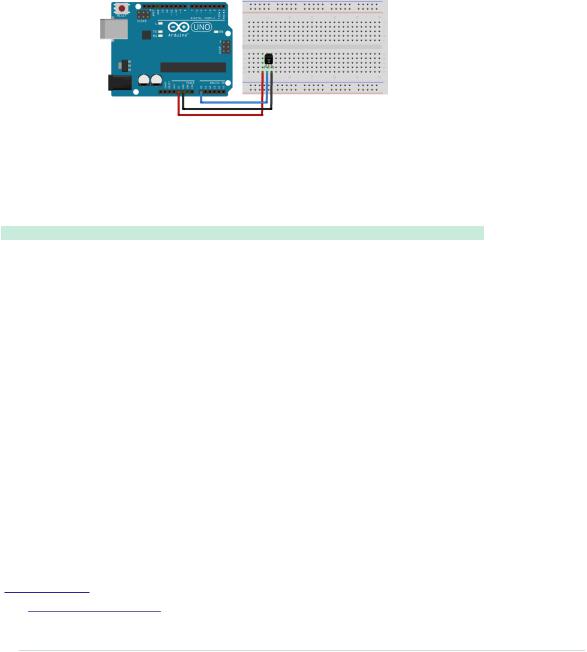
To connect the TMP36 to the Arduino, connect the Arduino’s ground and power to the corresponding pins of the TMP36. Then connect the sensor’s signal pin to the pin A0—that is, the analog pin number 0:
As you might’ve guessed from its vendor’s name, the TMP36 is an analog device: it changes the voltage on its signal pin corresponding to the current temperature. The higher the temperature, the higher the voltage. For us, it’s an excellent opportunity to learn how to use the Arduino’s analog IO pins. So, let’s see some code that uses the sensor:
InputDevices/Temperature/SensorTest/SensorTest.ino
Line 1 const unsigned int TEMP_SENSOR_PIN = A0;
-const float SUPPLY_VOLTAGE = 5.0;
-const unsigned int BAUD_RATE = 9600;
-
5 void setup() {
-Serial.begin(BAUD_RATE);
-}
-
- void loop() {
10 const float tempC = get_temperature();
-const float tempF = (tempC * 9.0 / 5.0) + 32.0;
-Serial.print(tempC);
-Serial.print(" C, ");
-Serial.print(tempF);
15 Serial.println(" F");
-delay(1000);
-}
-
- const float get_temperature() {
20 const int sensor_voltage = analogRead(TEMP_SENSOR_PIN);
-const float voltage = sensor_voltage * SUPPLY_VOLTAGE / 1024;
-return (voltage * 1000 - 500) / 10;
-}
3. http://tinyurl.com/msard-analog
report erratum • discuss

Chapter 5. Sensing the World Around Us • 88
In the first two lines, we define constants for the analog pin the sensor is connected to and for the Arduino’s supply voltage. Then we have a pretty normal setup method followed by a loop method that outputs the current temperature every second. The whole sensor logic has been encapsulated in the get_temperature method. It returns the temperature in degrees Celsius, and we convert it to a Fahrenheit value, too.
For the PING))) sensor, we only needed a digital pin that could be HIGH or LOW. Analog pins are different and represent a voltage ranging from 0V to the current power supply (usually 5V). We can read the Arduino’s analog pins using the analogRead method that returns a value between 0 and 1023, because analog pins have a resolution of 10 bits (1024 = 210). We use it in line 20 to read the current voltage supplied by the TMP36.
 How to Encode Sensor Data
Encoding sensor data is a problem that has to be solved often in Arduino projects, because all the nice data we collect usually has to be interpreted by applications running on regular computers.
When defining a data format, you have to take several things into account. Among others, the format shouldn’t waste the Arduino’s precious memory. In our case, we could’ve used XML for encoding the sensor data:
<sensor-data> <temperature>30.05</temperature> <distance>51.19</distance>
</sensor-data>
Obviously this isn’t a good choice, because now we’re wasting a multiple of the actual data’s memory for creating the file format’s structure. In addition, the receiving application has to use an XML parser to interpret the data.
But you shouldn’t go to the other extreme, either. That is, you should use binary formats only if absolutely necessary or if the receiving application expects binary data anyway.
All in all, the simplest data formats, such as character-separated values (CSV), are often the best choice.
There’s one problem left, though: we have to turn the value returned by analogRead into an actual voltage value, so we must know the Arduino’s current power supply. It usually is 5V, but there are Arduino models (such as the Arduino Pro, for example) that use only 3.3V. You have to adjust the constant
SUPPLY_VOLTAGE accordingly.
report erratum • discuss

Increasing Precision Using a Temperature Sensor • 89
We can turn the analog pin’s output into a voltage value by dividing it by 1024 and by multiplying it by the supply voltage, which we do in line 21.
We now have to convert the voltage the sensor delivers into degrees Celsius. In the sensor’s data sheet, we find the following formula:
T = ((sensor output in mV) - 500) / 10
We have to subtract 500 millivolts because the sensor always outputs a positive voltage. This way, we can represent negative temperatures, too. The sensor’s resolution is 10 millivolts, so we have to divide by 10. A voltage value of 750 millivolts corresponds to a temperature of (750 - 500) / 10 = 25°C. See it implemented in line 22.
Compile the program, upload it to the Arduino, and you’ll see something like the following in your serial monitor:
20.80 C, 69.44 F
20.80 C, 69.44 F
20.31 C, 68.56 F
20.80 C, 69.44 F
20.80 C, 69.44 F
As you can see, the sensor needs some time to calibrate, but its results get stable fairly quickly. By the way, you’ll always need to insert a short delay between two calls to analogRead, because the Arduino’s internal analog system needs some time (0.0001 seconds on the Uno) between two readings. We use a delay of a whole second to make the output easier to read and because we don’t expect the temperature to change rapidly. Otherwise, a delay of a single millisecond would be enough.
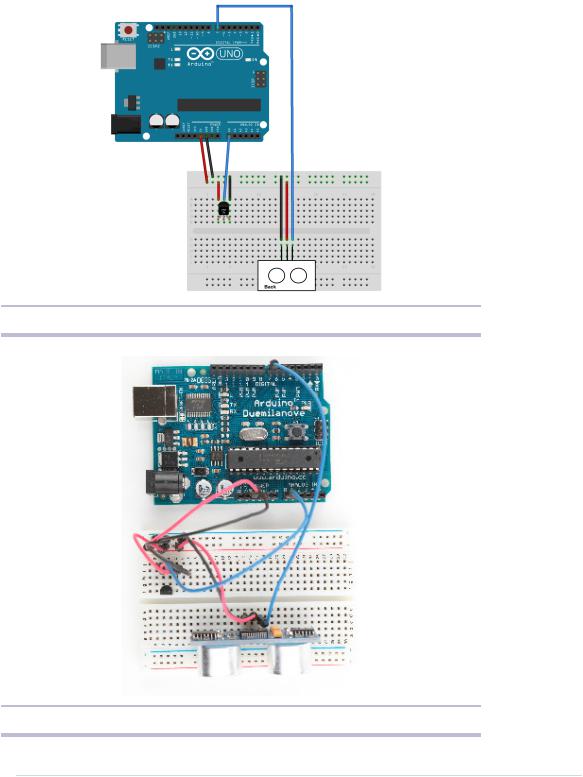
Now we have two separate circuits: one for measuring distances and one for measuring temperatures. See them combined to a single circuit in Figure 17,
The TMP36 and the PING))) sensors working together, on page 90 and Figure 18, Photo of final circuit, on page 90.
Use the following program to bring the circuit to life:
InputDevices/Ultrasonic/PreciseSensor/PreciseSensor.ino
Line 1 const unsigned int TEMP_SENSOR_PIN = A0;
-const float SUPPLY_VOLTAGE = 5.0;
-const unsigned int PING_SENSOR_IO_PIN = 7;
-const float SENSOR_GAP = 0.2;
5 const unsigned int BAUD_RATE = 9600;
-float current_temperature = 0.0;
-unsigned long last_measurement = millis();
-
-
report erratum • discuss
Chapter 5. Sensing the World Around Us • 90
Figure 17—The TMP36 and the PING))) sensors working together
Figure 18—Photo of final circuit
report erratum • discuss

Increasing Precision Using a Temperature Sensor • 91
10 void setup() {
-Serial.begin(BAUD_RATE);
-}
- |
|
- |
void loop() { |
15 |
unsigned long current_millis = millis(); |
- |
if (abs(current_millis - last_measurement) >= 1000) { |
- |
current_temperature = get_temperature(); |
- |
last_measurement = current_millis; |
- |
} |
20 |
Serial.print(scaled_value(current_temperature)); |
-Serial.print(",");
-const unsigned long duration = measure_distance();
-Serial.println(scaled_value(microseconds_to_cm(duration)));
-}
25
-long scaled_value(const float value) {
-float round_offset = value < 0 ? -0.5 : 0.5;
-return (long)(value * 100 + round_offset);
-}
30
-const float get_temperature() {
-const int sensor_voltage = analogRead(TEMP_SENSOR_PIN);
-const float voltage = sensor_voltage * SUPPLY_VOLTAGE / 1024;
-return (voltage * 1000 - 500) / 10;
35 |
} |
- |
|
-const float microseconds_per_cm() {
-return 1 / ((331.5 + (0.6 * current_temperature)) / 10000);
-}
40
-const float sensor_offset() {
-return SENSOR_GAP * microseconds_per_cm() * 2;
-}
-
45 const float microseconds_to_cm(const unsigned long microseconds) {
-const float net_distance = max(0, microseconds - sensor_offset());
-return net_distance / microseconds_per_cm() / 2;
-}
-
50 const unsigned long measure_distance() {
-pinMode(PING_SENSOR_IO_PIN, OUTPUT);
-digitalWrite(PING_SENSOR_IO_PIN, LOW);
-delayMicroseconds(2);
-digitalWrite(PING_SENSOR_IO_PIN, HIGH);
55
-digitalWrite(PING_SENSOR_IO_PIN, LOW);
-pinMode(PING_SENSOR_IO_PIN, INPUT);
-return pulseIn(PING_SENSOR_IO_PIN, HIGH);
-}
report erratum • discuss