


Bringing It All Together • 197
Bringing It All Together
With our PassiveInfraredSensor and SmtpService classes, it’s a piece of cake to build a burglar alarm with email notifications. Connect the PIR sensor to the Ethernet shield, as shown in the following figure.
Then enter the following code in your Arduino IDE:
Ethernet/BurglarAlarm/burglar_alarm.h
Line 1 #ifndef __BURGLAR_ALARM_H__
-#define __BURGLAR_ALARM_H__
-#include "pir_sensor.h"
-#include "smtp_service.h"
5
-class BurglarAlarm {
-PassiveInfraredSensor _pir_sensor;
- |
SmtpService |
_smtp_service; |
-void send_alarm() { 10 Email email(
-"arduino@example.com",
-"info@example.net",
-"Intruder Alert!",
-"Someone's moving in your living room!"
15 );
-_smtp_service.send_email(email);
-}
-
-public:
20 BurglarAlarm(
-const PassiveInfraredSensor& pir_sensor,
- |
const SmtpService& |
smtp_service) : |
-_pir_sensor(pir_sensor),
-_smtp_service(smtp_service)
25 {
-}
-
-
report erratum • discuss

Chapter 11. Creating a Burglar Alarm with Email Notification • 198
-void check() {
30 Serial.println("Checking");
-if (_pir_sensor.motion_detected()) {
-Serial.println("Intruder detected!");
-send_alarm();
-}
35 }
-};
-#endif
This defines a class named BurglarAlarm that aggregates all the code we’ve written so far. It encapsulates a SmtpService instance and a PassiveInfraredSensor object. Its most complex method is send_alarm, which sends a predefined email.
The rest of the BurglarAlarm class is pretty straightforward. Beginning on line 20, we define the constructor that initializes all private members. If the PIR sensor detects movement, the check method sends an email.
Let’s use the BurglarAlarm class:
Ethernet/BurglarAlarm/BurglarAlarm.ino
#include <SPI.h> #include <Ethernet.h>
#include "burglar_alarm.h"
const unsigned int PIR_INPUT_PIN = 2;
const unsigned int SMTP_PORT |
= 25; |
||
const unsigned int BAUD_RATE |
= 9600; |
||
const String |
USERNAME |
= "bm90bXl1c2VybmFtZQ=="; // Encoded in Base64. |
|
const String |
PASSWORD |
= "bm90bXlwYXNzd29yZA=="; // Encoded in Base64. |
|
byte mac[] = { 0xDE, |
0xAD, 0xBE, 0xEF, 0xFE, 0xED }; |
||
IPAddress my_ip(192, |
168, 2, |
120); |
|
// Insert IP address |
of your |
SMTP server below! |
|
IPAddress smtp_server(0, 0, 0, 0);
PassiveInfraredSensor pir_sensor(PIR_INPUT_PIN);
SmtpService |
smtp_service(smtp_server, |
SMTP_PORT, USERNAME, PASSWORD); |
BurglarAlarm |
burglar_alarm(pir_sensor, |
smtp_service); |
void setup() { Ethernet.begin(mac, my_ip); Serial.begin(BAUD_RATE); delay(20 * 1000);
}
void loop() { burglar_alarm.check(); delay(3000);
}
report erratum • discuss
Bringing It All Together • 199
First we include all of the libraries we need, and we define constants for the PIR sensor pin and our MAC address. Then we define SmtpService and PassiveInfraredSensor objects and use them to define a BurglarAlarm instance. Note that we pass a username and a password, implying that we’re using an authenticated SMTP connection to send our emails. If you use an unauthenticated connection, you can safely remove the USERNAME and PASSWORD parameters and all of their occurrences.
In the setup method, we define the serial port and the Ethernet shield. I’ve also added a delay of twenty seconds, which gives you enough time to leave the room before the alarm begins to work.
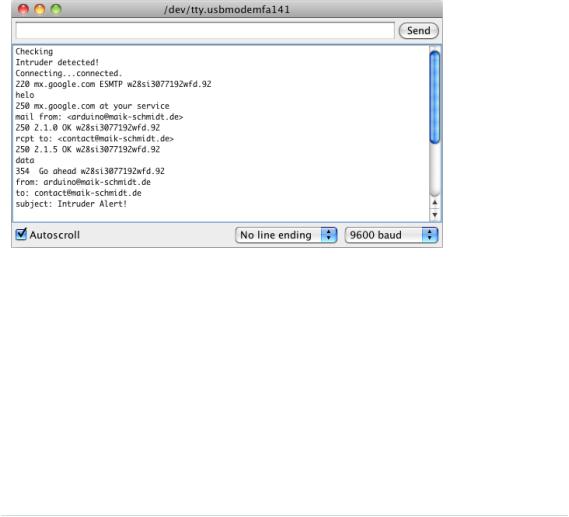
The loop function is simple, too. It delegates all the work to BurglarAlarm’s check method. In the following figure, you can see what happens when the burglar alarm detects an intruder.
Did you notice how easy object-oriented programming on an embedded device can be? We’ve cleanly hidden in two small classes the complexity of both email and the PIR sensor. To build the burglar alarm, we then only had to write some glue code.
One word regarding privacy: do not abuse the project in this chapter to observe other people without their knowledge. Not only is it unethical, but in many countries it’s even illegal!
In this and the preceding chapter, you learned different ways to connect the Arduino to the Internet. Some of them require an additional PC, while others need an Ethernet shield, but they all open the door to a whole new range of embedded computing applications.
report erratum • discuss

Chapter 11. Creating a Burglar Alarm with Email Notification • 200
Networking is one of those techniques that may have a direct impact on the outside world. In the next chapter, you’ll learn about another technique that has similar effects: you’ll learn how to control devices remotely.
What If It Doesn’t Work?
The burglar alarm is a networking project, so you should check all the things mentioned in What If It Doesn’t Work?, on page 180. In addition, you should double-check the connection parameters and authentication information for your email provider. Did you use the correct IP address for your email provider? Did you use the right SMTP port? Did you use the right username and password? Did you use the right Base64 version of the username and password?
PIR sensors are fairly simple devices. Still, you can wire them the wrong way, so if the motion detection doesn’t work, double-check the wiring.
Exercises
•Build a project similar to the burglar alarm, but use another type of sensor. There’s tons of inspiration out there on the Web.9
•Add the current timestamp to the burglar alarm email. Get the timestamp from a Daytime service.
•Add support for DHCP and DNS to the burglar alarm.
•Add support for Base64 to the burglar alarm, so you no longer have to manually encode your username and password. A Base64 library is available.10
•Add a piezo buzzer to the project and emit a beeping sound whenever a burglar is detected.
•Get a TTL Serial Camera11 and attach photos of the burglar to your emails. This is a fairly advanced exercise. You have to learn how to control the camera, and you also have to learn how to send email attachments.
9.http://www.tigoe.net/pcomp/code/arduinowiring/873
10.https://github.com/adamvr/arduino-base64
11.https://learn.adafruit.com/ttl-serial-camera/overview
report erratum • discuss

CHAPTER 12
Creating Your Own Universal Remote
Control
Remote controls add a lot of convenience to our lives, but they aren’t without annoyances. Sometimes remotes don’t have a certain function that you’d like, such as a sleep timer. Plus, remote controls seem to reproduce at the same rate as rabbits. They quickly occupy your whole coffee table, and you have to feed them with expensive batteries that you don’t have at home when you need them during a football game. Universal remote controls reduce the pain, but even the most expensive products aren’t perfect.
Although we use remote controls every day, few of us understand how they work. In this chapter, you’ll find out how remote controls work from the inside out, and then you’ll build your own universal remote control that’s better than a store-bought one because you can fully customize it to your needs. You can easily add all of your favorite functions, and you can add functions that other remotes don’t offer. If a commercial product doesn’t support a certain vendor, you’re usually stuck. With your own remote, you can easily add new protocols. You can even support not only infrared, but also more transmission technologies, such as Bluetooth or Wi-Fi.
We get started by learning the basics of infrared signaling. You’ll build an infrared circuit to grab control codes from any remote you have on hand. Once you grab the control codes, you can emit them using an infrared LED, and you’ll start to build your own universal remote control.
Then we’ll even take the idea of a remote control a step further. Once we have a universal remote, we’ll control the Arduino itself using the serial port or an Ethernet connection. This way, you can control the Arduino using a web browser, so you can control your TV set or DVD player using a web browser.
report erratum • discuss