


CHAPTER 11
Creating a Burglar Alarm with Email Notification
In the preceding chapter, you learned how to access networking services with the Arduino in various ways. Adding networking capabilities to an Arduino enables you to create countless useful projects. In this chapter, you’ll use your newly gained knowledge to build a real-world project: a burglar alarm that uses email notification.
The burglar alarm will send you an email whenever it detects movement in your living room during your absence. To achieve this, you first have to learn how to send emails. You already know a lot about networking with an Arduino, so this won’t be too difficult.
You also need to know how to detect motion. So you’ll also learn how passive infrared (PIR) sensors work and how you can control them with an Arduino.
At the end of the chapter, not only will you have learned some useful skills, but you’ll also feel much safer when the burglar alarm is running.
report erratum • discuss
Chapter 11. Creating a Burglar Alarm with Email Notification • 184
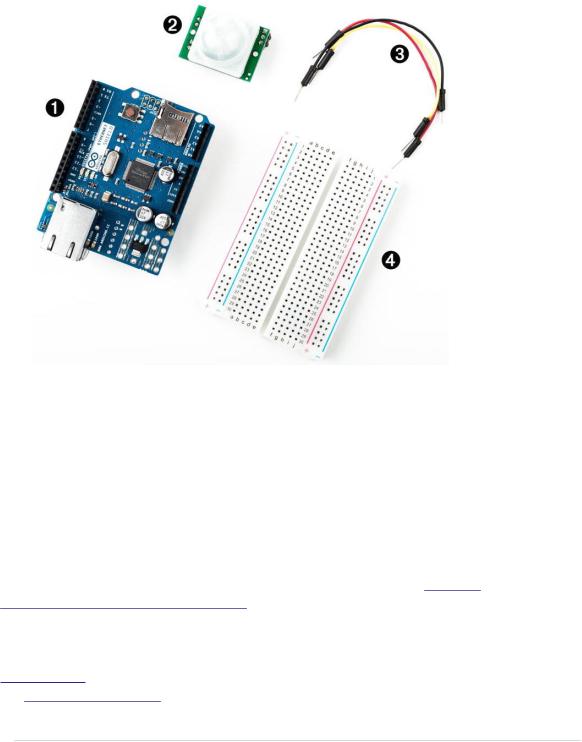
What You Need
1.An Ethernet shield for the Arduino
2.A PIR motion sensor
3.Some wires
4.A breadboard
5.An Arduino board, such as the Uno, Duemilanove, or Diecimila
6.A USB cable to connect the Arduino to your computer
Emailing from the Command Line
Although email is an important service, only a few people know how it actually works behind the scenes. To send emails from an Arduino, we could choose the easy path and use a PC as an email relay, as we did in Tweeting Messages with Processing, on page 168, to Tweet messages. As real hackers, we’ll follow a more sophisticated path and implement a subset of the Simple Mail Transfer Protocol (SMTP).1
1.http://en.wikipedia.org/wiki/Smtp
report erratum • discuss
Emailing from the Command Line • 185
SMTP is a typical Internet protocol. It uses only text, and it is mainly linebased; that is, you exchange information line by line. A typical email consists of only a few attributes: a sender, a receiver, a subject, and a message body. To transmit an email, you have to send a request to an SMTP server. The request has to adhere to the SMTP specification.
Before we send an email using an Arduino and an Ethernet shield, you should learn how to send an email from a command line using the telnet command. To do so, you have to find an SMTP server that actually allows you to send emails. This isn’t as easy as it sounds.
The biggest problem is that over the years, SMTP servers got very good at detecting spam messages. Often you can’t send an email manually using a telnet session because the SMTP server thinks it’s spam. Usually, the SMTP server will accept your commands, but eventually it will tell you that it won’t send your email.
Also, many SMTP servers today insist on encrypted connections, which is a good thing. Implementing the cryptographic algorithms on an Arduino is quite difficult and uses a lot of resources.
So, even with your email provider’s SMTP server, you might run into big problems when you try to use it for sending emails from your Arduino.
To overcome such issues, you can use a special SMTP service, such as SMTP2GO.2 Most of these services support unencrypted connections and do not restrict access in any way. Of course, you have to pay for the service if the number of emails you send exceeds a certain limit. Most services offer a free account that allows you to send a few emails per day or per month. As of this writing, SMTP2GO allows you to send twenty emails per day for free. If your burglar alarm sends more than twenty emails per day, you should consider moving to a new neighborhood anyway.
To follow this chapter’s email examples, I strongly suggest you register an account at a free SMTP service, such as SMTP2GO. If you have access to an unrestricted SMTP server already, you can use that one, of course.
The following telnet session shows you how to send an email using SMTP2GO:
maik> telnet smtpcorp.com 2525
Trying 207.58.147.66...
Connected to smtpcorp.com. Escape character is '^]'.
220 smtpcorp.com ESMTP Exim 4.80 Sun, 01 Jun 2014 18:22:28 +0000
2.http://www.smtp2go.com/
report erratum • discuss

Chapter 11. Creating a Burglar Alarm with Email Notification • 186
EHLO
250-smtpcorp.com Hello dslb-088-077-003-169.pools.example.net [88.77.3.169] 250-SIZE 52428800
250-8BITMIME
250-PIPELINING
250-AUTH CRAM-MD5 PLAIN LOGIN
250-STARTTLS
250 HELP
AUTH LOGIN
334 VXNlcm5hbWU6 bm90bXl1c2VybmFtZQ==
334 UGFzc3dvcmQ6 bm90bXlwYXNzd29yZA==
235 Authentication succeeded
MAIL FROM:<arduino@example.com>
250 OK
RCPT TO:<info@example.com>
250 Accepted <info@example.com>
DATA
354 Enter message, ending with "." on a line by itself from:arduino@example.com
to:info@example.com subject:This is a test
Really, it is a test!
.
250 OK id=1WrAQ9-4gfLuZ-5U
QUIT
221 smtpcorp.com closing connection Connection closed by foreign host.
Although it’s more complex, this session is similar to our Daytime example. We only send more complex commands. (By the way, you don’t have to write the commands in uppercase.) Please note that we’re connecting to port 2525, which is not the standard SMTP port (25). Check your SMTP service provider’s website to see what port you have to use.
We start the session using EHLO. We use the EHLO command to tell the SMTP server that we’d like to use a slightly extended version of SMTP that supports authentication.
After that, we send the AUTH LOGIN command to tell the SMTP server that we’d like to send our username and password. The SMTP server sends back the string VXNlcm5hbWU6. It looks a bit weird at first, but it’s only the string
“Username:” encoded using Base64.3
3.http://en.wikipedia.org/wiki/Base64 At http://www.freeformatter.com/base64-encoder.html, you can convert text into Base64 strings.
report erratum • discuss

Emailing from the Command Line • 187
We send our username and encode it using Base64, too. The SMTP server’s reply is UGFzc3dvcmQ6 (“Password:”), so we send our password (encoded using Base64).
Note that although Base64 data looks cryptic, it’s not encrypted at all. It’s as insecure as plain text, and there are software developers who can read Base64 data as quickly as regular text. You can find countless Base64 converters on the Web, and there’s a Base64 library for nearly every programming language.
After the authentication succeeds, we tell the server that we’d like to send an email using MAIL FROM:. The email address we provide with this command will be used by the server in case our email bounces back. Note that the server sends back a response line for every request. These responses always start with a three-digit status code.
The RCPT TO: command sets the recipient’s email address. If you’d like to send an email to more than one recipient, you have to repeat the command for each of them.
With the DATA command, we tell the server that we now start to transmit the email’s attributes. Email attributes are mainly a list of key/value pairs where key and value are delimited by a colon. So in the first three lines, we set the attributes “from,” “to,” and “subject,” and they all have the meaning you’d expect when sending an email.
You separate the email’s body from the attributes using a blank line. To mark the end of the email body, send a line containing a single period. Send the
QUIT command to end the session with the SMTP server.
You should find a new email in your inbox or in your spam folder. If not, try another SMTP server first. Things can still go wrong, and although simple in theory, SMTP can be a complex beast in practice. SMTP servers often return helpful error messages that might help you quickly solve your problem.
If you want to give your current SMTP server a try, you have to find out its address first. Open a terminal and enter the following:
maik> nslookup
>set type=mx
>gmail.com
Server: 192.168.2.1 Address: 192.168.2.1#53 Non-authoritative answer:
gmail.com mail exchanger = 5 gmail-smtp-in.l.google.com. gmail.com mail exchanger = 10 alt1.gmail-smtp-in.l.google.com. gmail.com mail exchanger = 20 alt2.gmail-smtp-in.
> exit
report erratum • discuss

Chapter 11. Creating a Burglar Alarm with Email Notification • 188
This command returns a list of all mail exchange servers (MX) that belong to the domain gmail.com (replace it with the domain of your email provider) and that are available on your network. In this case they all belong to Google Mail, and you cannot use them to send emails from your Arduino, because Google Mail insists on an encrypted connection.
Provided your email provider is less restrictive, you can try to send an email using no authentication and no encryption at all. Open a connection to the SMTP standard port 25 and replace the server name smtp.example.com and all email addresses accordingly in the following telnet session:
maik> telnet smtp.example.com 25
Trying 93.184.216.119...
Connected to smtp.example.com. Escape character is '^]'.
220 mx.example.com ESMTP q43si10820020eeh.100
HELO
250 mx.example.com at your service
MAIL FROM: <arduino@example.com>
250 2.1.0 OK q43si10820020eeh.100
RCPT TO: <info@example.com>
250 2.1.5 OK q43si10820020eeh.100
DATA
354 Go ahead q43si10820020eeh.100 from: arduino@example.com
to: info@example.com subject: This is a test
Really, this is a test!
.
250 2.0.0 OK 1286819789 q43si10820020eeh.100
QUIT
221 2.0.0 closing connection q43si10820020eeh.100 Connection closed by foreign host.
Here we send the HELO command (the spelling is correct) to establish a session with the SMTP server that doesn’t need authentication information. The rest of the conversation looks exactly like our previous example.
Sometimes you have to try a few things before you’re able to send an email from your command line. Don’t proceed until you succeed, because sending email from your command line is the basis for the next section, in which you’ll learn how to send emails with an Arduino.
report erratum • discuss