


Detecting Motion Using a Passive Infrared Sensor • 193
-
-// Insert IP address of your SMTP server below!
-IPAddress smtp_server(0, 0, 0, 0);
15
- SmtpService smtp_service(smtp_server, SMTP_PORT, USERNAME, PASSWORD);
-
-void setup() {
-Ethernet.begin(mac, my_ip);
20 Serial.begin(BAUD_RATE);
-delay(1000);
-Email email(
-"arduino@example.com",
-"info@example.net",
25 "Yet another subject",
-"Yet another body"
-);
-smtp_service.send_email(email);
-}
30
- void loop() {}
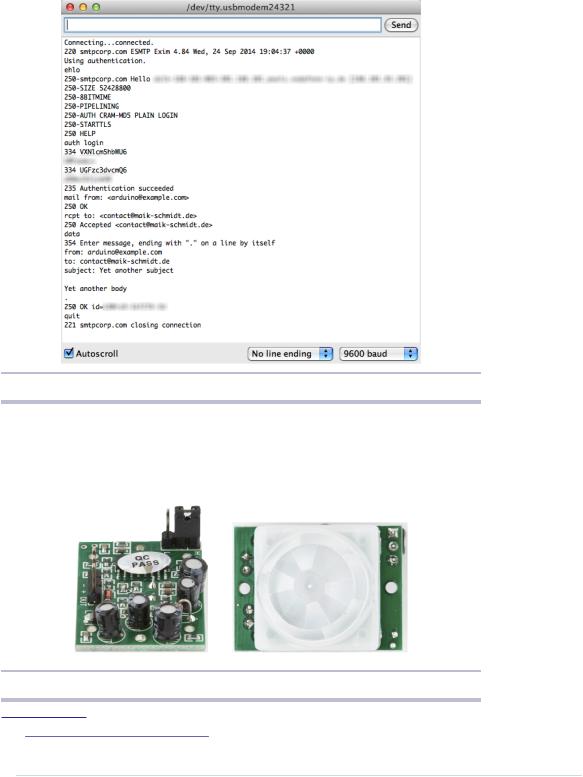
No surprises here. We define constants for the SMTP port, the MAC address, the username, the password, and so on; then we create an SmtpService instance. In the setup function, we initialize the Ethernet shield and the serial port, then wait for a second to let things settle down. In line 22, we create a new Email object and pass it to the send_email method.
Figure 28, A typical SMTP session on the Arduino, on page 194 shows this in action (including authentication).
Now we know how to send emails with an Arduino, but to build our burglar alarm, we still have to learn how to detect motion.
Detecting Motion Using a Passive Infrared Sensor
Detecting motion is a useful technique, and you probably already know devices that turn on the light in your garden or at your door whenever someone is near enough. Most use passive infrared sensors (PIR)5 for motion detection.
Nearly every object emits infrared light and a PIR sensor measures exactly this kind of light. Detecting motion is comparatively easy if you’re already able to receive the infrared radiation emitted by objects in the sensor’s field of view. If the sensor receives the infrared light emitted by a wall and suddenly a human being or an animal moves in front of the wall, the infrared light signal will change.
5.http://en.wikipedia.org/wiki/Passive_infrared_sensor
report erratum • discuss
Chapter 11. Creating a Burglar Alarm with Email Notification • 194
Figure 28—A typical SMTP session on the Arduino
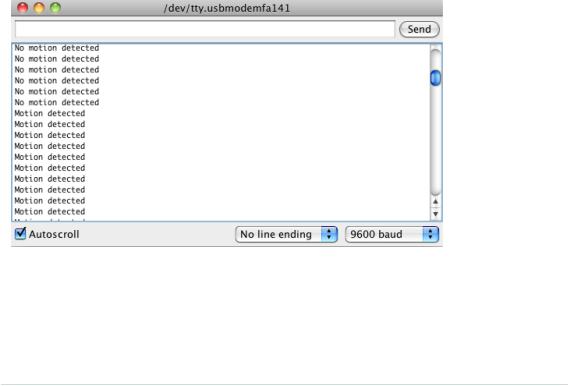
Off-the-shelf sensors hide these details, so you can use a single digital pin to check whether someone is moving in the sensor’s field of view. The Parallax PIR sensor6 is a good example of such a device, and we can use it as the basis of our burglar alarm.
Figure 29—Top and bottom of a passive infrared sensor
6.http://www.parallax.com/product/555-28027
report erratum • discuss
Detecting Motion Using a Passive Infrared Sensor • 195
The PIR sensor has three pins: power, ground, and signal. Connect power to the Arduino’s 5V supply, ground to one of the Arduino’s GND pins, and signal to digital pin 2. In the following figure, you see a circuit diagram that connects a PIR sensor from Adafruit7 to an Arduino. Note that PIR sensors from different vendors often differ in the order of their connectors. The PIR sensor in Figure 29, Top and bottom of a passive infrared sensor, is different, so you should always make sure you connect the correct pins.
|
The PIR sensor usually also has a jumper that you can use for changing its |
|
behavior. For our project, it has to be in position H; the jumper has to cover |
|
the pin next to the H. (Lady Ada has an excellent tutorial on PIR sensors.)8 |
|
Then enter the following code in the Arduino IDE: |
|
Ethernet/MotionDetector/MotionDetector.ino |
Line 1 |
const unsigned int PIR_INPUT_PIN = 2; |
- |
const unsigned int BAUD_RATE = 9600; |
- |
|
- |
class PassiveInfraredSensor { |
5int _input_pin;
-
-public:
-PassiveInfraredSensor(const int input_pin) {
-_input_pin = input_pin;
10 pinMode(_input_pin, INPUT);
-}
-const bool motion_detected() const {
-return digitalRead(_input_pin) == HIGH;
-}
15 |
}; |
- |
|
- |
PassiveInfraredSensor pir(PIR_INPUT_PIN); |
- |
|
- |
void setup() { |
20 |
Serial.begin(BAUD_RATE); |
-}
7.http://www.adafruit.com/products/189
8.https://learn.adafruit.com/pir-passive-infrared-proximity-motion-sensor
report erratum • discuss
Chapter 11. Creating a Burglar Alarm with Email Notification • 196
-
-void loop() {
-if (pir.motion_detected()) {
25 Serial.println("Motion detected");
-} else {
-Serial.println("No motion detected");
-}
-delay(200);
30 }
With the constant PIR_INPUT_PIN, you can define the digital pin you’ve connected your PIR sensor to. In line 4, we begin the definition of a class named PassiveInfraredSensor that encapsulates all things related to PIR sensors.
We define a member variable named _input_pin that stores the number of the digital pin we’ve connected our sensor to. Then we define a constructor that expects the pin number as an argument and assigns it to our member variable.
The only method we need to define is motion_detected. It returns true if it has currently detected a motion and false otherwise. So, it has to check only whether the current state of the sensor’s digital pin is HIGH or LOW.
Compile the sketch and upload it to your Arduino. You should see an output similar to the following screenshot when you start to wave your hand in front of the sensor.
Now we’ve built the two main components of our burglar alarm, and the only thing left to do is to bring them both together. We’ll do that in the next section.
report erratum • discuss