

CHAPTER 7
Writing a Game for the Motion-Sensing Game Controller
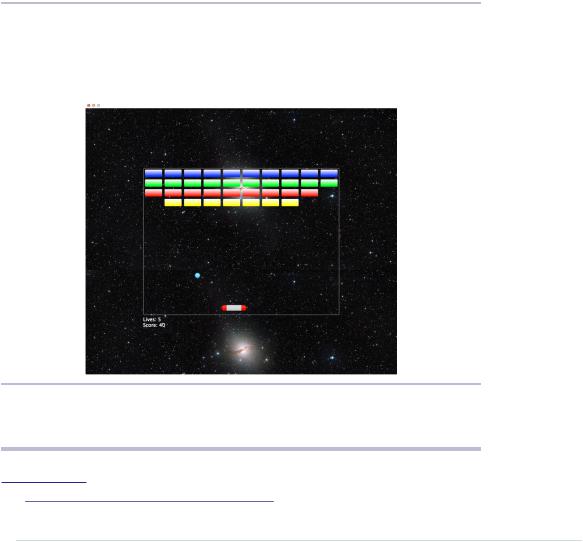
To test our game controller, we’ll program a simple Breakout1 clone in JavaScript. The player’s goal is to destroy all bricks in the upper half of the screen using a ball. It’ll look something like the following figure.
Figure 21—Our Breakout clone
Background image credit: ESA/Hubble, NASA, Digitized SkySurvey, MPG/ESO. Acknowledgment: Davide de Martin
1.http://en.wikipedia.org/wiki/Breakout_%28arcade_game%29
report erratum • discuss

Chapter 7. Writing a Game for the Motion-Sensing Game Controller • 112
To control the ball with the paddle at the bottom of the screen, you can tilt the controller around the x-axis to move the paddle horizontally. The game runs in a web browser, and it communicates with the Arduino via a serial port. It reads the game controller’s state several times per second to determine the controller’s current x-axis position.
Although this isn’t a book about game programming, it won’t hurt to take a look at the game’s innards, especially because game programming with JavaScript is really pure fun! Also, JavaScript is very popular. It’s available on nearly every computer, because all modern web browsers come with JavaScript interpreters.
We’ll implement the game as a Google Chrome app, so make sure you’ve read Appendix 4, Controlling the Arduino with a Browser, on page 267. The Chrome app implements the game’s logic, and it talks to our game controller via serial port. It reads the current controller state and turns it into movements of our paddle on the screen.
Writing a GameController Class
With the SerialDevice class from Writing a SerialDevice Class, on page 274, it’s easy to create a GameController class that provides even more convenient access to our motion-sensing Arduino. Here’s its constructor function:
BrowserGame/GameController/js/game_controller.js
var GameController = function(path, threshold) { this.arduino = new SerialDevice(path); this.threshold = threshold || 325; this.moveLeft = false;
this.moveRight = false; this.buttonPressed = false;
this.boundOnReadLine = this.onReadLine.bind(this); this.arduino.onReadLine.addListener(this.boundOnReadLine); this.arduino.connect();
}
This function defines several properties. First, it creates a property named arduino and initializes it with a new SerialDevice object. The next property defines a threshold for the game controller’s x-axis. To check whether a user has tilted the game controller to the left or to the right, we need to know the controller’s resting point. Instead of looking for the exact resting point, we’ll add some tolerance, and that’s the value we’ll store in threshold.
The following three properties are all Boolean flags representing the controller’s current state. If moveLeft is true, the user has moved the controller to the left.
report erratum • discuss
Writing a GameController Class • 113
Eventually, we add our own onReadLine listener to the SerialDevice object and use our usual bind trick.
The onReadLine listener interprets the data we get from the Arduino:
BrowserGame/GameController/js/game_controller.js
GameController.prototype.onReadLine = function(line) { const TOLERANCE = 5;
var attr = line.trim().split(' '); if (attr.length == 4) {
this.moveRight = false; this.moveLeft = false; var x = parseInt(attr[0]);
if (x <= this.threshold - TOLERANCE) { this.moveLeft = true;
}else if (x >= this.threshold + TOLERANCE) { this.moveRight = true;
}
this.buttonPressed = (attr[3] == '1');
}
var message = 'moveLeft(' + this.moveLeft + '), ' + 'moveRight (' + this.moveRight + '), ' + 'buttonPressed(' + this.buttonPressed + ')';
console.log(message); document.getElementById('output').innerText = message;
}
The method splits the line it receives at each blank character. Then it makes sure that the line contains exactly four attributes. If yes, it checks whether the current X position is to the left or to the right of the controller’s tipping point. Note that we use the threshold value here to make the movement detection smoother.
Finally, the method checks whether the controller’s button is currently pressed. Also, it writes the controller’s current state to the console.
By the way, if you’d like to control the game using a Nunchuk later on (see Chapter 9, Tinkering with the Wii Nunchuk, on page 145), you only have to adjust the GameController class.
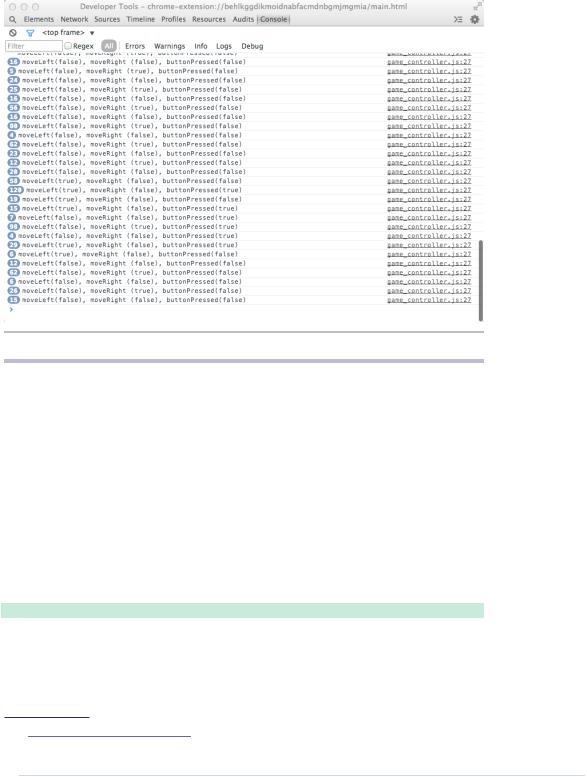
In Figure 22, The game controller communicates with a Chrome app, on page 114, you can see the output of a sample Chrome app that outputs the game controller’s state to the JavaScript console.
We can now conveniently combine Chrome apps with our motion-sensing controller. In the next section, you’ll learn how to create a more advanced application using these techniques.
report erratum • discuss
Chapter 7. Writing a Game for the Motion-Sensing Game Controller • 114
Figure 22—The game controller communicates with a Chrome app.
Creating the Game
At this point you know enough about Chrome apps and controlling a motionsensing game controller to create an entertaining video game. Writing a video game isn’t directly related to programming the Arduino. Still, it’ll show you some techniques you can use in other projects, and it’ll give you a much better understanding of how the integration of hardware and software works.
Before you dive into the code, download it from the book’s website2 and play the game. Doing so will help you find your way through the code much easier.
When programming a browser game, you usually start with its HTML code. In our case it looks like this:
BrowserGame/Arduinoid/main.html
<!DOCTYPE html>
<html lang="en">
<head>
<meta charset="utf-8"/>
<link rel="stylesheet" type="text/css" href="css/arduinoid.css"/> <title>Arduinoid</title>
2.http://www.pragprog.com/titles/msard2
report erratum • discuss

Creating the Game • 115
</head>
<body>
<div id="game">
<div id="playfield"> <div id="paddle"></div> <div id="ball"></div>
<div id="winner" class="message"> <p>You win!</p>
</div>
<div id="game_over" class="message"> <p>Game Over</p>
</div>
</div>
<div id="stats">
<div>Lives: <span id="lives"/></div> <div>Score: <span id="score"/></div>
</div>
</div>
<audio src="sound/awake10_megaWall.mp3" autoplay loop/> <script src="js/jquery-1.11.1.min.js"></script> <script src="js/serial_device.js"></script>
<script src="js/game_controller.js"></script> <script src="js/arduinoid.js"></script>
</body>
</html>
There’s nothing special about this HTML document. At the top we associate the document with a style sheet named arduinoid.css. We’ll specify all things related to layout in this file.
Next, we define a couple of <div> elements. The main element has its id attribute set to game, and it contains all the other elements. Most elements are fairly self-explanatory. The playfield element is where the action happens. It hosts a paddle and a ball. These elements represent the game’s main objects—that is, the player’s paddle and the ball.
The winner and game_over elements contain messages we’ll display in case the player has won or lost the game. They’ll be invisible when the game starts.
In the stats element, you can find the game’s most important statistical information: the number of lives left and the current score.
After that, we add a cool chiptune3 created by Alex Smith4 to the game using the audio element. The autoplay attribute starts the song immediately, and the loop attribute makes it loop forever. It’s a great song, so that doesn’t hurt.
3.http://opengameart.org/content/awake-megawall-10
4.http://cynicmusic.com/
report erratum • discuss
Chapter 7. Writing a Game for the Motion-Sensing Game Controller • 116
Finally, we import all the JavaScript code we need. The jQuery5 library is a very popular tool for creating dynamic web applications. It makes it very easy to manipulate HTML elements, and it’ll make our life much easier.
You already know the serial_device.js and game_controller.js files. The arduinoid.js file is more interesting because it contains the actual game logic. It starts with the definition of a few data structures holding the game’s most important status information:
BrowserGame/Arduinoid/js/arduinoid.js const MAX_LIVES = 5;
var GameStates = { RUNNING: 'running', PAUSED: 'paused', LOST: 'lost',
WON: 'won'
}
var Game |
= { |
lives: |
MAX_LIVES, |
score: |
0, |
state: |
GameStates.PAUSED, |
paddle: { speed: 15,
width: $("#paddle").width(), height: $("#paddle").height()
},
playfield: {
width: $("#playfield").width(), height: $("#playfield").height(), rows: 4,
columns: 10
},
ball: {
diameter: $("#ball").width(), vx: 5 + Math.random() * 5, vy: -10
},
controller: new GameController('/dev/tty.usbmodem24321')
}
5.http://jquery.com/
report erratum • discuss

Creating the Game • 117
First of all, it defines a constant named MAX_LIVES that contains the maximum number of lives in the game. This is the place to go for cheaters. The GameStates map defines the game’s possible states. This is a very common pattern in game programming, and you’ll see later how easy it is to write the game’s main loop when you identify the game states properly.
The Game object defines all of the game’s properties, such as the current score, the number of lives left, and the game’s current state. It also contains all information about the game’s object, such as the ball’s current velocity in all directions or the paddle’s speed. Of course, it also defines a GameController object, and you have to adjust the path to the Arduino’s serial port.
Most of the Game objects are constants at the beginning; we set only the ball’s velocity in the X direction to a random value. This way, the ball won’t always go into the same direction each time you start a new round.
Note that we use jQuery functions for the first time when we determine the width and height of the game objects. Look at the following piece of code:
width: $("#paddle").width()
It looks cryptic at first, but it should be obvious that it somehow determines the paddle’s width. Therefore, it uses jQuery’s most important method. Its name is $ (yes, you can actually define a JavaScript function named $), and it’s a versatile method you can use for various purposes.
The $ function expects a single argument you can use to specify a certain element in your current HTML page. To identify the element, you can use the usual CSS selectors. In our case, we’d like to get the element with the ID paddle, and in CSS you can look up elements specified by an ID by inserting the # character before the ID.
After we’ve retrieved the element we’re looking for, we use jQuery’s width method to read its width. jQuery offers many more methods for accessing all possible CSS attributes. Using these methods for getting and setting CSS attributes is much easier than using JavaScript’s native functions for looking up and manipulating elements on the current HTML page.
Now that we’ve set up the game’s data structures, we can implement the game’s main logic. We start by defining a few methods for initializing and resetting the game.
BrowserGame/Arduinoid/js/arduinoid.js
Line 1 function initGame() {
-Game.state = GameStates.PAUSED;
-Game.lives = MAX_LIVES;
report erratum • discuss

Chapter 7. Writing a Game for the Motion-Sensing Game Controller • 118
-Game.score = 0;
5resetMovingObjects();
-updateStatistics();
-drawPlayfield();
-}
-
10 function resetMovingObjects() {
-$("#paddle").css("left", (Game.playfield.width - Game.paddle.width) / 2);
-$("#ball").css("left", (Game.playfield.width - Game.ball.diameter) / 2);
-$("#ball").css("top", parseInt($("#paddle").css("top")) - Game.paddle.height);
-}
15
-function updateStatistics() {
-$('#lives').text(Game.lives);
-$('#score').text(Game.score);
-}
20
-function drawPlayfield() {
-var colors = ['blue', 'green', 'red', 'yellow'];
-var $playfield = $('#playfield');
-$playfield.children('.row').remove();
25
-for (var row = 0; row < Game.playfield.rows; row++) {
-var $row = $('<div class="row"></div>');
-$row.appendTo($playfield);
-for (var col = 0; col < Game.playfield.columns; col++) {
30 var $block = $("<div class='block'></div>");
-$block.css("background", 'url("img/' + colors[row] + '.png")');
-$block.appendTo($row);
-}
-}
35}
initGame pretty much deserves its name, because it actually initializes the
game. It sets a few properties of the Game object to their default values directly. Then it calls several functions for initializing specific game objects. resetMovingObjects sets the positions of the ball and the paddle to their default values. The paddle appears at the middle of the playfield’s bottom. The ball then sits on top of the paddle.
updateStatistics copies the current number of lives and the current score to the HTML page. It uses jQuery’s text method to set the text of the elements specified by the IDs lives and score. In the initGame function, the game’s default values will be copied, of course, but we’ll call this function later on, when the game is running.
The drawPlayfield function draws the bricks that the player has to hit with the ball. It creates four <div> elements with their class attribute set to row. Within
report erratum • discuss
Creating the Game • 119
each row element, it creates ten <div> elements of class block. To achieve this, it first removes all row elements that might exist already in line 24. Again, we use jQuery to our advantage. The children method returns all children of the playfield element having the class row. The remove method removes all of these elements from the HTML page.
Note that variable names can contain the $ character, too, in JavaScript. We use it for naming variables such as $playfield that refer to jQuery objects, which is a helpful convention.
With two nested for loops, we create the bricks afterwards. Here we use the omnipotent $ function again to create all the <div> elements we need. If you pass a string containing HTML code to the $ method, it actually creates the element. In line 27 we create a new row, and in the following line we insert the newly created row into the current HTML page.
In the following for loop, we do the same for the actual blocks. Here we not only create the <div> elements, but we also set their background property to an image depending on the block’s row. The images are gradient images that make the blocks more colorful.
Now that the game has been initialized, we can implement the game loop that gets called for each frame.
BrowserGame/Arduinoid/js/arduinoid.js function gameLoop() {
switch (Game.state) { case GameStates.PAUSED:
if (Game.controller.buttonPressed) { Game.state = GameStates.RUNNING;
}
break;
case GameStates.RUNNING: movePaddle(); moveBall(); checkCollisions(); updateStatistics(); break;
case GameStates.WON: handleMessageState("winner"); break;
case GameStates.LOST: handleMessageState("game_over"); break;
default: break;
}
}
report erratum • discuss

Chapter 7. Writing a Game for the Motion-Sensing Game Controller • 120
function handleMessageState(message) { $("#" + message).show();
if (Game.controller.buttonPressed) { $("#" + message).hide(); initGame();
}
}
The gameLoop function is surprisingly simple, because it only checks the game’s current state and then delegates its work accordingly. If the game is paused currently, it checks whether the player has pressed the game controller’s button. If yes, it changes the game’s state to GameStates.RUNNING.
If the game is running already, gameLoop moves all game objects, checks for potential collisions, and updates the game’s statistics. If the game was won or lost, it calls handleMessageState to display a corresponding message.
handleMessageState displays a message by manipulating an HTML element’s content. It also checks whether the game controller’s button was pressed. If yes, it hides the message and initializes the game so the player can start a new round. After a player has won or lost a game, he or she can start a new game by pressing the button on the game controller.
Moving the objects on the screen is the most important part in many video games. Thanks to jQuery, it’s not that difficult.
BrowserGame/Arduinoid/js/arduinoid.js
Line 1 function moveBall() {
-var ball_pos = $("#ball").position();
-var ball_x = ball_pos.left;
-var ball_y = ball_pos.top;
5 var next_x_pos = ball_x + Game.ball.vx;
-var next_y_pos = ball_y + Game.ball.vy;
-
-if (next_x_pos <= 0) {
-Game.ball.vx *= -1; 10 next_x_pos = 1;
-} else if (next_x_pos >= Game.playfield.width - Game.ball.diameter) {
-Game.ball.vx *= -1;
-next_x_pos = Game.playfield.width - Game.ball.diameter - 1;
-}
15
-var paddle_y = $("#paddle").position().top;
-if (next_y_pos <= 0) {
-Game.ball.vy *= -1;
-next_y_pos = 1;
20 } else if (next_y_pos + Game.ball.diameter >= paddle_y) { - var paddle_x = $("#paddle").position().left;
report erratum • discuss

Creating the Game • 121
-if (next_x_pos >= paddle_x &&
-next_x_pos <= paddle_x + Game.paddle.width)
-{
25 Game.ball.vy *= -1;
-next_y_pos = paddle_y - Game.ball.diameter;
-}
-}
-
30 |
$("#ball").css({ "left" : next_x_pos, "top" : next_y_pos }); |
- |
} |
- |
|
-function movePaddle() {
-if (Game.controller.moveLeft) {
35 var paddle_x = $("#paddle").position().left;
-if (paddle_x - Game.paddle.speed >= 0) {
-$("#paddle").css("left", paddle_x - Game.paddle.speed);
-} else {
-$("#paddle").css("left", 0);
40 }
-}
-
-if (Game.controller.moveRight) {
-var paddle_x = $("#paddle").position().left;
45 var next_pos = paddle_x + Game.paddle.width + Game.paddle.speed;
-if (next_pos < Game.playfield.width) {
-$("#paddle").css("left", paddle_x + Game.paddle.speed);
-}
-}
50 }
The most useful jQuery method when moving objects is position. It returns an object that contains an HTML element’s current left and top attributes. In CSS, these attributes specify an object’s x- and y-coordinates on the screen. In lines 2 to 4 of the moveBall function, we use the position function to determine the ball’s current screen coordinates. In the following two lines, we calculate the ball’s new position by adding the current velocities for both directions.
After that, we check whether the ball’s new position would be out of the screen. If yes, we clip the coordinates to the screen’s boundaries. In lines 8 to 14, we make sure that the ball’s x-coordinate is greater than zero and less than the playfield’s width. If the ball hits the left or right boundary of the playfield, we multiply vx by -1, so it changes its direction.
Nearly the same happens in lines 16 to 28 for the ball’s y-coordinate. Whenever the ball hits the top of the playfield, we multiply vy by -1. The playfield has no bottom boundary, but we have to check whether the ball would hit the paddle. If it does, we invert vy, too.
report erratum • discuss

Chapter 7. Writing a Game for the Motion-Sensing Game Controller • 122
Eventually, we set the ball’s position to the new values in line 30.
Moving the paddle is similar, but it depends on the current state of the game controller. If the player wants the paddle to move left, we subtract the paddle’s current speed from the paddle’s x-coordinate. We also make sure that the paddle doesn’t leave the screen. Movement to the right works nearly the same. We only have to add the paddle’s current speed.
A difficult problem in video games is collision detection. You’ve probably played a game or two and yelled “No, that thing didn’t hit me!” or “I’m sure I killed that alien first!” In most cases inexact collision detection is the cause of your frustration.
Even for our simple game, exact collision detections aren’t easy. The blocks have rounded corners, so checking whether the ball overlaps one of the corners or has actually touched the block isn’t trivial. For a good game experience this isn’t necessary, so I’ve simplified the collision detection.
BrowserGame/Arduinoid/js/arduinoid.js
Line 1 function checkCollisions() {
-if (ballDropped()) {
-Game.lives = Game.lives - 1;
-if (Game.lives == 0) {
5 Game.state = GameStates.LOST;
-} else {
-Game.state = GameStates.PAUSED;
-resetMovingObjects();
-}
10 }
-if (!checkBlockCollision()) {
-Game.state = GameStates.WON;
-}
-}
15
-function ballDropped() {
-var ball_y = $("#ball").position().top;
-var paddle_y = $("#paddle").position().top;
-return ball_y + Game.ball.diameter > paddle_y + Game.paddle.height;
20 |
} |
- |
|
-function inXRange(ball_left, block_left, block_width) {
-return (ball_left + Game.ball.diameter >= block_left) &&
-(ball_left <= block_left + block_width);
25 |
} |
- |
|
-function inYRange(ball_top, block_top, block_height) {
-return (ball_top + Game.ball.diameter >= block_top) &&
-(ball_top <= block_top + block_height);
30 }
report erratum • discuss
Creating the Game • 123
-
-function checkBlockCollision() {
-var block_width = $(".block").first().width();
-var block_height = $(".block").first().height(); 35 var ball_left = $("#ball").position().left;
-var ball_top = $("#ball").position().top;
-var blocks_left = false;
-$(".block").each(function() {
-if ($(this).css("visibility") == "visible") {
40 blocks_left = true;
-var block_top = $(this).position().top;
-var block_left = $(this).position().left;
-var in_x = inXRange(ball_left, block_left, block_width);
-var in_y = inYRange(ball_top, block_top, block_height); 45 if (in_x && in_y) {
-Game.score += 10;
-$(this).css("visibility", "hidden");
-if (in_x) {
-Game.ball.vy *= -1;
50
-if (in_y) {
-Game.ball.vx *= -1;
-}
-}
55
-});
-return blocks_left;
-}
The checkCollisions function first checks whether the player has dropped the ball. In this case we decrease the number of lives. Then we check whether the player has lost all of his lives. If yes, we set the game’s state to GameStates.LOST. Otherwise, we pause the game and set the ball and paddle positions to their defaults.
ballDropped compares the y-coordinate of the ball’s bottom with the y-coordinate of the paddle’s bottom. If the ball’s bottom is greater, the ball has been dropped.
Next we define two helper functions named inXRange and inYRange. They check whether the ball overlaps with a block horizontally or vertically. We use these functions in checkBlockCollision to see whether any visible block has been hit by the ball.
Therefore, we need a few more jQuery methods. In line 33, we select all elements belonging to the class block using $(".block"). If you pass a selector to the $ function that selects more than one element, the function automatically returns a list of objects. We select the first object using the first method; then
report erratum • discuss