


Adding Your Own Button • 53
-const int CURRENT_BUTTON_STATE = digitalRead(BUTTON_PIN);
-if (CURRENT_BUTTON_STATE != old_button_state &&
-CURRENT_BUTTON_STATE == HIGH)
15 {
-if (led_state == LOW)
-led_state = HIGH;
-else
-led_state = LOW;
20 digitalWrite(LED_PIN, led_state);
-delay(50);
-}
-old_button_state = CURRENT_BUTTON_STATE;
-}
This final version of our LED switch differs from the previous one in only a single line: to debounce the button, we wait for 50 milliseconds in line 21 before we enter the main loop again. For the moment this solution is sufficient, but you’ll learn about an even better one in a few minutes.
That’s everything you need to know about pushbuttons for now. In the next section, we’ll use two buttons to turn our binary die into a real game.
Adding Your Own Button
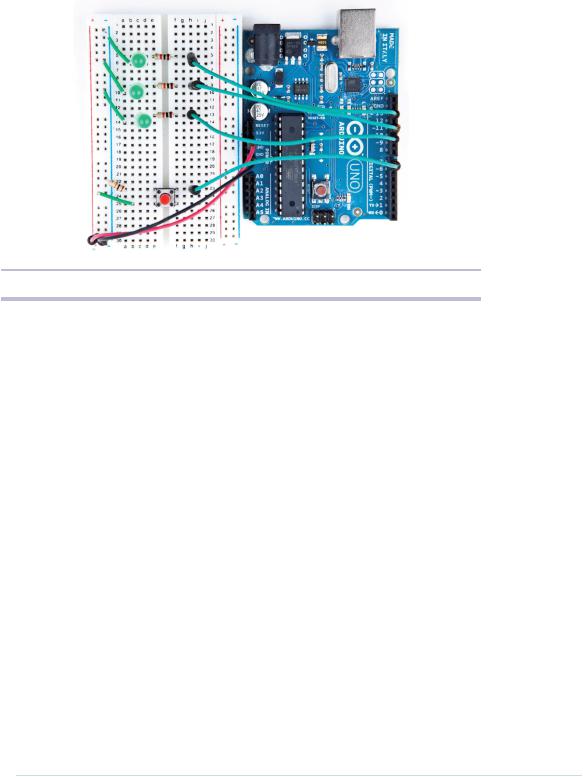
Now that you know how to work with pushbuttons, you no longer have to abuse the Arduino’s reset button to control the die. You can add your own pushbutton instead. As Figure 12, Our binary die with its own start button, on page 54, we need to change our current circuit only slightly. Actually, we don’t have to change the existing parts at all; we only need to add some things. First, we plug a button into the breadboard and connect it to pin 7. Then we connect the button to the ground via a 10kΩ resistor and use a small piece of wire to connect it to the 5-volt pin.
That’s all the hardware we need. Here’s the corresponding software:
BinaryDice/DiceWithButton/DiceWithButton.ino const unsigned int LED_BIT0 = 12; const unsigned int LED_BIT1 = 11; const unsigned int LED_BIT2 = 10; const unsigned int BUTTON_PIN = 7;
void setup() { pinMode(LED_BIT0, OUTPUT); pinMode(LED_BIT1, OUTPUT); pinMode(LED_BIT2, OUTPUT); pinMode(BUTTON_PIN, INPUT); randomSeed(analogRead(A0));
}
report erratum • discuss
Chapter 3. Building Binary Dice • 54
Figure 12—Our binary die with its own start button
int current_value = 0; int old_value = 0; void loop() {
current_value = digitalRead(BUTTON_PIN);
if (current_value != old_value && current_value == HIGH) { output_result(random(1, 7));
delay(50);
}
old_value = current_value;
}
void output_result(const long result) { digitalWrite(LED_BIT0, result & B001); digitalWrite(LED_BIT1, result & B010); digitalWrite(LED_BIT2, result & B100);
}
That’s a perfect merge of the original code and the code needed to control a debounced button. As usual, we initialize all pins we use: three output pins for the LEDs and one input pin for the button. We also initialize the random seed, and in the loop function we wait for new button presses. Whenever the button gets pressed, we roll the die and output the result using the LEDs. We’ve replaced the reset button with our own!
Now that you know how easy it is to add a pushbutton, we’ll add another one in the next section to turn our simple die into a game.
report erratum • discuss

Building a Dice Game • 55
Building a Dice Game
Turning our rudimentary die into a full-blown game requires adding another pushbutton. With the first one we can still roll the die, and with the second one we can program a guess. When we roll the die again and the current result equals our guess, the three LEDs on the die will blink. Otherwise, they will remain dark.
To enter a guess, press the guess button the correct number of times. If you think the next result will be a 3, press the guess button three times and then press the start button.
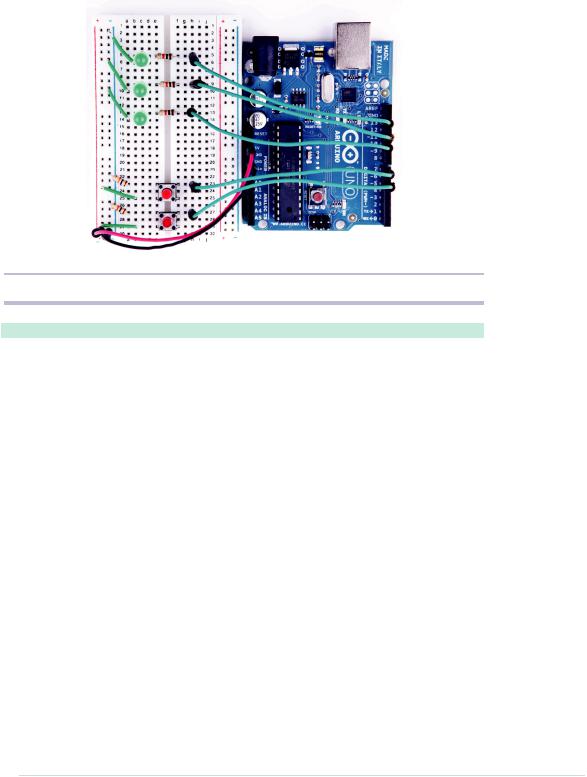
To add another button to the circuit, do exactly the same thing as you did for the first one. Figure 13, Our binary die now has a guess button, on page 56 shows that we have added yet another button circuit to the breadboard. This time we’ve connected it to pin 5.
Now we need some code to control the new button. You might be tempted to copy it from the previous program—after all, we copied the hardware design, right? In the real world, some redundancy is totally acceptable, because you actually need two physical buttons, even if they are the same in principle. In the world of software, redundancy is a no-go, though, because it quickly leads to maintenance hell. You should always make sure that every important piece of information is represented only once in your program. Instead of copying numbers, you should use constants. Instead of copying code, you should use functions or classes. This way your code will become more compact and more readable. As a bonus, it will be much easier to change your code, because when you copy code you have to remember all the places you’ve copied it to when you have to make a change. If you’ve isolated the code in a single place, you have to change it only once.
So, we won’t copy our debounce logic, but we’ll use the Bounce2 library1 that was written for this purpose. Download the library2 and unpack its contents into ~/Documents/Arduino/libraries (on a Mac) or My Documents\Arduino\libraries (on a Windows machine). Usually that’s all you have to do, but it never hurts to read the installation instructions and documentation on the web page.
Now that’s all done, our dice game is complete. Here’s the code of the final version:
1.https://github.com/thomasfredericks/Bounce-Arduino-Wiring
2.https://github.com/thomasfredericks/Bounce-Arduino-Wiring/archive/master.zip
report erratum • discuss
Chapter 3. Building Binary Dice • 56
Figure 13—Our binary die now has a guess button.
BinaryDice/DiceGame/DiceGame.ino
Line 1 #include <Bounce2.h>
-const unsigned int LED_BIT0 = 12;
-const unsigned int LED_BIT1 = 11;
-const unsigned int LED_BIT2 = 10;
5 const unsigned int GUESS_BUTTON_PIN = 5;
-const unsigned int START_BUTTON_PIN = 7;
-const unsigned int BAUD_RATE = 9600;
-const unsigned int DEBOUNCE_DELAY = 20;
-
10 int guess = 0;
-Bounce start_button;
-Bounce guess_button;
-
- void setup() {
15 pinMode(LED_BIT0, OUTPUT);
-pinMode(LED_BIT1, OUTPUT);
-pinMode(LED_BIT2, OUTPUT);
-pinMode(START_BUTTON_PIN, INPUT);
-pinMode(GUESS_BUTTON_PIN, INPUT);
20 start_button.attach(START_BUTTON_PIN);
-start_button.interval(DEBOUNCE_DELAY);
-guess_button.attach(GUESS_BUTTON_PIN);
-guess_button.interval(DEBOUNCE_DELAY);
-randomSeed(analogRead(A0));
25 |
Serial.begin(BAUD_RATE); |
- |
} |
- |
|
report erratum • discuss

Building a Dice Game • 57
-void loop() {
-handle_guess_button();
30 |
handle_start_button(); |
- |
} |
- |
|
-void handle_guess_button() {
-if (guess_button.update()) {
35 if (guess_button.read() == HIGH) {
-guess = (guess % 6) + 1;
-output_result(guess);
-Serial.print("Guess: ");
-Serial.println(guess);
40 }
-}
-}
-
-void handle_start_button() { 45 if (start_button.update()) {
-if (start_button.read() == HIGH) {
-const int result = random(1, 7);
-output_result(result);
-Serial.print("Result: ");
50 Serial.println(result);
-if (guess > 0) {
-if (result == guess) {
-Serial.println("You win!");
-hooray();
55 |
} else { |
-Serial.println("You lose!");
-}
-}
-delay(2000);
60 guess = 0;
-}
-}
-}
-void output_result(const long result) { 65 digitalWrite(LED_BIT0, result & B001);
-digitalWrite(LED_BIT1, result & B010);
-digitalWrite(LED_BIT2, result & B100);
-}
-
70 void hooray() {
-for (unsigned int i = 0; i < 3; i++) {
-output_result(7);
-delay(500);
-output_result(0);
75 delay(500);
-}
-}
report erratum • discuss

Chapter 3. Building Binary Dice • 58
Admittedly that’s a lot of code, but you know most of it already, and the new parts are fairly easy. In the first line, we include the Bounce2 library we’ll use later to debounce our two buttons. Then we define constants for the pins we use, and we define the variable guess that will hold the player’s current guess.
The Bounce2 library declares a class named Bounce, and you have to create a
Bounce object for every button you want to debounce. That’s what happens in lines 11 and 12.
In the setup method, we initialize all our pins and set the random seed. We also initialize the serial port, because we’ll output some debug messages. In lines 20 to 23, we initialize the two Bounce objects. The attach method connects a Bounce object to a certain pin. With the interval method you can set a button’s debounce delay in milliseconds.
Our loop function has been reduced to two function calls. One is responsible for dealing with guess button pushes, and the other one handles pushes of the start button. In handle_guess_button, we use the Bounce class for the first time. To determine the current state of our guess_button object, we have to call its update method. Afterward, we read its current status using the read method.
If the button was pressed, its state is set to HIGH, and we increment the guess variable. To make sure that the guess is always in the range between 1 and 6, we use the modulus operator (%) in line 36. This operator divides two values and returns the remainder. For 6, it returns values between 0 and 5, because when you divide a number by 6, the remainder is always between 0 and 5. Add 1 to the result, and you get values between 1 and 6. Finally, we output the current guess using the three LEDs, and we also print it to the serial port.
The handling of the start button in handle_start_button works exactly the same as the handling of the guess button. When the start button is pressed, we calculate a new result and output it on the serial port. Then we check whether the user has entered a guess (guess is greater than zero in this case) and whether the user has guessed the correct result. In either case, we print a message to the serial port, and if the user guessed right, we also call the hooray method. hooray lets all three LEDs blink several times.
At the end of the method, we wait for two seconds until the game starts again, and we reset the current guess to zero.
After you’ve uploaded the software to the Arduino, start the IDE’s serial monitor. It will print the current value of the guess variable whenever you press the guess button. Press the start button, and the new result appears. In the following figure, you can see a typical output of our binary die.
report erratum • discuss