


Publishing Your Own Library • 71
Because we’ve encapsulated the whole Morse code logic in the Telegraph class, our main program is short and concise. Creating software for embedded devices doesn’t mean we can’t benefit from the advantages of object-oriented programming.
Still, we have some minor things to do to turn our project into a first-class library. Read more about it in the next section.
Publishing Your Own Library
One of the nice features of the Arduino IDE is its syntax coloring. Class names, function names, variables, and so on all have different colors in the editor. This makes it much easier to read source code, and it’s possible to add syntax coloring for libraries. You only have to add a file named keywords.txt to your project:
TelegraphLibrary/keywords.txt
# Syntax-coloring for the telegraph library
Telegraph KEYWORD1 send_message KEYWORD2
Blank lines and lines starting with a # character will be ignored. The remaining lines contain the name of one of the library’s members and the member’s type. Separate them with a tab character. Classes have the type
KEYWORD1, while functions have the type KEYWORD2. For constants, use LITERAL1.
To enable syntax coloring for the telegraph library, copy keywords.txt to the libraries/Telegraph folder and restart the IDE. Now the name of the Telegraph class will be orange, and send_message will be brown.
Before you finally publish your library, you should add a few more things:
•Store all example sketches in a folder named examples and copy it to the libraries/Telegraph folder. Every example sketch should get its own subdirectory within that folder.
•Choose a license for your project and copy its terms into a file named
LICENSE.3 You might think this is over the top for many libraries, but it will give your potential audience confidence.
•Add installation instructions and documentation. Usually, users expect to find documentation in a file named README, and they will look for installation instructions in a file named INSTALL. You should try to install
3.At http://www.opensource.org/, you can find a lot of background information and many standard licenses.
report erratum • discuss
Chapter 4. Building a Morse Code Generator Library • 72
your library on as many operating systems as possible and provide
installation instructions for all of them.
•Publish your project on GitHub,4 Google Code,5 or any other popular sites for hosting open-source projects. This way, other people can contribute easily to your project.
After you’ve done all this, your libraries/Telegraph folder should look like this:
Finally, create a zip archive containing all the files in your project. On most operating systems, it’s sufficient to right-click the directory in the Explorer, Finder, or whatever you are using and turn the directory into a zip archive. On Linux systems and Macs, you can also use one of the following commandline statements to create an archive:
maik> zip -r Telegraph Telegraph
maik> tar cfvz Telegraph.tar.gz Telegraph
4.http://github.com
5.https://code.google.com/
report erratum • discuss

What If It Doesn’t Work? • 73
The first command creates a file named Telegraph.zip, and the second one creates
Telegraph.tar.gz. Both formats are widespread, and it’s best to offer them both for download.
Although you have to perform a lot of manual file operations, it’s still easy to create an Arduino library. So, there’s no excuse: whenever you think you’ve built something cool, make it publicly available.
Note that the structure for library projects has slightly changed in the Arduino IDE 1.5.x and later.6 The biggest change is that all library source files (telegraph.h and telegraph.cpp, in our case) now have to be stored in a separate folder named src. The new specification is backwards compatible—that is, old libraries will still work in the new IDE.
Until now, our projects have communicated with the outside world using LEDs (output) and pushbuttons (input). In the next chapter, you’ll learn how to work with more sophisticated input devices, such as ultrasonic sensors. You’ll also learn how to visualize data that an Arduino sends to programs running on your computer.
What If It Doesn’t Work?
The Arduino IDE has a strong opinion on naming files and directories, and it was built for creating sketches, not libraries. So, you need to perform a few manual file operations to get everything into the right place. In the figure on the preceding page, you can see the final directory layout. If you have more than one version of the Arduino IDE installed, make sure you’re using the correct libraries folder.
Remember that you have to restart the IDE often. Whenever you change one of the files belonging to your library, restart the IDE.
If syntax coloring doesn’t work, make sure your keywords file is actually named keywords.txt. Double-check whether you have separated all objects and type specifiers by a tab character. Restart your IDE!
Exercises
•Morse code not only supports letters and digits, but it also defines symbols such as commas. Improve the Telegraph class so that it understands all characters of the Morse code.
6.https://github.com/arduino/Arduino/wiki/Arduino-IDE-1.5:-Library-specification
report erratum • discuss
Chapter 4. Building a Morse Code Generator Library • 74
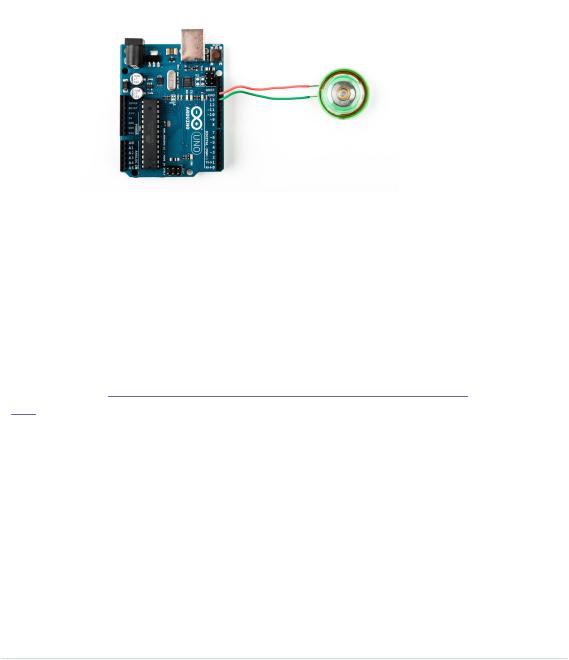
•Blinking LEDs are great, but when we think of Morse code, we usually think of beeping sounds, so replace the LED with a piezo speaker, which is cheap and easy to use. The following figure shows how you connect it to an Arduino. Piezo speakers have a ground pin and a signal pin, so connect the speaker’s ground to the Arduino’s ground, and connect the signal pin to Arduino pin 13.
Then replace the output_symbol method with the following code:
void Telegraph::output_symbol(const int length) { const int frequency = 131;
tone(_output_pin, frequency, length);
This sends a square wave to the speaker, and it plays a tone having a frequency of 131 Hertz. (Look at the example under File > Examples > 02.Digital > toneMelody that comes with the Arduino IDE to learn more about playing notes with a piezo speaker.)
•The Arduino IDE offers an alternative way to handle serial communication. Have a look at Serial Communication Using Various Languages, on page 255, and rewrite the Morse code library so that it uses the new serialEvent function. Also, use String objects instead of character arrays.
•Improve the library’s design to make it easier to support different output devices. You could pass some kind of OutputDevice object to the Telegraph constructor. Then derive a LedDevice and a SpeakerDevice from OutputDevice. It could look as follows:
class OutputDevice { public:
virtual void output_symbol(const int length);
};
class Led : public OutputDevice {
report erratum • discuss

Exercises • 75
public:
void output_symbol(const int length) {
// ...
}
};
class Speaker : public OutputDevice { public:
void output_symbol(const int length) {
// ...
}
};
You can then use these classes as follows:
Led led;
Speaker speaker;
OutputDevice* led_device = &led;
OutputDevice* speaker_device = &speaker;
led_device->output_symbol(200); speaker_device->output_symbol(200);
The rest is up to you.
•Try to learn Morse code. Let someone else type some messages into the serial terminal and try to recognize what that person sent. This isn’t necessary for learning Arduino development, but it’s a lot of fun!
report erratum • discuss