

CHAPTER 4
Building a Morse Code Generator Library
You now know enough about the Arduino development environment and about blinking LEDs to start a bigger project. In this chapter, we’ll develop a Morse code generator that reads text from the serial port and outputs it as light signals using an LED.
By building this project, you’ll deepen your understanding of serial communication between the Arduino and your computer. You’ll also learn a lot about the typical Arduino development process: how to use existing libraries and how to structure bigger projects into your own libraries. At the end, you’ll be able to create a library that is ready for publishing on the Internet.
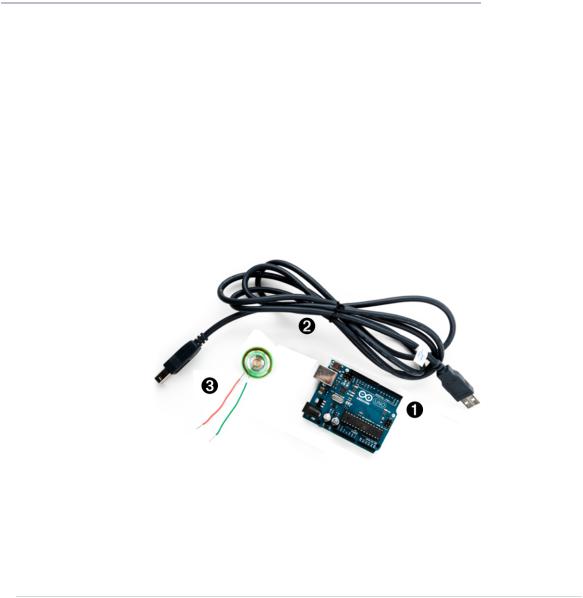
What You Need
1.An Arduino board such as the Uno, Duemilanove,
or Diecimila
2.A USB cable to connect the Arduino to your computer
3.A speaker or a buzzer (optional)
report erratum • discuss
Chapter 4. Building a Morse Code Generator Library • 62
Learning the Basics of Morse Code
Morse code was invented to turn text into sounds.1 In principle, it works like a character set encoding, such as ASCII. But while ASCII encodes characters as numbers, in Morse code they’re sequences of dots and dashes (also called dits and dahs). Dits are shorter in length than dahs. An A is encoded as · – and – – · · is Z.
Morse code also specifies a timing scheme that defines the length of the dits and dahs. It specifies how long the pauses between symbols and words have to be. The base unit of Morse code is the length of a dit, and a dah is as long as three dits. You insert a pause of one dit between two symbols, and you separate two letters by three dits. You insert a pause of seven dits between two words.
To transmit a message encoded in Morse code, you need a way to emit signals of different lengths. The classic approach is to use sounds, but we will use an LED that is turned on and off for varying periods of time. Sailors still transmit Morse code using blinking lights.
Let’s implement a Morse code generator!
Building a Morse Code Generator
The main part of our library will be a C++ class named Telegraph. In this section, we’ll define its interface, but we will start with a new sketch that looks as follows:
TelegraphLibrary/TelegraphLibrary.ino void setup() {
}
void loop() {
}
This is the most minimalistic Arduino program possible. It doesn’t do anything except define all mandatory functions, even if they are empty. We do this so we can compile our work in progress from time to time and check whether there are any syntactical errors. Save the sketch as TelegraphLibrary, and the IDE will create a folder named TelegraphLibrary and a file named TelegraphLibrary.ino in it. All the files and directories we need for our library will be stored in the
TelegraphLibrary folder.
1.http://en.wikipedia.org/wiki/Morse_Code
report erratum • discuss

Building a Morse Code Generator • 63
Now open a new tab, and when asked for a filename, enter telegraph.h. Yes, we will create a good old C header file. (To be precise, it will even be a C++ header file.)
TelegraphLibrary/telegraph.h
#ifndef __TELEGRAPH_H__ #define __TELEGRAPH_H__
class Telegraph { public:
Telegraph(const int output_pin, const int dit_length); void send_message(const char* message);
private: void dit(); void dah();
void output_code(const char* code); void output_symbol(const int length);
int _output_pin; int _dit_length; int _dah_length;
};
#endif
Ah, obviously object-oriented programming is not only for the big CPUs anymore! This is an interface description of a Telegraph class that you could use in your next enterprise project (provided that you need to transmit some information as Morse code, that is).
We start with the classic double-include prevention mechanism; that is, the body of the header file defines a preprocessor macro named __TELEGRAPH_H__. We wrap the body (that contains this definition) in an #ifndef so that the body is only compiled if the macro has not been defined. That way, you can include the header as many times as you want, and the body will be compiled only once.
The interface of the Telegraph class consists of a public part that users of the class have access to and a private part that only members of the class can use. In the public part, you find two things: a constructor that creates new
Telegraph objects and a method named send_message that sends a message by emitting it as Morse code. In your applications, you can use the class as follows:
Telegraph telegraph(13, 200); telegraph.send_message("Hello, world!");
report erratum • discuss
Chapter 4. Building a Morse Code Generator Library • 64
In the first line, we create a new Telegraph object that communicates on pin 13 and emits dits that are 200 milliseconds long. Then we emit the message
“Hello, world!” as Morse code. This way, we are able to send whatever message we want, and we can change easily the pin and the length of a dit.
Now that we have defined the interface, we will implement it.
Fleshing Out the Morse Code Generator’s Interface
Declaring interfaces is important, but it’s as important to implement them. Create a new tab and enter the filename telegraph.cpp.
This is the right place to explain why we’ve used TelegraphLibrary and not Telegraph as the sketch’ name, even though it’d be a more natural choice. The reason is that the Arduino IDE turns every sketch (ending with .ino) into a C++ file (ending with .cpp). For a sketch named Telegraph.ino it generates a C++ file named
Telegraph.cpp. In a case-insensitive file system, this conflicts with a file named telegraph.cpp, and it leads to some strange error messages.
Enter the following code now in the newly created tab:
TelegraphLibrary/telegraph.cpp
#include <ctype.h> #include <Arduino.h> #include "telegraph.h"
const char* LETTERS[] = { |
|
|
|
|
|
|||
".-", "-... |
", "-.-.", |
"-.. |
", |
".", |
// A-E |
|||
"..-.", "--.", ".... |
", |
"..", |
".---", |
// |
F-J |
|||
"-.-", ".-.. |
", "--", |
|
"-.", |
"---", |
// |
K-O |
||
".--.", "--.-", ".-.", |
"...", "-", |
// P-T |
||||||
"..-", "... |
-", ".--", |
"-.. |
-", "-.--", // |
U-Y |
||||
"--.. |
" |
|
|
|
|
|
// |
Z |
}; |
|
|
|
|
|
|
|
|
const char* DIGITS[] = { |
|
|
|
|
|
|||
"-----", ".----", "..---", " |
... |
--", // 0-3 |
|
|||||
".... |
-", "..... |
", "-.... |
|
", "--... |
", // 4-7 |
|
||
"---..", "----." |
|
|
|
// 8-9 |
|
|||
}; |
|
|
|
|
|
|
|
|
Like most C++ programs, ours imports some libraries first. Because we need functions such as toupper later, we include ctype.h, and we have to include telegraph.h to make our class declaration and its corresponding function declarations available. But what is Arduino.h good for?
Until now we haven’t thought about where constants such as HIGH, LOW, or
OUTPUT came from. They are defined in several header files that come with the
report erratum • discuss