- •Acknowledgments
- •Preface
- •Who Should Read This Book
- •What’s in This Book
- •Arduino Uno and the Arduino Platform
- •Code Examples and Conventions
- •Online Resources
- •The Parts You Need
- •Starter Packs
- •Complete Parts List
- •1. Welcome to the Arduino
- •What You Need
- •What Exactly Is an Arduino?
- •Exploring the Arduino Board
- •Installing the Arduino IDE
- •Meeting the Arduino IDE
- •Hello, World!
- •Compiling and Uploading Programs
- •What If It Doesn’t Work?
- •Exercises
- •2. Creating Bigger Projects with the Arduino
- •What You Need
- •Managing Projects and Sketches
- •Changing Preferences
- •Using Serial Ports
- •What If It Doesn’t Work?
- •Exercises
- •3. Building Binary Dice
- •What You Need
- •Working with Breadboards
- •Using an LED on a Breadboard
- •First Version of a Binary Die
- •Working with Buttons
- •Adding Your Own Button
- •Building a Dice Game
- •What If It Doesn’t Work?
- •Exercises
- •4. Building a Morse Code Generator Library
- •What You Need
- •Learning the Basics of Morse Code
- •Building a Morse Code Generator
- •Fleshing Out the Morse Code Generator’s Interface
- •Outputting Morse Code Symbols
- •Installing and Using the Telegraph Class
- •Publishing Your Own Library
- •What If It Doesn’t Work?
- •Exercises
- •5. Sensing the World Around Us
- •What You Need
- •Measuring Distances with an Ultrasonic Sensor
- •Increasing Precision Using Floating-Point Numbers
- •Increasing Precision Using a Temperature Sensor
- •Creating Your Own Dashboard
- •What If It Doesn’t Work?
- •Exercises
- •What You Need
- •Wiring Up the Accelerometer
- •Bringing Your Accelerometer to Life
- •Finding and Polishing Edge Values
- •Building Your Own Game Controller
- •More Projects
- •What If It Doesn’t Work?
- •Exercises
- •7. Writing a Game for the Motion-Sensing Game Controller
- •Writing a GameController Class
- •Creating the Game
- •What If It Doesn’t Work?
- •Exercises
- •8. Generating Video Signals with an Arduino
- •What You Need
- •How Analog Video Works
- •Building a Digital-to-Analog Converter (DAC)
- •Connecting the Arduino to Your TV Set
- •Using the TVout Library
- •Building a TV Thermometer
- •Working with Graphics in TVout
- •What If It Doesn’t Work?
- •Exercises
- •9. Tinkering with the Wii Nunchuk
- •What You Need
- •Wiring a Wii Nunchuk
- •Talking to a Nunchuk
- •Building a Nunchuk Class
- •Using Our Nunchuk Class
- •Creating Your Own Video Game Console
- •Creating Your Own Video Game
- •What If It Doesn’t Work?
- •Exercises
- •10. Networking with Arduino
- •What You Need
- •Using Your PC to Transfer Sensor Data to the Internet
- •Registering an Application with Twitter
- •Tweeting Messages with Processing
- •Communicating Over Networks Using an Ethernet Shield
- •Using DHCP and DNS
- •What If It Doesn’t Work?
- •Exercises
- •11. Creating a Burglar Alarm with Email Notification
- •What You Need
- •Emailing from the Command Line
- •Emailing Directly from an Arduino
- •Detecting Motion Using a Passive Infrared Sensor
- •Bringing It All Together
- •What If It Doesn’t Work?
- •Exercises
- •What You Need
- •Understanding Infrared Remote Controls
- •Grabbing Remote Control Codes
- •Cloning a Remote
- •Controlling Infrared Devices Remotely with Your Browser
- •Building an Infrared Proxy
- •What If It Doesn’t Work?
- •Exercises
- •13. Controlling Motors with Arduino
- •What You Need
- •Introducing Motors
- •First Steps with a Servo Motor
- •Building a Blaminatr
- •What If It Doesn’t Work?
- •Exercises
- •Current, Voltage, and Resistance
- •Electrical Circuits
- •Learning How to Use a Wire Cutter
- •Learning How to Solder
- •Learning How to Desolder
- •The Arduino Programming Language
- •Bit Operations
- •Learning More About Serial Communication
- •Serial Communication Using Various Languages
- •What Are Google Chrome Apps?
- •Creating a Minimal Chrome App
- •Starting the Chrome App
- •Exploring the Chrome Serial API
- •Writing a SerialDevice Class
- •Index

Chapter 12. Creating Your Own Universal Remote Control • 212
variable, and when we encounter a newline character, we also set the input_available flag to true. This way, the loop function can determine whether a new command has been received and which command it was.
In loop, we wait for commands. When a new command arrives, we check whether it’s supported. If it is supported, we send the corresponding control code. Otherwise, we print an error message.
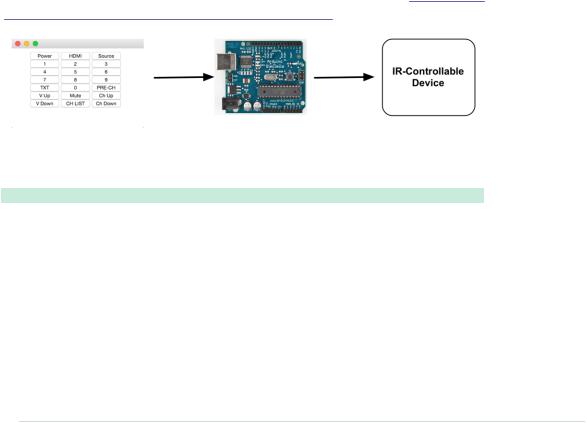
Compile and upload the sketch, and you can control the TV of your choice—a Samsung TV, in this example—using any serial monitor, which is quite cool already. The interface is still awkward for less geeky people, so in the next section, you’ll learn how to create a more user-friendly interface.
Controlling Infrared Devices Remotely with Your Browser
We’ve already created several projects that you can control using a serial monitor. For programmers, that’s a nice and convenient interface, but as soon as you want to present your projects to your nontechnical friends, you’d better have something more user-friendly and colorful.
Now we’ll implement a Google Chrome app to create a nice user interface for our cloned remote control. Before you proceed, you should read Appendix 4,
Controlling the Arduino with a Browser, on page 267, if you haven’t already.
The Chrome app’s manifest.json file contains no surprises. It defines the application name and grants the application access to the serial port.
RemoteControl/TvRemoteUI/manifest.json
{
"manifest_version": 2, "name": "TV Remote Emulator", "version": "1", "permissions": [ "serial" ], "app": {
"background": {
"scripts": ["background.js"]
}
},
"minimum_chrome_version": "33"
}
report erratum • discuss

Controlling Infrared Devices Remotely with Your Browser • 213
The same is true for the application’s background.js file. It renders the following
HTML file when the application is launched.
RemoteControl/TvRemoteUI/main.html
<!DOCTYPE html>
<html lang="en">
<head>
<meta charset="utf-8"/>
<link rel="stylesheet" type="text/css" href="css/style.css"/> <title>TV Remote Emulator</title>
</head>
<body>
<div id="main">
<div>
<button id="power" type="button">Power</button> <button id="hdmi" type="button">HDMI</button> <button id="source" type="button">Source</button>
</div>
<div>
<button id="one" type="button">1</button> <button id="two" type="button">2</button> <button id="three" type="button">3</button>
</div>
<div>
<button id="four" type="button">4</button> <button id="five" type="button">5</button> <button id="six" type="button">6</button>
</div>
<div>
<button id="seven" type="button">7</button> <button id="eight" type="button">8</button> <button id="nine" type="button">9</button>
</div>
<div>
<button id="txt" type="button">TXT</button> <button id="zero" type="button">0</button> <button id="pre_ch" type="button">PRE-CH</button>
</div>
<div>
<button id="vol_up" type="button">V Up</button> <button id="mute" type="button">Mute</button> <button id="prog_up" type="button">Ch Up</button>
</div>
<div>
<button id="vol_down" type="button">V Down</button> <button id="ch_list" type="button">CH LIST</button> <button id="prog_down" type="button">Ch Down</button>
</div>
</div>
<script src="js/jquery-1.11.1.min.js"></script>
report erratum • discuss

Chapter 12. Creating Your Own Universal Remote Control • 214
<script src="js/serial_device.js"></script> <script src="js/remote.js"></script>
</body>
</html>
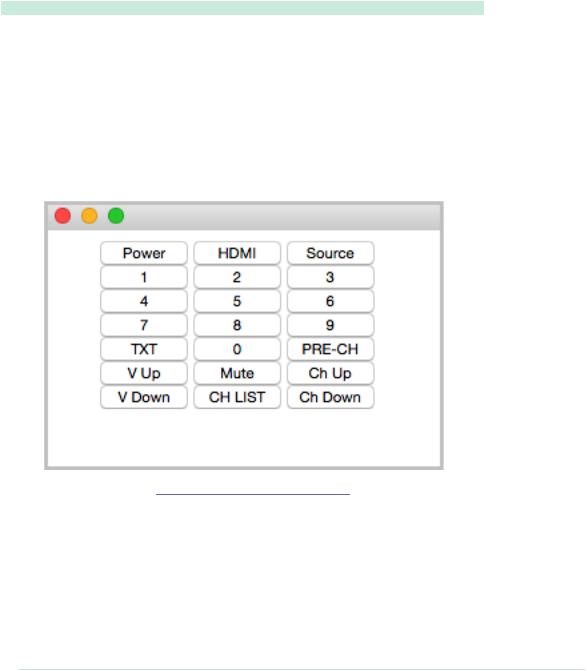
This HTML document defines seven rows that contain three buttons each. Also, it loads several JavaScript files. It loads the jQuery library and the SerialDevice class we defined in Writing a SerialDevice Class, on page 274. In addition, it loads a file named remote.js that defines what happens when a user clicks a button on our virtual remote.
RemoteControl/TvRemoteUI/js/remote.js
Line 1 $(function() {
-var BAUD_RATE = 9600;
-var remote = new SerialDevice("/dev/tty.usbmodem24311", BAUD_RATE);
-
5remote.onConnect.addListener(function() {
-console.log("Connected to: " + remote.path);
-});
-
-remote.connect();
10
-$("[type=button]").on("click", function(event){
-var buttonType = $(event.currentTarget).attr("id");
-console.log("Button pressed: " + buttonType);
-remote.send(buttonType + "\n");
15 |
}); |
- |
}); |
|
In remote.js, we use jQuery’s $ function in the first line to make sure all Java- |
|
Script code gets executed after the whole HTML page has been loaded. Then |
|
we define a new SerialDevice instance named remote and connect to it. Make |
|
sure you’re using the right serial port name here. |
|
The rest of the code attaches callback functions to all of the buttons we’ve |
|
defined. We use jQuery’s $ function to select all elements having the type |
|
button. Then we call the on function for each button element and pass it the |
|
parameter click to add a callback function that gets called when the button |
|
gets clicked. |
|
In the callback function for click events, we use the event’s currentTarget prop- |
|
erty in line 12 to determine which button has actually been clicked. We read |
|
the button’s ID attribute and use it as the command we send to the Arduino. |
|
If the user clicks the button with the ID one, the program will send the com- |
|
mand one to the Arduino. The Arduino will then send the corresponding code |
|
via infrared. Using a consistent naming scheme for the button elements in |
|
the HTML page has really paid off. To add another button, you only have to |
report erratum • discuss

Controlling Infrared Devices Remotely with Your Browser • 215
modify the HTML page. Add a new button element and set its ID attribute to the name of the Arduino command that emits the corresponding remote control code.
To align the buttons of our virtual remote control and to make the Chrome app look nice, we use the following stylesheet:
RemoteControl/TvRemoteUI/css/style.css
#main { width: 18em;
margin-left: auto; margin-right: auto;
}
button { width: 6em;
}
The stylesheet mainly ensures that all buttons have the same width. Run the Chrome app, and you’ll see something like the following figure:
Upload the sketch from Cloning a Remote, on page 207, to your Arduino and start the Chrome app. Click any button to perform the corresponding action. That’s an interface even your grandma could use, isn’t it?
You still need to connect the Arduino to your computer’s serial port to control it with a web browser. In the next section, you’ll learn how to overcome this and control an Arduino without a serial connection.
report erratum • discuss
