


Chapter 1. Welcome to the Arduino • 14
Installing the Arduino IDE on Linux
Installation procedures on Linux distributions are still not very homogeneous. The Arduino IDE works fine on nearly all modern Linux versions, but the installation process differs from distribution to distribution. Also, you often have to install additional software (the Java Virtual Machine, for example) that comes preinstalled with other operating systems.
It’s best to check the official documentation14 and look up the instructions for your preferred system.
Now that the drivers and IDE are installed, let’s see what it has to offer.
Meeting the Arduino IDE
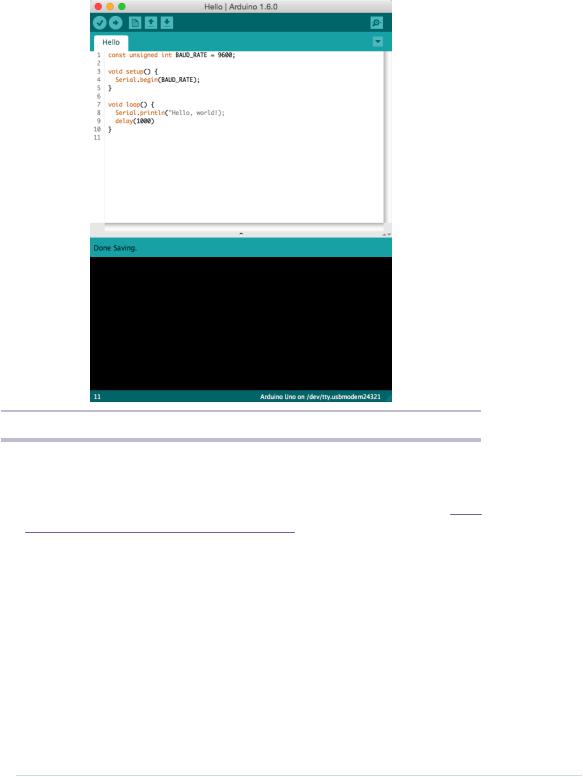
Compared to IDEs such as Eclipse, Xcode, or Microsoft Visual Studio, the Arduino IDE is simple. It mainly consists of an editor, a compiler, a loader, and a serial monitor. (See Figure 5, The Arduino IDE is well organized, on page 15 or, even better, start the IDE on your computer.)
It has no advanced features such as a debugger or code completion. You can change only a few preferences, and as a Java application it does not fully integrate into the Mac desktop. It’s still usable, though, and even has decent support for project management.
The image that follows shows the IDE’s toolbar, which gives you instant access to the functions you’ll need most:
Upload Open
Verify |
New |
Save |
Serial Monitor |
•With the Verify button, you can compile the program that’s currently in the editor. So, in some respects, “Verify” is a misnomer, because clicking the button doesn’t only verify the program syntactically, it also turns the program into a representation suitable for the Arduino board. You can invoke this function using the DR keyboard shortcut on a Mac or Ctrl-R on all other systems.
14.http://www.arduino.cc/playground/Learning/Linux
report erratum • discuss
Meeting the Arduino IDE • 15
Figure 5—The Arduino IDE is well organized.
•When you click the Upload button (DU or Ctrl-U), the IDE compiles the current program and uploads it to the Arduino board you’ve chosen in the IDE’s Tools > Serial Port menu. (You’ll learn more about this in Compiling and Uploading Programs, on page 19.)
•The New button (DN or Ctrl-N) creates a new program by emptying the content of the current editor window. Before that happens, the IDE gives you the opportunity to store all unsaved changes.
•Open (DO or Ctrl-O) opens an existing program from the file system.
•Save (DS or Ctrl-S) saves the current program.
•The Arduino can communicate with a computer via a serial connection. Clicking the Serial Monitor button (BDM or Ctrl-Shift-M) opens a serial monitor window that allows you to watch the data sent by an Arduino and also to send data back.
report erratum • discuss
Chapter 1. Welcome to the Arduino • 16
Although using the IDE is easy, you might run into problems or want to look up something special. In such cases, take a look at the Help menu. It points to many useful resources at the Arduino’s website that provide not only quick solutions to all typical problems, but also reference materials and tutorials.
Hello, World!
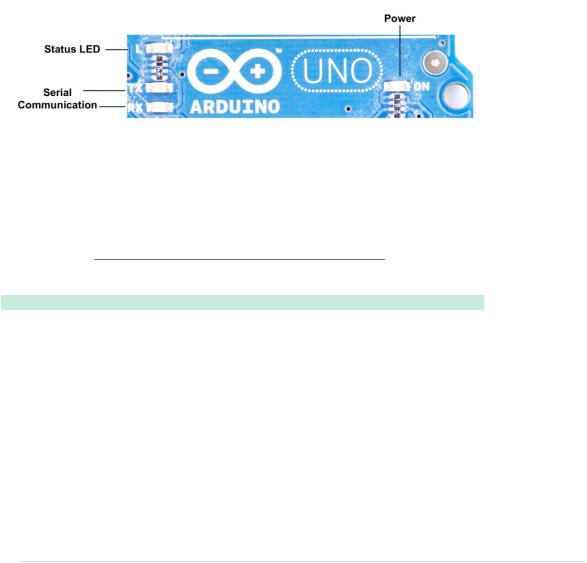
To get familiar with the IDE’s most important features, we’ll create a simple program that makes an light-emitting diode (LED) blink. An LED is a cheap and efficient light source, and the Arduino already comes with several LEDs. One LED shows whether the Arduino is currently powered, and two other LEDs blink when data is transmitted or received via a serial connection.
|
In our first little project, we’ll make the Arduino’s status LED blink. The status |
|
LED is connected to digital IO pin 13. Digital pins act as a kind of switch and |
|
can be in one of two states: HIGH or LOW. If set to HIGH, the output pin is |
|
set to 5 volts, causing a current to flow through the LED so it lights up. If set |
|
back to LOW, the current flow stops, and the LED turns off. You don’t need |
|
to know exactly how electricity works at the moment, but if you’re curious, |
|
take a look at Current, Voltage, and Resistance, on page 239. |
|
Open the IDE and enter the following code in the editor: |
|
Welcome/HelloWorld/HelloWorld.ino |
Line 1 |
const unsigned int LED_PIN = 13; |
- |
const unsigned int PAUSE = 500; |
- |
|
- |
void setup() { |
5pinMode(LED_PIN, OUTPUT);
- |
} |
- |
|
-void loop() {
-digitalWrite(LED_PIN, HIGH);
10 delay(PAUSE);
-digitalWrite(LED_PIN, LOW);
-delay(PAUSE);
-}
report erratum • discuss

Hello, World! • 17
Let’s see how this works and dissect the program’s source code piece by piece. In the first two lines, we define two unsigned int constants using the const keyword. LED_PIN refers to the number of the digital IO pin we’re using, and PAUSE defines the length of the blink period in milliseconds.
Every Arduino program needs a function named setup, and ours starts in line 4. A function definition always adheres to the following scheme:
<return value type> <function name> '(' <list of parameters> ')'
In our case the function’s name is setup, and its return value type is void: it returns nothing. setup doesn’t expect any arguments, so we left the parameter list empty. Before we continue with the dissection of our program, you should learn more about the Arduino’s data types.
Arduino Data Types
Every piece of data you store in an Arduino program needs a type. Depending on your needs, you can choose from the following:
•boolean values take up one byte of memory and can be true or false.
•char variables take up one byte of memory and store numbers from -128 to 127. These numbers usually represent characters encoded in ASCII; that is, in the following example, c1 and c2 have the same value:
char c1 = 'A'; char c2 = 65;
Note that you have to use single quotes for char literals.
•byte variables use one byte and store values from 0 to 255.
•An int variable needs two bytes of memory; you can use it to store numbers from -32,768 to 32,767. Its unsigned equivalent unsigned int also consumes two bytes of memory but stores numbers from 0 to 65,535.
•For bigger numbers, use long. It consumes four bytes of memory and stores values from -2,147,483,648 to 2,147,483,647. The unsigned variant unsigned long also needs four bytes but ranges from 0 to 4,294,967,295.
•float and double are the same at the moment on most Arduino boards, and you can use these types for storing floating-point numbers. Both use four bytes of memory and are able to store values from -3.4028235E+38 to 3.4028235E+38. On the Arduino Due, double values are more accurate and occupy eight bytes of memory.
report erratum • discuss

Chapter 1. Welcome to the Arduino • 18
•You need void only for function declarations. It denotes that a function doesn’t return a value.
•Arrays store collections of values having the same type:
int values[2]; |
// A two-element array |
||
values[0] |
= 42; |
// Set the first element |
|
values[1] |
= -42; |
// Set the second element |
|
int |
more_values[] = { 42, -42 }; |
||
int |
first |
= more_values[0]; // first == 42 |
|
In the preceding example, the arrays values and more_values contain the same elements. We have used only two different ways of initializing an array. Note that the array index starts at 0, and keep in mind that uninitialized array elements contain unreliable values.
•A string is an array of char values. The Arduino environment supports the creation of strings with some syntactic sugar—all these declarations create strings with the same contents.
char string1[8] |
= { 'A', 'r', 'd', 'u', 'i', 'n', 'o', '\0' }; |
char string2[] |
= "Arduino"; |
char string3[8] |
= "Arduino"; |
char string4[] |
= { 65, 114, 100, 117, 105, 110, 111, 0 }; |
Strings should always be terminated by a zero byte. When you use double quotes to create a string, the zero byte will be added automatically. That’s why you have to add one byte to the size of the corresponding array.
In Emailing Directly from an Arduino, on page 189, you’ll learn how to use the Arduino’s String class. It makes working with strings safer and more convenient.
Arduino Functions
Arduino calls setup once when it boots, and we use it in our “HelloWorld” example in Hello, World!, on page 16, for initializing the Arduino board and all the hardware we have connected to it. We use the pinMode method to turn pin 13 into an output pin. This ensures the pin can provide enough current to light up an LED. The default state of a pin is INPUT, and both INPUT and
OUTPUT are predefined constants.15
Another mandatory function named loop begins in line 8. It contains the main logic of a program, and the Arduino calls it in an infinite loop. Our program’s main logic has to turn on the LED connected to pin 13 first. To do this, we use digitalWrite and pass it the number of our pin and the constant HIGH. This
15. See http://arduino.cc/en/Tutorial/DigitalPins for the official documentation.
report erratum • discuss