


Chapter 12. Creating Your Own Universal Remote Control • 216
Building an Infrared Proxy
All of our previous remote control approaches have one major drawback: they all depend on a serial connection to a PC. In this section, you’ll learn how to replace this connection with an Ethernet connection, so you no longer need a PC but only Internet access. You will directly plug your Ethernet cable into an Ethernet shield connected to the Arduino, so it is available on your network. Then you’ll connect an infrared LED to the Ethernet shield using the same circuit as shown in Cloning a Remote, on page 207.
You don’t necessarily have to use your PC’s web browser to access the Arduino. You could also use the browser on your PlayStation Portable or on your iPhone. Yes, you can now control your TV set using your game consoles or your smartphone. Oh, and you could replace the Ethernet shield with a WiFi shield so you don’t have to connect your Arduino physically to your network router.
Before we dive into the code, we should do a little planning ahead and make clear what we’d like to achieve. We’ll build an infrared proxy—a device that receives commands via Ethernet and turns them into infrared signals. (See the image on page 212.) To make it easy to integrate the device into a network, we’ll make it accessible via HTTP. This way, we can control it using a regular web browser.
We’ll implement only a very small portion of the HTTP standard on the Arduino—we’ll support only a certain URL scheme. The URLs we’ll support look as follows:
http://«arduino-ip»/«protocol-name»/«command-length»/«command-code»
We’ll replace «arduino-ip» with the IP address of the Arduino’s Ethernet shield. The element «protocol-name» can be one of the supported protocols (“NEC,”
“SONY,” “RC5,” “RC6,” “DISH,” “JVC,” or “SAMSUNG”). «command-length» specifies the length of the command code in bits, and «command-code» contains the command code itself as a hexadecimal number.
Note that the sketch currently doesn’t support Panasonic devices because they don’t fit our URL scheme.
Let’s assume we’d like to send the code for the power key on a Samsung remote, and our Arduino has the IP address 192.168.2.42. Then we’d have to point our web browser to the following URL:
http://192.168.2.42/SAMSUNG/32/E0E040BF
report erratum • discuss

Building an Infrared Proxy • 217
In this case, the protocol name is SAMSUNG, the length of the command code is 32 bits, and the command code is E0E040BF (the hexadecimal number we grabbed in Grabbing Remote Control Codes, on page 203).
We already used the Arduino as a web client in Chapter 10, Networking with Arduino, on page 163, but now we need to turn it into a web server. The server waits for new HTTP requests like the one shown previously, parses the URL, and emits the corresponding infrared signal.
We’ll hide all of these details in a class named InfraredProxy, and to keep things as easy and as concise as possible, we’ll make use of both the Ethernet and the IRremote library. The InfraredProxy class is still one of the book’s most sophisticated examples of Arduino code. Here’s its interface:
RemoteControl/InfraredProxy/infrared_proxy.h
#include <SPI.h> #include <Ethernet.h> #include <IRremote.h>
class InfraredProxy { private:
IRsend _infrared_sender;
void read_line(EthernetClient& client, char* buffer, const int buffer_length); bool send_ir_data(const char* protocol, const int bits, const long value); bool handle_command(char* line);
public:
void receive_from_server(EthernetServer server);
};
After including all libraries needed, we declare the InfraredProxy class. We define a member variable named _infrared_sender that stores an IRsend object we need to emit infrared control codes. Then we declare three private helper methods and the receive_from_server method, which is the only public method of the
InfraredProxy class.
Let’s have a look at the implementation of all methods. We’ll start with read_line:
report erratum • discuss
Chapter 12. Creating Your Own Universal Remote Control • 218
RemoteControl/InfraredProxy/infrared_proxy.cpp void InfraredProxy::read_line(
EthernetClient& client, char* buffer, const int buffer_length)
{
int buffer_pos = 0;
while (client.available() && (buffer_pos < buffer_length - 1)) { const char c = client.read();
if (c == '\n') break;
if (c != '\r') buffer[buffer_pos++] = c;
}
buffer[buffer_pos] = '\0';
}
read_line reads one line of data sent by a client. A line ends either with a newline character (\n) or with a carriage return character followed by a newline character (\r\n). read_line expects the EthernetClient object to read data from, a character buffer to store the data in (buffer), and the maximum length of the character buffer (buffer_length). The method ignores all newline and carriage return characters, and it sets the line’s last character to \0 so the buffer to be filled will always be a null-terminated string.
send_ir_data is responsible for sending infrared commands:
RemoteControl/InfraredProxy/infrared_proxy.cpp bool InfraredProxy::send_ir_data(
const char* protocol, const int bits, const long value)
{
bool result = true;
if (!strcasecmp(protocol, "NEC")) _infrared_sender.sendNEC(value, bits);
else if (!strcasecmp(protocol, "SONY")) _infrared_sender.sendSony(value, bits);
else if (!strcasecmp(protocol, "RC5")) _infrared_sender.sendRC5(value, bits);
else if (!strcasecmp(protocol, "RC6")) _infrared_sender.sendRC6(value, bits);
else if (!strcasecmp(protocol, "DISH")) _infrared_sender.sendDISH(value, bits);
else if (!strcasecmp(protocol, "SHARP")) _infrared_sender.sendSharp(value, bits);
else if (!strcasecmp(protocol, "JVC")) _infrared_sender.sendJVC(value, bits, 0);
else if (!strcasecmp(protocol, "SAMSUNG")) _infrared_sender.sendSAMSUNG(value, bits);
else
result = false; return result;
}
report erratum • discuss
Building an Infrared Proxy • 219
It emits an infrared command specified by a protocol type (protocol), the length of the code measured in bits (bits), and the code value to be sent (value). Depending on the name of the protocol, the method delegates all the real work to our IRsend instance.
handle_command implements one of the most difficult aspects of our InfraredProxy—it parses the URL addressed by the HTTP request:
RemoteControl/InfraredProxy/infrared_proxy.cpp
Line 1 bool InfraredProxy::handle_command(char* line) {
-strsep(&line, " ");
-char* path = strsep(&line, " ");
-
5char* args[3];
-for (char** ap = args; (*ap = strsep(&path, "/")) != NULL;)
-if (**ap != '\0')
-if (++ap >= &args[3])
-break;
10 const int bits = atoi(args[1]);
-const long value = strtoul(args[2], NULL, 16);
-return send_ir_data(args[0], bits, value);
-}
To understand what this method does, you have to understand how HTTP requests work. If you wander up to your web browser’s address bar and enter a URL like http://192.168.2.42/SAMSUNG/32/E0E040BF, your browser will send an HTTP request that looks like this:
GET /SAMSUNG/32/E0E040BF HTTP/1.1 host: 192.168.2.42
The first line is a GET request, and handle_command expects a string containing such a request. It extracts all the information encoded in the given path (/SAMSUNG/32/E0E040BF) and uses it to emit an infrared signal. Parsing the information is tricky, but using C’s strsep function, it’s not too difficult. strsep separates strings delimited by certain characters. It expects a string containing several separated strings and a string containing all delimiters. To get the separated strings, you have to call strsep repeatedly until it returns NULL. That is, whenever you invoke strsep, it returns the next string or NULL.
We use strsep in two different contexts. In the first case, we extract the path from the GET command: we strip off the string “GET” and the string “HTTP/1.1.” Both are separated from the path by a blank character. In line 2, we call strsep to remove the “GET” at the beginning of the string. We don’t even store the function’s return value, because we know it’s “GET” anyway.
report erratum • discuss

Chapter 12. Creating Your Own Universal Remote Control • 220
In line 3, we read the next separated string, which contains the actual path. If you were to pass the request GET http://192.168.2.42/SAMSUNG/32/E0E040BF HTTP/1.1 to handle_command, path would contain /SAMSUNG/32/E0E040BF now.
At this stage, we have a string consisting of three strings separated by a slash character (/). It’s time to use strsep again, and if you understand what happens in lines 6 to 9, then you can call yourself familiar with both C and the strsep function. In the end, the array args contains all three path elements. We can pass the protocol name directly to send_ir_data, but we have to turn the bit length and the value of the code into int and long values before. For the conversion, we use the atoi and strtoul functions. We use the latter one to convert a hexadecimal value to a decimal value.
Now we have defined all helper methods we need, and we only have to implement the only public method of the InfraredProxy class:
RemoteControl/InfraredProxy/infrared_proxy.cpp
Line 1 void InfraredProxy::receive_from_server(EthernetServer server) {
-const int MAX_LINE = 256;
-char line[MAX_LINE];
-EthernetClient client = server.available(); 5 if (client) {
-while (client.connected()) {
-if (client.available()) {
-read_line(client, line, MAX_LINE);
-Serial.println(line);
10 if (line[0] == 'G' && line[1] == 'E' && line[2] == 'T')
-handle_command(line);
-if (!strcmp(line, "")) {
-client.println("HTTP/1.1 200 OK\n");
-break;
15 |
} |
-}
-}
-delay(1);
-client.stop();
20 |
} |
- |
} |
|
The receive_from_server method finally implements the core logic of our InfraredProxy |
|
class. It expects an instance of the EthernetServer class that is defined in the |
|
Ethernet library. It waits for a client to connect using EthernetServer’s available |
|
method in line 4. Whenever the server is connected to a client, it checks |
|
whether the client has new data using EthernetClient’s available method in line 7. |
|
receive_from_server reads the data sent by the client line by line, calling read_line. |
|
It prints each line to the serial port for debugging purposes, and for every line |
report erratum • discuss

Building an Infrared Proxy • 221
it checks whether the line begins with GET. If yes, it calls handle_command; otherwise, it checks whether the line is empty, because all HTTP messages are terminated by an empty line. In this case, receive_from_server sends back an
“OK” response, waits for a millisecond to give the client some time to process the response, and then disconnects from the client by calling stop.
Admittedly, that was a lot of code, but the effort was well worth it. Using the
InfraredProxy is really simple now:
RemoteControl/InfraredProxy/InfraredProxy.ino
#include <SPI.h> #include <Ethernet.h> #include <IRremote.h>
#include "infrared_proxy.h"
const unsigned int PROXY_PORT = 80; const unsigned int BAUD_RATE = 9600;
byte mac[] = { 0xDE, 0xAD, 0xBE, 0xEF, 0xFE, 0xED }; IPAddress ip(192, 168, 2, 42);
EthernetServer server(PROXY_PORT);
InfraredProxy ir_proxy;
void setup() { Serial.begin(BAUD_RATE); Ethernet.begin(mac, ip); server.begin();
}
void loop() { ir_proxy.receive_from_server(server);
}
As usual, we define the MAC and IP addresses we’d like to use. Then we define an EthernetServer object, passing it the port it should listen to, 80 (the standard HTTP port). Also, we initialize a new InfraredProxy object.
In the setup method, we initialize the serial port for debugging purposes. We also initialize the Ethernet shield, and we call EthernetServer’s begin method to start our server’s listener. In loop, we call only the InfraredProxy’s receive_from_server method, passing it our EthernetServer instance.
Let’s finally test the code! Attach the Ethernet shield to your Arduino, and attach the infrared LED circuit to the shield. Configure the MAC and IP addresses, compile the InfraredProxy sketch, and upload it to your Arduino. Point your web browser to http://192.168.2.42/SAMSUNG/32/E0E040BF (adjust the URL to your local settings!) and see what happens to your TV set or whatever
report erratum • discuss
Chapter 12. Creating Your Own Universal Remote Control • 222
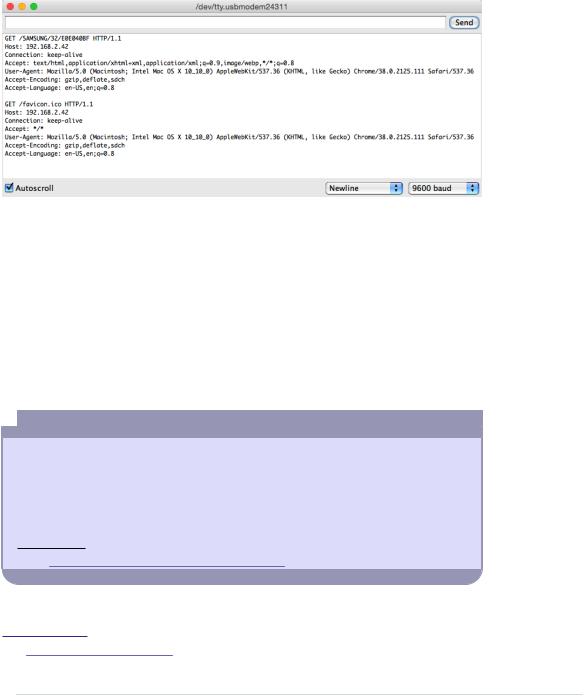
device you want to control. In the following figure, you can see a typical output of the infrared proxy on the serial monitor. Note that the web browser sends not only one but two requests. The second one is for downloading the website’s Favicon,4 and we can safely ignore it.
Although we’ve used only a minimal amount of hardware (a cheap and simple infrared LED), this chapter’s projects are very useful and fairly sophisticated, at least from a software development point of view. Now not only can we control any device that understands infrared signals, but we also can do it using a computer’s serial port or even a web browser.
Also, you no longer need to connect the Arduino to your computer’s USB port. The infrared proxy needs only the USB port to get some power. Plug an AC adapter into your Arduino, and you can get rid of your USB cable.
For the first time, we’ve controlled real-world devices using an Arduino. We’ll continue to do so in the next chapter, where you’ll learn how to control motors.
 Control Everything
All of the projects in this chapter are based on devices you can control already using an infrared remote control. But you can also add an infrared receiver to existing devices or build completely new gadgets that come with an infrared receiver.
In principle, you could control your refrigerator or your microwave oven with a remote control. But have you ever thought about a remote-controlled lawnmower?a I bet not.
a.http://www.instructables.com/id/Arduino-RC-Lawnmower/
4.http://en.wikipedia.org/wiki/Favicon
report erratum • discuss