

Appraisal of Surgical Instruments |
9 |
a |
b |
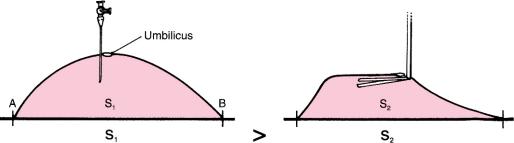
Fig. 1.7 Comparison of (a) pneumoperitoneum, created with a Varess needle, and (b) gasless laparoscopy. S surface
The working space concept also explains difficulties of working in a gasless environment where the shape of the abdomen, once retracted with a gasless device, is not round but more trapezoidal (Fig. 1.7). This does not provide adequate working space, and is one of the reasons for which gasless laparoscopy has been abandoned.
Trocars
Choosing an Appropriate Trocar. There is no ideal trocar size. Ten-millimeter trocars are recommended for most advanced procedures as they allow flexibility and use of different diameters of scissors, clip appliers, and other instruments. Advanced surgeons can also use 5 mm trocars for advanced cases to improve cosmesis but the 5 mm instruments tend to be less blunt and possibly more traumatic than larger 10 mm instruments when used to dissect planes.
The 5 mm trocars are routinely used for basic laparoscopic cholecystectomies, laparoscopic hernia procedures, and laparoscopic appendectomies. These smaller trocars leave barely visible marks and are ideal as supplemental trocars whenever needed in any advanced procedure.
There has been a recent trend towards the use of smaller trocars, even for advanced procedures. Microlaparoscopy has also been offered as an option in selected cases using 2–3 mm trocars.
There is some discussion over the issue of disposable vs. nondisposable trocars, but the author’s preference is for the disposable variety. These have safety shields, and if they are manipulated appropriately they will serve their purpose and intraabdominal injuries can be avoided.
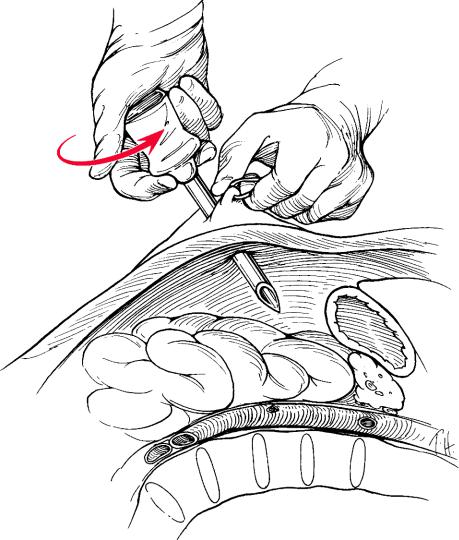
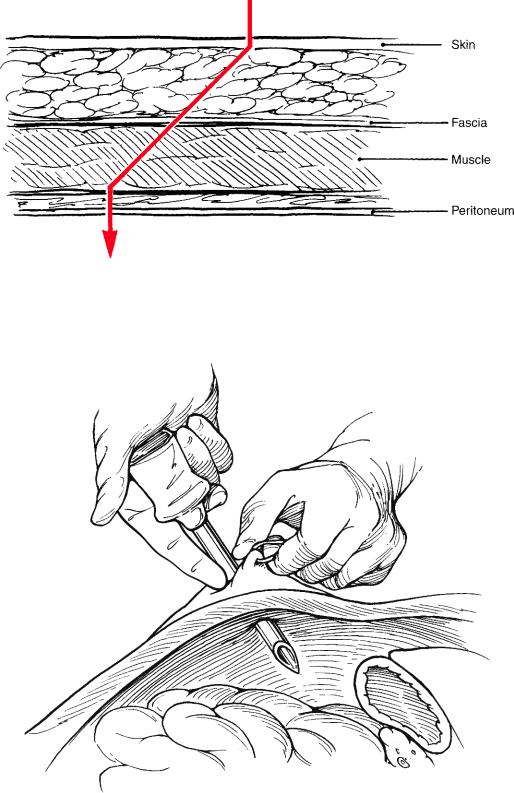
Disposable Trocars. The critical maneuver when inserting disposable trocars is to retract the abdominal wall manually, to increase the distance between the abdominal wall and the intraabdominal organs, and to create a virtual space that is otherwise absent. If this is not done, the trocar will push the abdominal wall during insertion and may injure intraabdominal organs and even major vessels such as the aorta (Fig. 1.8). Disposable trocars should be held firmly in the palm and not in a pencil fashion as advised by some companies. Most of the force should come from the shoulder and not the forearm.
Appraisal
of Surgical
Instruments
10 |
Chapter 1 General Concepts |
Fig. 1.8 Creation of working space in the abdomen
A conical blade shape is a better choice than a pyramidal shape because it pushes the tissue upon insertion and avoids laceration. The general movement of insertion is a slight clockwise screwing motion with very little pushing of the right hand, and fixation by the left hand, as shown in Fig. 1.8.
Nondisposable Trocars. These are now rarely used in the United States due to concerns over blood-borne pathogens, although they are still in use in European and other countries. To avoid herniation, a “Z” entry of the fascial layers was promoted by Kurt Semm (Fig. 1.9).
Optical Viewing Trocars. The optiview trocars have the advantage of allowing entry into the abdomen under direct laparoscopic guidance. In theory this should avoid the injury of superficial vessels crossing the fascia, and provide awareness of penetration of the peritoneal cavity. This is a useful advantage. The author’s preference goes to these types of trocars, as they enhance safety during their insertion.
Appraisal of Surgical Instruments |
11 |
Fig. 1.9 “Z” entry of the fascial layers with a nondisposable trocar
Fig. 1.10 Safe insertion of a trocar while exerting countertraction and using the finger to limit
the thrust
12 Chapter 1 General Concepts
Prevention of Accidents with Trocars. It cannot be overemphasized that caution is essential to avoid injuries when using any kind of trocar. The surgeon should be very cautious not to insert the full length of the trocar, and always to keep at least half of the shaft outside the abdomen until a laparoscope is inserted and the intraperitoneal space is visualized. It is safer to have a trocar stuck midway in the fascia than midway in an abdominal organ. After palming the trocar, a finger is placed above the tip to act as an additional safety measure (Fig. 1.10).A useful tip is to insert the video laparoscope in the trocar if the localization of the trocar and the intraabdominal situation is not clear. One can then check whether the trocar is still in the fascia and muscles. This works on a principle similar to the optical viewing trocar.
Triangulation of Trocars. It is also noted that the trocars are not only inserted at a 90° angle to the camera, but may also point in a triangular fashion towards the target inside the abdomen (Fig. 1.11 dotted lines) (double triangulation).
Fig. 1.11 Double “triangulation” during trocar insertion