


Laparoscopic Roux-en-Y Gastric Bypass |
217 |
Fig. 14.3 Effect of preoperative weight loss on the fatty liver. A = before preoperative weight loss, the liver is swollen. B = after significant preoperative weight loss, the fatty liver “shrinks”
Patient Positioning
The patient is placed in the supine position with both arms out. Care must be taken not to extend the arms excessively to prevent brachial plexus injury. The beds should be specialized for bariatric patients with a footboard to avoid sliding during the procedure, especially in steep reverse Trendelenberg.Padding is very important secondary to the increased weight of the patient on pressure points. A Foley catheter is placed and an orogastric tube is inserted by the anesthesiologist, which will be removed prior to stapling the stomach.
Technique
The surgeon stands on the right of the patient, the camera assistant stands behind him, and the first assistant is on the opposite (left) side of the patient. The first step is
218 Chapter 14 Bariatric Surgery
insufflation of the abdomen. We believe that the easiest technique is the use of the Veress needle. This has been done safely in our experience of more than 1,000 cases. An optiview trocar is then inserted slightly above the umbilicus. Once the optiview trocar is in place, the right and left hand of the surgeon’s ports are placed in a double triangulated fashion, as described in Chap. 1. The next trocar placed is used for retraction of the transverse colon. This same trocar will be used by the right hand of the surgeon during the gastric part of the operation. In case of difficulties, two 5-mm trocars are inserted for the assistant on the left side.
The next step is division of the greater omentum, which is performed using the harmonic shears. This reduces the distance the alimentary loop must travel to reach the stomach (Fig. 14.4). In the case of severe adhesions, we remove them by directing specific
Fig. 14.4 Division of the greater omentum in order to reduce the hump for the positioning of the antecolic Roux-en-Y intestinal loop

Laparoscopic Roux-en-Y Gastric Bypass |
219 |
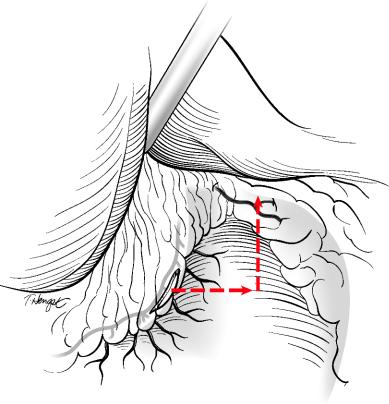
trocars towards this task; the greater omentum can also be divided from right to left at the limit of the transverse colon, thereby sufficiently mobilizing the greater omentum to access the ligament of Treitz. Once the greater omentum is divided, clips are placed at the division to mark the site where the jejunal loop will be placed on the colon. The transverse colon is retracted using a Babcock grasper. The area of division of small bowel is identified approximately 20–25 cm from the angle of Treitz. The small bowel is exposed with the left hand using an atraumatic grasper; an assistant can help with counter-trac- tion An Ethicon GIA-45 (white) is fired to transect the small bowel (Fig. 14.5). One and half firings of the GIA-45 white should divide the mesentery (Fig. 14.6). To avoid injuring
Lig. of Treitz
Angle of Treitz
2 0 c m .
Fig. 14.5 Division of the jejunum 20–25 cm from the angle of Treitz using a white load
Fig. 14.6 Division of the mesentery with 1.5 firings with the 45 mm vascular stapler

220 Chapter 14 Bariatric Surgery
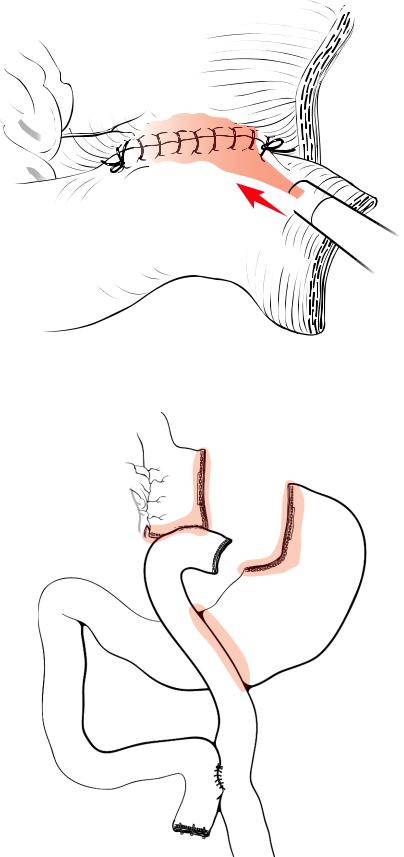
the superior mesenteric artery, one should never fire more than two loads of the GIA-45 in the mesentery (Fig. 14.7). The next step is coagulation of any bleeding along the cut edges of the mesentery. It is extremely important to use electrocautery or clips to avoid postoperative bleeding. The harmonic shears are used to open up the crotch of this division to further extend the length of the alimentary loop. Occasionally, the proximal part of the Roux limb becomes ischemic due to stapling of the feeding vessels. Using another GIA-45 white, this piece of small bowel – like a Ravioli – will be transected where a pulsating artery is seen at the mesenteric border of the small bowel (Fig. 14.8). The proximal part of the cut intestine is marked using several clips placed along the staple line to avoid confusion when pulling the roux limb up. This provides orientation of the 100–150 cm loop. If the BMI is less than 50, a 100-cm loop is used, while a 150 cm loop is constructed if the BMI is greater than 50.A clip is placed distally, and the smallest possible opening is made using the harmonic shears (Fig. 14.9). The same opening is then created on the proximal part of the small bowel.At this point, the GIA-45 white is inserted, and the jejunojejunostomy is created. Stabilization of the stapler is performed using the stapler nearly closed to avoid widening the opening (Fig. 14.10). The jejunostomy is then closed. One Kaiser stitch – named after one of our attendings – is placed at the lower part of the enterotomy (Fig. 14.11), and the enterotomy is closed with a running 3–0 Prolene on an SH1, the best possible small needle (Fig. 14.12). The Kaiser stitch is tied to the running suture. The mesenteric window is closed using a running 3–0 nonabsorbable suture, minimizing the risk of internal hernias (Fig. 14.13). The area is thoroughly checked for bleeding. At this point, attention is directed to the second part of the operation (construction of the gastric pouch) (Fig.14.14).The patient is placed in reverse Trendelenburg
Fig. 14.7 Risk for injury of the SMA if three or more loads of the 45 mm stapler are used

Laparoscopic Roux-en-Y Gastric Bypass |
221 |
If “blue” then remove segment
Fig. 14.8 Resection of an ischemic small bowel tip (resection of a “Ravioli”)
Fig. 14.9 Enterotomy for the jejunojejunostomy using the harmonic shears; the distal jejunum is marked with a clip

222 |
Chapter 14 Bariatric Surgery |
Fig. 14.10 Side to side jejunojejunostomy using the 45 mm vascular stapler. The proximal tip of the jejunum was marked with clips
Fig. 14.11 Closure of the enterotomies using a running 3–0 Prolene on an SH1 needle. The
proximal corener is closed using one interrupted stitch (the “Kaiser” stitch)

Laparoscopic Roux-en-Y Gastric Bypass |
223 |
Fig. 14.12 Closure of the enterotomies using an extramucosal running 3–0 Prolene stitch
Fig. 14.13 Closure of the mesenteric defect using a running 2–0 Ethibond suture
224 |
Chapter 14 Bariatric Surgery |
Fig. 14.14 Figure depicting the future gastric pouch
position.The liver is retracted superiorly after inserting the subxiphoid trocar.Mandatory preoperative weight loss will reduce the volume of a fatty liver, which enhances and eases the use of sophisticated instruments in all cases. The angle of His is identified to the left side of the fat pad and opened gently with the harmonic shears. The “L” retractor is then used to further open the angle of His. Next, the lesser curvature is identified slightly under the second gastric vein. The harmonic shears are used to open the lesser omentum close to the gastric wall. With the assistance of two graspers, the lesser sac is opened promptly without further dissection with the harmonic shears to minimize the risk of burn injury to the gastric wall (Fig. 14.15). At this point, with the right hand of the surgeon holding the L retractor inside the opening, a GIA-45 blue is fed through the window (Fig. 14.16). Before firing the stapler, the NG-tube is removed by the anesthesiologist, and then several firings of the GIA-45 blue will finish the creation of the gastric pouch vertically, and clips are placed along the staple line for hemostasis as needed. It is very important to avoid a fold during the first vertical firing at the intersection between the horizontal and vertical staple lines; such a fold can create a weak point, and is frequently the site of staple line disruption, especially when stapling the thick stomach of a male patient. This disruption can cause a postoperative leak (Fig. 14.17). The L-shaped retractor will always precede the introduction of the stapler (Fig. 14.18).

Laparoscopic Roux-en-Y Gastric Bypass |
225 |
Right margin of stomach under pars flaccida
Pylorus
Fig. 14.15 Preparation of the firing of the first transverse cut; opening the retrogastric window medial to the nerve of Latarjet, using a maneuver with two atraumatic grasper forceps
Fig. 14.16 Division of the horitzontal portion of the gastric pouch using the linear 45 mm stapler with blue loads. Note the inferior retraction of the grasper forceps of the assistant, and the placement of the right-angled “L” shaped retractor holding the gastric pouch, held by the right hand of the surgeon

226 |
Chapter 14 Bariatric Surgery |
NO FOLD
Fig. 14.17 Division of the vertical portion of the pouch; the 45 mm stapler is placed as not to create a fold at the intersection of the two staple lines
Occasionally, after the firing of the last load of staples (Fig. 14.19), there is a connection remaining between the pouch and the gastric remnant (Fig. 14.20). Cutting this tissue can result in a leak from this corner, and convert the angle of His to the angle of sorrow. Although it seems like a waste of a staple load, this tissue should also be divided with a stapler to make sure that there is no opening at the corner. Sometimes, after complete division of the stomach, there is a sharp angle at the corner of the pouch that can look dusky. This should be trimmed with another firing of the stapler. In female patients, we also use the Seamguard (Gore Inc, Flagstaff, AZ) to reinforce the staple lines and ensure hemostasis; however, we do not use the Seamguard with the first and last staple loads (technically at the corners), so that if there is a problem that needs to be fixed with a suture, the Seamguard is not in the way. In men, we often avoid using Seamguards due

Laparoscopic Roux-en-Y Gastric Bypass |
227 |
Fig. 14.18 Introduction of the “L” shaped retractor that emerges just lateral to the angle of
His, the fat pad always left medially
Fig. 14.19 Firing the stapler using Seamguard vicryl reinforcement; the tip of the stapler should always be visible
228 |
Chapter 14 Bariatric Surgery |
Fig. 14.20 The last firing of the top portion of the stomach often leaves an undivided 1–3 mm gastric portion. Arrows indicate the necessity of firing a final load beyond the visible staple line to avoid inadvertent opening leading to leaks
to the thickness of the stomach to avoid the disruption of the staple line. The Roux limb is then pulled up in an antecolic, antegastric fashion. Extreme attention must be paid not to twist the long Roux limb during this part of the operation. If the Roux limb looks short and the anastomosis is under tension, there are a few tricks to fix the problem. If the limb is still short, the patient should be placed back in the supine position, and the peritoneum covering the crotch of the divided mesentery should be opened. This will usually give enough length to relieve the tension. It is also possible to score the mesentery with the harmonic shears in a radiating fashion; this will ease the tension on the Roux-en-Y by lengthening it (Fig. 14.21). If the length is still insufficient, then one can divide the lesser omentum all the way up to the right crus of the diaphragm to release the attachments of the esophagus and add to the length of the pouch (Dr.Ninh Nguyen’s technique,Fig.14.22). Alternatively, the anastomosis can be performed in a retrocolic, retrogastric fashion, which traverses a shorter distance than the antecolic technique, but we have not needed to use this. The patient is then placed in reverse Trendelenberg position, and the gastrojejunostomy is performed. The first posterior layer is sutured using a 3–0 Prolene on an SH1 starting in the first centimeter in the vertical division and finishing at the lesser curvature. This technique has dramatically reduced the number of postoperative strictures due to the creation of a larger anastomosis (Fig. 14.23). The enterotomy and gastrostomy are completed using the harmonic shears to a length of 1.5 cm (Figs. 14.24 and 14.25). If there is a little bleeding on the mucosa, it is possible to control it with intraluminal clips. Electrocautery should be avoided, as it can result in a postoperative leak (Fig. 14.26).

Laparoscopic Roux-en-Y Gastric Bypass |
229 |
Fig. 14.21 Technique (1) to increase mesenteric length. Scoring the mesentery (dotted lines) will increase the length of the Roux-en-Y by 2–3 cm
Phrenoesophageal membrane
Fig. 14.22 Technique (2) to decrease tension on the gastrojejunal anastomosis; taking down
of the phrenoesophageal membrane (Nguyen)

230 |
Chapter 14 Bariatric Surgery |
1 cm.
Fig. 14.23 Start of the first posterior layer of the gastrojejunostomy on the vertical portion, 1 cm above the horitzontal staple line. This will increase the size of the gastrojejunostomy, thus reducing the risk of postoperative stricture
Fig. 14.24 Opening the gastrotomy with harmonic shears

Laparoscopic Roux-en-Y Gastric Bypass |
231 |
Fig. 14.25 Opening the enterotomy; figure shows the completed first posterior layer using
3–0 Prolene (on SH1 needle)
Fig. 14.26 Control of bleeding inside the anastomosis using clips (avoid electrocautery)

232 Chapter 14 Bariatric Surgery
The second posterior layer is sutured using Vicryl (Fig. 14.27); this facilitates dilation if it becomes necessary as the suture dissolves at the second month. The use of vicryl is tricky, and one should always be careful, since Vicryl can unravel. The anterior layers are completed using the same 3–0 Prolene on an SH1 (Figs. 14.28 and 14.29); The first anterior layer is extramucosal; care is taken to dunk both corners and angles. The anastomosis is tested using methylene blue through the NG tube in measured 5cc increments, which also has the advantage of delineating the size of the gastric pouch. A twenty CC pouch is usually ideal. Fibrin sealant is applied on the vertical gastric stapled lines and in Petersen’s space (Figs. 14.30 and 14.31); an omental patch using the greater omentum is routinely placed on the gastrojejunostomy. A JP drain is placed around the anastomosis in left upper quadrant to detect any postoperative bleeding. The trocars are then removed under direct vision.In case of bleeding from port sites,a spatula is used to achieve homeostasis from inside the abdomen, or it is inserted through the trocar site, and hemostasis completed from the outside. Closure of the skin using dermabond will complete the operation. The patient is urged to ambulate the same day, and will be placed on a liquid diet the next morning. If the patient tolerates the liquid diet without nausea or vomiting due to the swelling of the anastomosis, the patient is discharged. The drain is removed at this time. Twenty percent of our patients complain of nausea and some vomiting due to edema of the anastomosis. There is no need to perform an upper GI swallow since it will always show no passage of contrast. This will usually resolve the next day. We discharge our patients on a proton pump inhibitor for 1 year to prevent anastomotic ulcers.
Fig. 14.27 Running the second posterior layer using 3–0 Vicryl on an SH1 needle

Laparoscopic Roux-en-Y Gastric Bypass |
233 |
Fig. 14.28 Running the first anterior layer using an extramucosal 3–0 SH1 Prolene suture
Fig. 14.29 Running the second and last anterior layer using a serosal 3–0 SH1 Prolene suture
234 |
Chapter 14 Bariatric Surgery |
Fig. 14.30 Optional reinforcement of the anastomosis using fibrin glue
Fig. 14.31 Areas where fibrin glue is applied for hemostasis and adhesion (vertical gastric staple lines, Petersen’s defect)