


244 Chapter 14 Bariatric Surgery
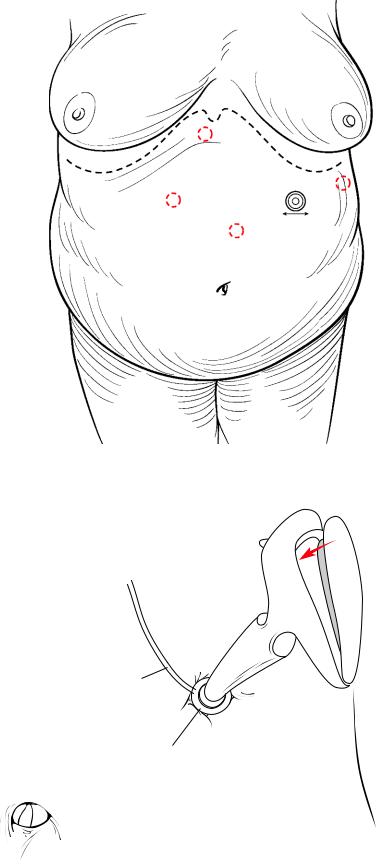
The first stitch attaches the stomach to the left crus (a French technique, Fig. 14.45) as an alternative to the gastric wall. Two other gastro-gastric stitches are placed to fix the band in the correct 45° position (Fig. 14.46). It is important that these stitches are placed high on the stomach to leave sufficient space for the Realize Band. A fourth stitch is used to reconstitute the phrenoesophageal membrane covering the right crus (Katkhouda stitch), and the last stitch is placed under the band itself, to further minimize the risk of slippage (Patterson’s stitch). The last two stitches are optional. After this is done, the tubing is grasped and exteriorized through the 15 mm trocar.At this time, the incision of the fifteen millimeter trocar is widened to about 4 cm (Fig. 14.47), and a small area of the fascia is identified under the trocar entry site. A pocket is created, and the port-a-cath is fixed in place using a specially provided device (Fig. 14.48). It is important to ensure that the tubing is not twisted. We like to add a single vicryl stitch to approximate the fascia around the tubing to avoid any herniation. The subcutaneous fat and skin are closed in layers, and the remaining incisions are then closed using dermabond.
Complications
There are two major complications related to the lap band that would necessitate a revisional procedure: slippage and erosion.
Slippage. If the fundus is not plicated above the band, the stomach can slip under the band. If a patient continues to overeat in spite of having a very tight band, the pressure inside the pouch results in distention of the pouch. Over time, this excessive distention pushes the stomach through the band and results in slippage. On a plain X-ray of the abdomen, instead of appearing at a 45° angle pointing from the left shoulder to the right lower quadrant, the band will be in a horizontal plane or even at a 90° angle to the appropriate position (pointing from the right shoulder to the left lower quadrant).
The first step is to remove all the fluid from the band and keep the patient on liquid diet. This may result in reversal of the slipped pouch; however, if this maneuver is unsuccessful, the patient should be taken back to the operating room.
The positioning and trocar placement is exactly the same as the initial lap band operation. The adhesions of the liver to the band are taken down with harmonic shears. Then the gastro-gastric imbricating sutures are divided and the imbrication is reversed. Occasionally this can be done with an endo-GIA if the planes are obliterated. The band is then unlocked and removed, which results in release of the slippage. The options now are to make a new retroesophageal tract to place the same band, or preferably to convert the procedure to a Roux-en-Y gastric bypass (if discussed with the patient preoperatively).
Erosion. Erosions usually happen if the band is too tight or if there was an injury to the stomach in the original operation. Infection of the port site is commonly the first symptom of band erosion. It is diagnosed with endoscopy, which reveals a part of the band inside the stomach.

Laparoscopic Adjustable Band |
245 |
Fig. 14.45 First stitch to imbricate the stomach over the band to reduce the risk of slippage.
Fixation of the stomach to the diaphragm
Fig. 14.46 Two remaining gastro-gastric stitches of 2–0 Ethibond inbricating the stomach around the band
246 |
Chapter 14 Bariatric Surgery |
4 cm. incision
Fig. 14.47 Four centimeter incision made extending the incision of the 15 mm trocar for introduction of the port
Tubing to band
Injection port
Fig. 14.48 Securing the port with metallic anchors using the specific device

Laparoscopic Adjustable Band |
247 |
The positioning and port placement is again the same as the original operation. The first step is to find the tube of the band (Fig. 14.49). The adhesions are taken down, and dissection continues directly on the tube until the band itself is found. The capsule around the band is divided using the harmonic shears (Fig. 14.50). This usually involves opening a hole inside the stomach where the erosion occurred. The band is then divided with sharp scissors and removed (Fig. 14.51). The hole in the stomach is closed with 2–0 prolene suture and an omental patch (Fig. 14.52). The closure is tested with methylene blue and a drain is placed. The port-a cath is removed and the skin is left open if infection is present.A gastrographin swallow is done on postoperative day 4–5, and if normal, the patient will be started on diet.
Occasionally, if most of the band is inside the stomach, the procedure can be done endoscopically. First, the port-a-cath is removed. Next, the band is cut inside the stomach using endoscopic scissors and removed via the mouth. Since there is no opening of the tract intraoperatively, there is no need for drainage or closure of the defect. The tract around the tube works like a tract around a t-tube and will close over time.
Fig. 14.49 Gastric erosion following lap band surgery; the guide to the band is represented by the tubing, shown here being dissected free of adhesions with the harmonic shears
248 |
Chapter 14 Bariatric Surgery |
Fig. 14.50 Exposure of the lap band chamber by opening the encapsulated layer around the
silicone Band
Band cut
Fig. 14.51 Division of the lap band using sharp, strong scissors