


Laparoscopic Sleeve Gastrectomy |
249 |
Hole 
Omentum
Fig. 14.52 Closure of the gastric erosion using an omental patch |
|
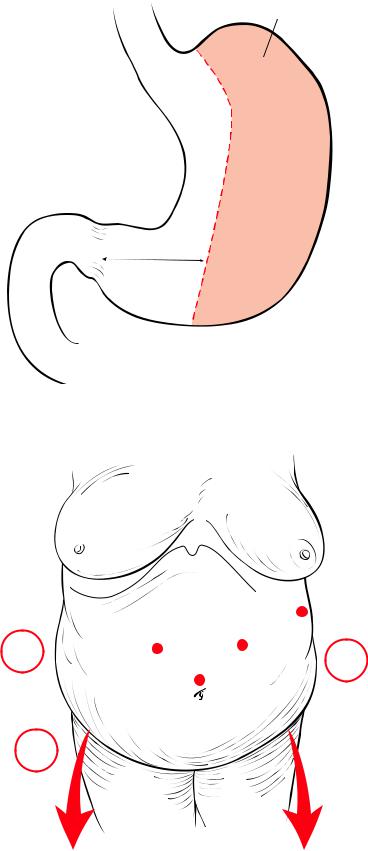
The purpose is to create a 60–200 cc pouch removing a major part of the stomach, creating |
Laparoscopic |
a sleeve and preserving a portion of the antrum (Fig.14.53). The patient is placed in a steep |
Sleeve |
reverse Trendelenburg position (Fig. 14.54). Good exposure of the stomach, by ensuring |
Gastrectomy |
the stomach is stretched, is crucial for the dissection of the greater curvature. The har- |
|
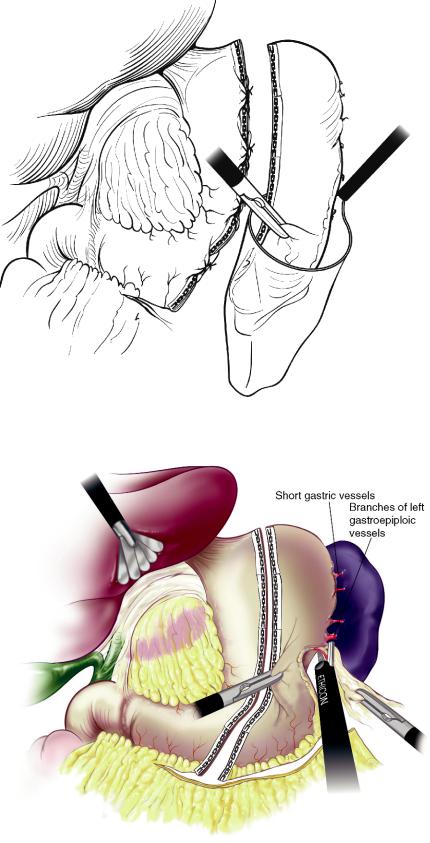
monic shear is used to take down all the branches of the left gastroepiploic vessels. The |
|
greater curvature dissection continues approximately two centimeters to the pylorus, then |
|
a distance of five to six centimeters proximal to the pylorus is identified to start the first |
|
firing (Fig. 14.55). The sleeve gastrectomy is performed via sequential firings of a GIA |
|
forty-five starting with a 4.8 mm (green) stapler enforced with bioabsorbable material |
|
Seamguard (W.L. Gore Associates, Flagstaff AZ). The first stapler is fired so that a narrow |
|
1.5 cm gap is left between the tip of the stapler and the lesser curvature (Fig. 14.56). The |
|
second firing is then performed, making sure that there is no occlusion of the gastric |
|
lumen. A 32–34, French bougie is then inserted and advanced along the lesser curvature |
|
into the duodenum to allow the calibration of the sleeve (Fig. 14.57) and then the sleeve |
|
gastrectomy, is completed by the firing of GIA-45 blue cartridges at the angle of His |
|
(Fig. 14.58). It is important to leave some gastric tissue at the upper edge near the angle of |
|
His to avoid injuring the gastro-esophagal junction. Seamguards are used on all firings. |
|
The gastric specimen is then removed through the umbilical port in a specimen bag |
|
(Fig. 14.59). An alternative technique is to divide the stomach before dividing the high |
|
gastroepiploic vessels and the short gastric vessels, thus allowing the stomach to remain |
|
attached and naturally retracted (Fig. 14.60). It is also possible to imbricate the areas of |
|
intersecting staple lines with interrupted stiches as an additional safety measure (Fig.14.61). |
|
250 |
Chapter 14 Bariatric Surgery |
Portion of stomach removed
100 cc longitudinal  pouch
pouch
6 cm.
Fig. 14.53 Laparoscopic sleeve gastrectomy
S
CA


 10
10
E
5
10 10 D
A 10C B  FA
FA
To steep reverse Trendelenburg
Fig. 14.54 Trocar port positions. C camera port; A left hand of surgeon; B right hand of sur-
geon; D grasper for assistant; E liver retractor

Laparoscopic Sleeve Gastrectomy |
251 |
5-6 cm. 
Fig. 14.55 Mobilization of the greater curvature to a distance of 5–6 cm of the pylorus
Fig. 14.56 Firing of the first load of a 45-mm stapler with green load, leaving a 1.5-cm margin to the lesser curve

252 |
Chapter 14 Bariatric Surgery |
34
Fig. 14.57 Introduction of a 34Fr bougie after the completion of the second firing of the stapler
Fig. 14.58 Completion of the sleeve gastrectomy, all staple lines reinforced with Seamguard. Note that there is a sliver of stomach left at the angle of His to reduce the risk of postoperative leaks at this area
Laparoscopic Sleeve Gastrectomy |
253 |
Fig. 14.59 Removal of the gastric specimen in a bag
Fig. 14.60 Alternative technique for sleeve gastrectomy. Mobilization of the greater curve and fundus following the division of the stomach, thus allowing for a natural retraction of the stomach during stapling

254 |
Chapter 14 Bariatric Surgery |
Fig. 14.61 Final view of the completed sleeve gastrectomy. The intersections of the staple lines are dunked using interrupted stitches