

Chapter 10 High-Precision Timing (Counters/Timers)
Measuring Pulse Width
This section describes how you can use a counter to measure pulse width. There are several reasons you may need to determine pulse width. For example, to determine the duration of an event, set your application to measure the width of a pulse that occurs during that event. Another example is determining the interval between two events. In this case, you measure the pulse width between the two events. An example of when you might use this type of application is determining the time interval between two boxes on a conveyor belt or the time it takes one box to be processed through an operation. The event is an edge every time a box goes by a point, which prompts a digital signal to change in value. All LabVIEW counter examples are located in the labview\examples\daq\counter library.
Measuring a Pulse Width
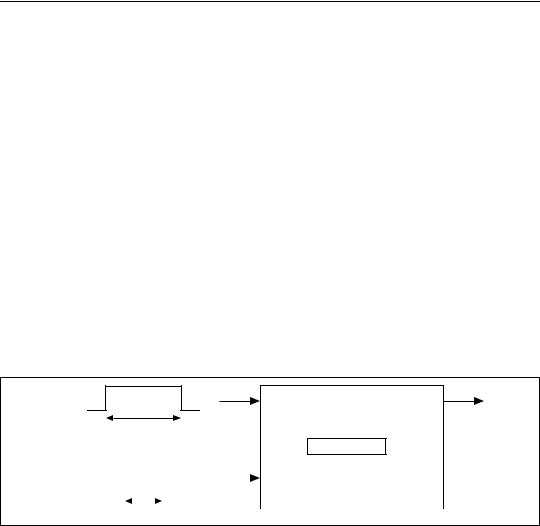
You can measure an unknown pulse width by counting the number of pulses of a faster known frequency that occur during the pulse to be measured. Connect the pulse you want to measure to the GATE input pin and a signal of known frequency to the SOURCE (CLK) input pin, as shown in Figure 10-16. The pulse of unknown width (Tpw) gates the counter configured to count a timebase clock of known period (Ts). The pulse width equals the timebase period times the count, or: Tpw = Ts × count. The SOURCE (CLK) input can be an external or internal signal.
GATE |
OUT |
Tpw
Count Register
frequency |
|
|
|
|
|
|
|
|
|
SOURCE |
|
|
|
|
|
|
|
|
|
||||
source |
|
|
|
|
|
|
|
|
|
|
|
|
|
|
|
|
|
|
|
|
|
||
|
|
|
Ts |
|
|||||||
|
|
|
|
||||||||
Figure 10-16. Counting Input Signals to Determine Pulse Width
An internal signal is based upon the type of counter chip on your
DAQ device. With TIO-ASIC devices, you can choose internal timebases of 20 MHz, 100 kHz, and a device-specific maximum timebase. With DAQ-STC devices, you have a choice between internal timebases of
20 MHz and 100 kHz. With Am9513 devices, you can choose internal timebases of 1 MHz, 100 kHz, 10 kHz, 1 kHz, and 100 Hz. With 8253/54
© National Instruments Corporation |
10-17 |
LabVIEW Measurements Manual |
Chapter 10 High-Precision Timing (Counters/Timers)
devices, the internal timebase is either 2 MHz or 1 MHz, depending on which device you have.
Figure 10-17 shows how to physically connect the counter on your device to measure pulse width.
|
|
|
|
counter |
|
|
|
|
|
|
|
|
your |
|
|
source |
|
|
|
|
out |
|
|
|
device |
|
|
gate |
|
|
|
|
|
|
|
|
|
|
|
|
|
|
|
|
|
|
|
Figure 10-17. Physical Connections for Determining Pulse Width
Determining Pulse Width
How you determine a pulse width depends upon which counter chip is on your DAQ device. If you are not sure which counter chip your DAQ device has, refer to your hardware user manual.
Open the Measure Pulse (DAQ-STC) and Measure Pulse (NI-TIO) examples and study their block diagrams.
Am9513
Open the block diagram of the Measure Pulse-Easy (9513) VI, available on the Functions»Data Acquisition»Counter palette. This VI uses the Easy VI, Measure Pulse Width or Period.
The Measure Pulse Width or Period VI counts the number of cycles of the specified timebase, depending on your choice from the type of
measurement menu located on the front panel of the VI. The measurement menu choices for this VI are the following:
•Measure high pulse width
•Measure low pulse width
•Measure period (rising edge to rising edge)
•Measure period (falling edge to falling edge)
•High pulse width (multiple pulses, DAQ-STC)
•Low pulse width (multiple pulses, DAQ-STC)
LabVIEW Measurements Manual |
10-18 |
www.ni.com |
Chapter 10 High-Precision Timing (Counters/Timers)
Either menu choice can be used to measure the width of a single pulse or to measure a pulse within a train of multiple pulses. However, the pulse must occur after the counter starts. Because the counter uses high-level gating, it might be difficult to measure a pulse within a fast pulse train. If the counter is started in the middle of a pulse, it measures the remaining width of that pulse.
The timebase you choose determines how long a pulse you can measure with the 16-bit counter. For example, the 100 Hz timebase allows you to measure a pulse up to 216 × 10 ms = 655 seconds long. The 1 MHz timebase allows you to measure a pulse up to 65 ms long. Because a faster timebase yields a more accurate pulse-width measurement, it is best to use the fastest timebase possible without the counter reaching terminal count (TC).
The valid? output of the example VI indicates whether the counter measured the pulse without overflowing (reaching TC). However, valid? does not tell you whether a whole pulse was measured when measuring a pulse within a pulse train.
8253/54
Open the block diagram of the Measure Short Pulse Width (8253) VI located in the examples\daq\counter\8253.llb.
This VI counts the number of cycles of the internal timebase of Counter 0 to measure a high pulse width. You can measure a single pulse or a pulse within a train of multiple pulses. However, the pulse must occur after the counter starts. This means it may be difficult to measure a pulse within a fast pulse train because the counter uses high-level gating. To measure a low pulse width, insert a 7404 inverter chip between your pulse source and the GATE input of counter 0.
On the Measure Short Pulse Width (8253) VI block diagram, the first call to ICTR Control VI sets up counting mode 4, which tells the counter to count down while the gate input is high. The Get Timebase (8253) VI is used to get the timebase of your DAQ device. A DAQ device with an 8253/54 counter has an internal timebase of either 1 MHz or 2 MHz, depending on the device. Inside the While Loop, ICTR Control VI is called to continually read the count register until one of four conditions are met:
•The count register value has decreased but is no longer changing. It is finished measuring the pulse.
•The count register value is greater than the previously read value. An overflow has occurred.
© National Instruments Corporation |
10-19 |
LabVIEW Measurements Manual |