

Phone_81_Development_for_Absolute_Beginners
.pdfproperty to the App class so that I can reference it throughout all pages in the app. Also, recall from the lesson on styling your app that you can create global resources and styles by defining them in the <Application.Resources> section of the App.xaml file.
4. It will also allow you to catch with unhandled exceptions in your app.
The operating system provides your app a Window to display in. Instead of allowing you to work directly with the Window, your app creates a Frame object that represents the Window, but adds navigation features … As we discussed in the lesson about navigation, the
Frame object can load and unload objects that derive from Windows.UI.Xaml.Controls.Page (which each of your Pages will derive from). It also keeps a history of all the pages that were loaded and in which order in the BackStack, an IList<PageStackEntry>. Much of the setup work for the Window and Frame happens in the OnLaunched event handler.
Ok, so honestly, there are many different ways to save your data while your app is running or prior to it going into a suspended state. I’m going to demonstrate three easy ways to enable this.
The first technique is to employ the SuspensionManager. The second technique is to use Windows.Storage.ApplicationData.Current.LocalSettings. The third is to use the NavigationHelper. Now, fair warning, the SuspensionManager and the NavigationHelper are not part of the Phone API. Instead, they are helper classes that are added to your project via a project or page template. The Blank App template does NOT include these by default, however
I’ll show you how we’ll add them into your project easily.
Let’s start with using no state saving techniques just to show you what the problem is.
Then, we can use these three techniques to solve the problem.
We’ll create a new Blank App project called “ManagingState”.
I’ll delete the MainPage.xaml. At this point, the project will not compile because the App.xaml.cs needs a page to load at start up. We’ll fix that later.
Add a Basic Page called Page1.xaml:
Windows Phone 8.1 Development for Absolute Beginners – Page 130
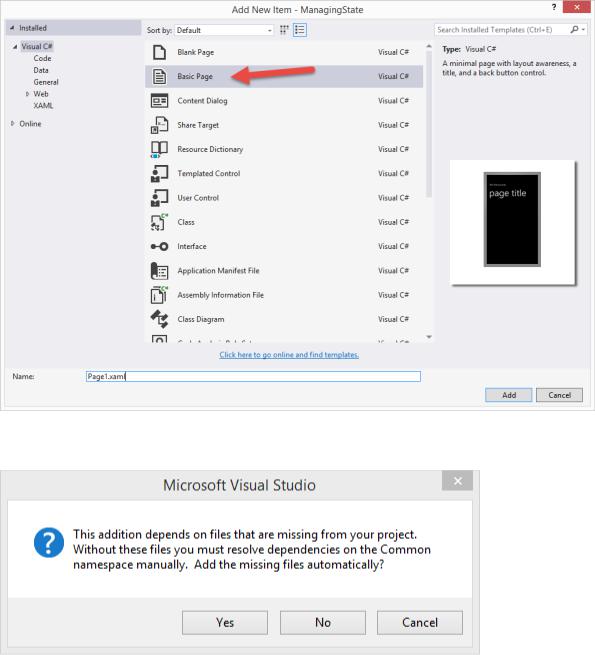
When you click the Add button, you’ll see the following message box:
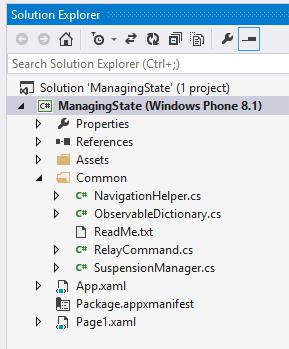
Click “Yes”. This will add both the Page1.xaml and a folder called \Common with a number of new files in it. We will not use these files just yet, but soon. Your Solution Explorer should look like this:
Windows Phone 8.1 Development for Absolute Beginners – Page 131
Add two more Basic Pages, called Page2.xaml and Page3.xaml, respectively.
In all three pages, add the following code inside of the <Grid> named “ContentRoot”:
<StackPanel>
<Button Content="Go To Previous Page" Click="previousButton_Click" />
<Button Content="Go To Next Page"
Click="nextButton_Click" />
<TextBox Name="valueTextBox" />
</StackPanel>
Also, change the TextBlock that displays the page title like so, using the appropriate
name:
<TextBlock Text="page 1" Margin="0,12,0,0" Style="{ThemeResource
HeaderTextBlockStyle}"/>
When you’re finished, Page1.xaml should look like this in the designer:
Windows Phone 8.1 Development for Absolute Beginners – Page 132

… and the other two pages should look similar.
Add the following code to Page1.xaml.cs, at the very bottom of the class definition (right after a code region named “NavigationHelper registration”:
private void previousButton_Click(object sender, RoutedEventArgs e)
{
if (Frame.CanGoBack) Frame.GoBack();
}
private void nextButton_Click(object sender, RoutedEventArgs e)
{
if (Frame.CanGoForward) Frame.GoForward(); else
Frame.Navigate(typeof(Page2));
}
In a similar fashion, add the following code to Page2.xaml.cs:
private void previousButton_Click(object sender, RoutedEventArgs e)
{
Frame.GoBack();
}
private void nextButton_Click(object sender, RoutedEventArgs e)
{
Windows Phone 8.1 Development for Absolute Beginners – Page 133

if (Frame.CanGoForward) Frame.GoForward(); else
Frame.Navigate(typeof(Page3));
}
And finally, in a similar fashion, add the following code to Page3.xaml.cs:
private void previousButton_Click(object sender, RoutedEventArgs e)
{
Frame.GoBack();
}
private void nextButton_Click(object sender, RoutedEventArgs e)
{
if (Frame.CanGoForward) Frame.GoForward(); else
Frame.Navigate(typeof(Page1));
}
Unfortunately, all of this prep work was necessary to create a viable scenario.
If you attempt to run the application at this point, you’ll get an error:
Double-click that entry in the Error List to go to the line of code that references MainPage which no longer exists in our app.
Change this line:
if (!rootFrame.Navigate(typeof(MainPage), e.Arguments))
… to …
Windows Phone 8.1 Development for Absolute Beginners – Page 134
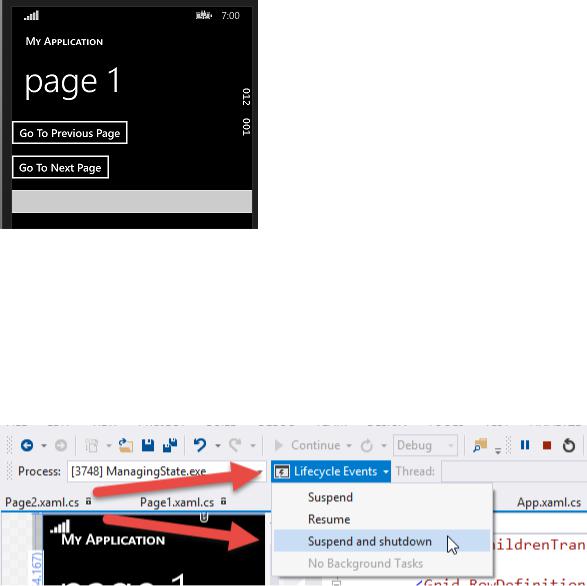
Click the “Go To Next Page” button until you reach Page 3 … you can even use the “Go To Previous Page” a couple of times if you wish just to see the Frame.GoBack() and Frame.GoForward() methods at work.
Next, go back to Visual Studio and select the Lifecycle Events dropdown (which is only displayed while you are debugging you app) and select “Suspend and shutdown”.
The app will terminate, you’ll leave Debug mode, and Visual Studio will return to the design time experience.
Now, restart the app in Debug mode. Notice that you will always start back on
Page1.xaml. Attempt to “Go Back”, however the the Frame.BackStack from your previous session is lost because the app was terminated and with it, all session state.
We’ll remedy this easily with the SuspensionManager class. I won’t give into the details of the class, however by inserting a couple of lines of code in the App.xaml.cs file’s OnNavigated and OnSuspending methods, we can at least get the Frame’s BackStack back.
Windows Phone 8.1 Development for Absolute Beginners – Page 135
In the App.xaml.cs, in the OnLaunched() method, find these lines of code:
if (rootFrame == null)
{
// Create a Frame to act as the navigation context and navigate to the first page rootFrame = new Frame();
Paste this line of code below them:
ManagingState.Common.SuspensionManager.RegisterFrame(rootFrame, "appFrame");
In a nutshell, the SuspensionManager.RegisterFrame tells the SuspensionManager which object (rootFrame, the only Frame in our app) that we’ll be suspending.
Next, in the OnSuspending event, find this comment:
// TODO: Save application state and stop any background activity
… and add this line of code:
await ManageAppLifecycle.Common.SuspensionManager.SaveAsync();
This will force you to add the async keyword into the OnSuspending method declaration like so:
private async void OnSuspending(object sender, SuspendingEventArgs e)
I devote a lesson to explaining the await and async keywords. For now, just add the async keyword and continue on.
At this point, we’ve registered the Frame with the SuspensionManager class and have called the SaveAsync() method which will save the current state of the Frame each time the app is suspended.
Finally, we’ll want to Load the saved Frame when the app has terminated. Remember: if the app doesn’t terminate, we won’t need to restore the state, but we do not get a notification when the app is about to be terminated. Therefore, we can’t take any chances and have to save state each time the app is suspended.
Back in the OnLaunched() method, locate these lines of code:
Windows Phone 8.1 Development for Absolute Beginners – Page 136

if (e.PreviousExecutionState == ApplicationExecutionState.Terminated)
{
//TODO: Load state from previously suspended application
…and paste the following line of code beneath the TODO comment:
await ManagingState.Common.SuspensionManager.RestoreAsync();
Once again, the presence of the await keyword will force us to modify the OnLoaded method signature by adding the async keyword like so:
protected async override void OnLaunched(LaunchActivatedEventArgs e)
Now, shut down the emulator. Why? We’ve already terminated the app once. As a result, the code we just added (SuspensionManager.RestoreAsync()) will attempt to run, but there will be no state saved and we’ll encounter an unhandled exception. This only happens because I asked to you run this app once prior to adding the SaveAsync() code. You’ll never have to do this again.
Run the app, navigate from page 1 to page 2 to page3 using hte “Go To Next Page” button.
Next, use the Lifecycle Events dropdown to “Suspend and Shutdown” the app.
Now, immediately run the app again. Notice that you’ll start with Page 3 since that was the last page prior to termination:
Windows Phone 8.1 Development for Absolute Beginners – Page 137
Furthermore, click the “Go To Previous Page” button a couple of times to return to page 2 and page 1. The moral of the story is that we’ve now saved both the last page the user was working on AND the Frame.BackStack!
What about application data? How can that be retained between termination sessions? In other words, if the user is typing in entries to the text boxes, how can those be entries be saved should the app terminate before they are permanently saved or used?
There are two techniques to save application data, as I alluded to earlier.
The first is to utilize Windows.Storage.ApplicationData.Current.LocalSettings.
LocalSettings is a simple dictionary that is saved to the app’s assigned storage area. There’s also a similar storage area called
Windows.Storage.ApplicationData.Current.RoamingSettings which will save data into a folder that gets synchronized across all of your devices. For now, we’ll prefer LocalSettings.
In Page1.xaml, modify the valueTextBox adding a Textchanged event handler:
<TextBox Name="valueTextBox"
TextChanged="valueTextBox_TextChanged" />
Right-click the new event handler name and select Go to Definition or the F12 function key. In the new valueTextBox_TextChanged event handler method, add the following code:
private void valueTextBox_TextChanged(object sender, TextChangedEventArgs e)
{
Windows.Storage.ApplicationDataContainer localSettings = Windows.Storage.ApplicationData.Current.LocalSettings;
localSettings.Values["value"] = valueTextBox.Text;
}
This code will save the current Text property of the valueTextBox control each time the text changes. This may seem excessive, however this is one sure way to guarantee the application data state is saved in case the phone’s battery dies or any other termination scenario.
How to load the value back? Look for the NavigationHelper_LoadState() event handler defined earlier on the Page1.xaml.cs and add the following code:
private void NavigationHelper_LoadState(object sender, LoadStateEventArgs e)
Windows Phone 8.1 Development for Absolute Beginners – Page 138

{
Windows.Storage.ApplicationDataContainer localSettings = Windows.Storage.ApplicationData.Current.LocalSettings;
if (localSettings.Values.ContainsKey("value"))
{
valueTextBox.Text = localSettings.Values["value"].ToString();
}
}
First, this ensures that the key “value” exists, and if it does, then load its value into the valueTextBox.Text property.
To test this, run the app, type in text like so:
… then back in Visual Studio, select the Lifecycle Events “Suspend and shutdown”. Immediately re-run the app. You should be returned to page 1 and “Bob” should re-appear in the text box.
The second technique for saving application data state is something built into the NavigationHelper class. You’ll learn more about this helper class later in this series when we begin working with the Hub App template. For now, just know that it is part of the Basic Page template, pre-wired and ready to go. If you create a new Blank page, you’ll have to do a lot of work to integrate it, but its not impossible … just easier to use the Basic Page template.
Windows Phone 8.1 Development for Absolute Beginners – Page 139