

Phone_81_Development_for_Absolute_Beginners
.pdfTextWrapping="Wrap"
VerticalAlignment="Top"
InputScope="Number"
Width="100"
FontSize="24"
LostFocus="amountTextBox_LostFocus"
TextChanged="billAmountTextBox_TextChanged"
GotFocus="amountTextBox_GotFocus" />
</StackPanel>
The billAmountTextBox allows the user to type in the amount printed on the receipt. Obviously, this will be a large part of the calculation for the tip.
Next, I’ll add a TextBlock (again, used as a label) and a series of RadioButtons to allow the user to choose the percentage to tip based on the quality of the service:
<TextBlock HorizontalAlignment="Left"
TextWrapping="Wrap"
Text="Percent To Tip:"
VerticalAlignment="Top"
FontSize="24"
Margin="0,20,0,0"/>
<RadioButton Content="10% - Horrible Service" Tag="0.1"
GroupName="percentRadio" Click="RadioButton_Click" />
<RadioButton Content="18% - Acceptable Service" Tag="0.18"
GroupName="percentRadio" IsChecked="True" Click="RadioButton_Click" />
<RadioButton Content="25% - Great Service" Tag="0.25" GroupName="percentRadio" Click="RadioButton_Click" />
Windows Phone 8.1 Development for Absolute Beginners – Page 90
Notice that I'm using the Tag property in each RadioButton. The Tag property is a holdover from many years ago. It allows you to add anything you want. What I've used it for, in this particular case, is the actual percentage amount that will be used for the calculation. Instead of having to do some switch statement determine the percentage, I just input the actual percentage inside of the Tag, so when a radio button is selected, I can programmatically retrieve the Tag, convert it to a decimal and then use that in my calculation for the percentage ticked.
.1 for 10%
.18 for 18%
.25 for 25%
Next, I’ll display the calculated tip amount. The first TextBlock is just the label describing the purpose for the next TextBlock which actually will display the tip amount:
<TextBlock HorizontalAlignment="Left" TextWrapping="Wrap" Text="Amount to Tip:" FontSize="24"
Margin="0,20,0,0" />
<TextBlock Name="amountToTipTextBlock" HorizontalAlignment="Left"
TextWrapping="Wrap"
VerticalAlignment="Top" Text="$0.00" FontSize="36"
/>
Finally, I’ll display the total amount of the bill which includes the pre-tip amount along with the tip. This will be the amount charged to my credit card:
<TextBlock HorizontalAlignment="Left"
TextWrapping="Wrap"
VerticalAlignment="Top"
Text="Total Bill:"
Windows Phone 8.1 Development for Absolute Beginners – Page 91
FontSize="24" Margin="0,20,0,0"
/>
<TextBlock x:Name="totalTextBlock" HorizontalAlignment="Left" TextWrapping="Wrap" VerticalAlignment="Top" Text="$0.00"
FontSize="36"
/>
The billAmountTextBox (as well as the RadioButton controls) have a number of events that we’ll want to handle for various purposes. For example, when the user taps the billAmountTextBox to enter an amount, we will want to clear the text and allow them to type in what they want. When the user is typing or editing the number, we want to perform the calculation instantly. When they move their mouse cursor out of the billAmountTextBox, we want to nicely format the number they typed as dollars and cents with a dollar sign symbol.
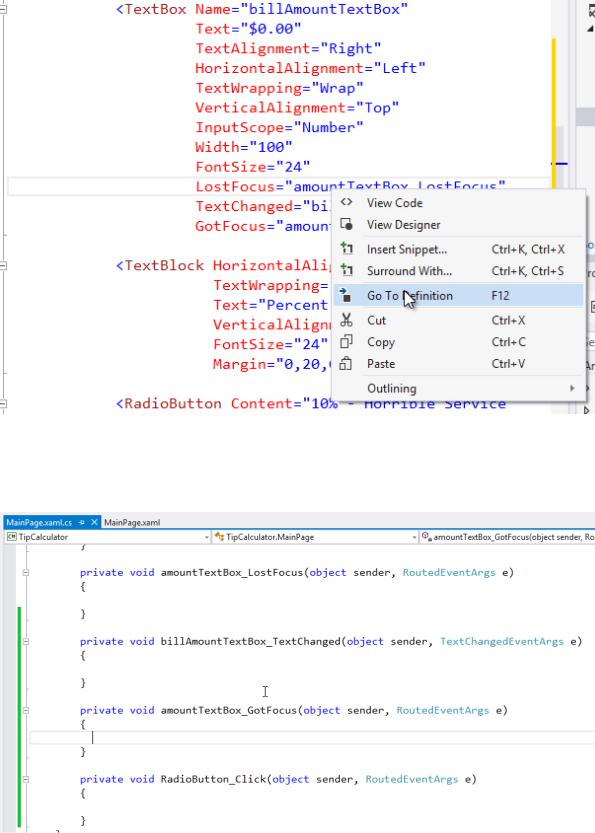
To set this up, I’ll put my mouse cursor in each of the event handler names I created and will right-click and select “Go To Definition”. Alternatively, I’ll put my mouse cursor in each event handle name and select F12 on the keyboard to perform the same operation:
Windows Phone 8.1 Development for Absolute Beginners – Page 92
The result is a series of stubbed out event handler methods in the MainPage.xaml.cs:
Windows Phone 8.1 Development for Absolute Beginners – Page 93
Now I need to perform the calculation of the tip and the other amounts, and format them for display. I could go about this in many different ways. I could just create all the code right here in my MainPage.xaml.cs, but I have larger aspirations for this app. Sure, some people might be using it on their phone, but some people might have their Microsoft Surface or other Windows 8 tablet with them while they're out to eat. They may want to use the app in that context instead. In the next lesson, we'll create a Universal app version of the Tip Calculator to build both the phone version of the app, and a Windows store version of the app for use on Windows tablets or on desktop.
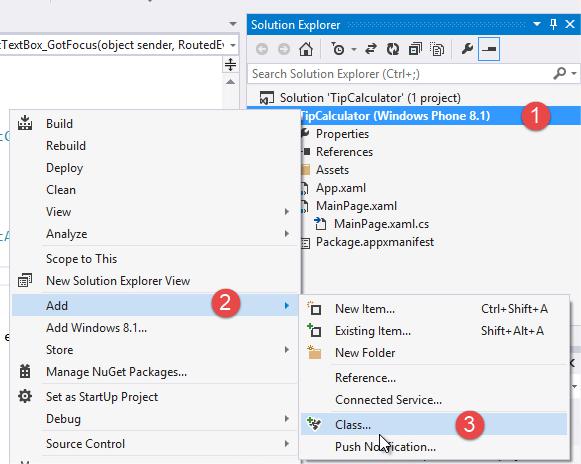
With that in mind, I'm going to add a class that will know how to calculate the tip and format the results as dollar values. This will make it easier for me in the future keeping all of the important stuff, like the calculations and the data members, isolated into their own class. I’ll (1) right-click the project name in the Solution Explorer, (2) select Add from the context menu, and (3) select Class … from the sub menu:
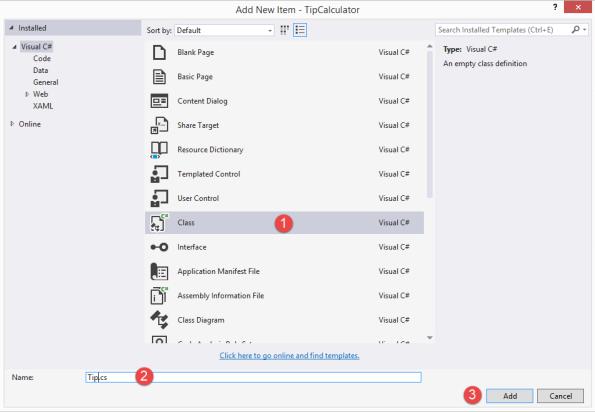
In the Add New Item dialog, (1) I’ll make sure Class is selected, (2) I’ll rename the file:
Tip.cs, and (3) click the Add button:
Windows Phone 8.1 Development for Absolute Beginners – Page 94
I’ll add the following code to the Tip class. First, note that I change this to a public class. Second, I create three auto-implemented properties, BillAmount, TipAmount and TotalAmount:
namespace TipCalculator
{
public class Tip
{
public string BillAmount { get; set; } public string TipAmount { get; set; } public string TotalAmount { get; set; }
You might be wondering why I am using strings instead of double or decimal. The reason is because I want to format these and make them publicly available, so I can more easily associate the values, and not have to do the conversion of the values inside of the MainPage.xaml.cs file. I want to just reference the BillAmount property, and automatically assign its formatted text value to the TextBox. By keeping that formatting inside of my tip class, it will make it more
Windows Phone 8.1 Development for Absolute Beginners – Page 95
easily reusable for the Universal app for Windows 8 or for my phone. At least, that's my thought process.
Next, we'll create a constructor. Inside of this constructor, I'll initialize each of the properties to String.Empty.
public Tip()
{
this.BillAmount = String.Empty; this.TipAmount = String.Empty; this.TotalAmount = String.Empty;
}
Next, I’ll create a method that will actually calculate the tip:
public void CalculateTip(string originalAmount, double tipPercentage)
{
double billAmount = 0.0; double tipAmount = 0.0; double totalAmount = 0.0;
if (double.TryParse(originalAmount.Replace('$', ' '), out billAmount))
{
tipAmount = billAmount * tipPercentage; totalAmount = billAmount + tipAmount;
}
this.BillAmount = String.Format("{0:C}", billAmount); this.TipAmount = String.Format("{0:C}", tipAmount); this.TotalAmount = String.Format("{0:C}", totalAmount);
}
}
}
Frankly, this is a very simple method. I accept the original bill amount as well as the tip percentage as input parameters. Next, since the original bill amount is typed in as a string, I’ll do some minor checking to ensure that the string can be converted to a double. I’ll remove the dollar sign to help ensure the success of the double.TryParse() method. TryParse() will return true if the value can successfully be turned into a double, false if it cannot (i.e., the user typed
Windows Phone 8.1 Development for Absolute Beginners – Page 96
in non-numeric values). Furthermore, it will return the parsed value as an out parameter called billAmount. We talked about out parameters, as well as other TryParse() style methods in the
C# Fundamentals for Absolute Beginners series so please review if you’ve forgotten how this works.
Assuming the original bill amount can be parsed into a double, we perform the calculation for tip and for the total bill amount. Lastly, we format each of those values and set the public auto-implemented properties so that we can access from from our MainPage.xaml.cs file.
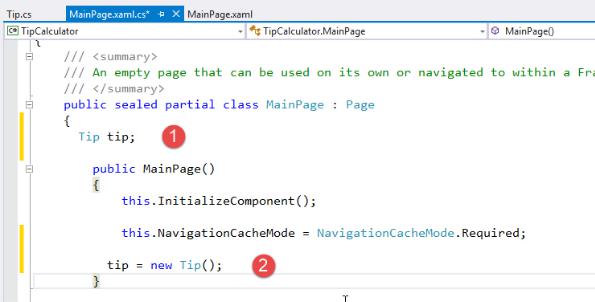
Now that we’ve implemented our business rules in the Tip.cs class, we’ll utilize its properties and methods back in our MainPage.xaml.cs file. (1) I’ll create a private field to hold on to a reference to our Tip class, and (2) in the MainPage() constructor, I’ll create a new instance of Tip and set it to the private field tip:
Since there are several event handler methods from which we’ll want to call the Tip’s CalculateTip method, I’ll implement that call in a private helper method called performCalculation():
private void performCalculation()
{
var selectedRadio = myStackPanel.Children.OfType<RadioButton>().FirstOrDefault(r => r.IsChecked == true);
Windows Phone 8.1 Development for Absolute Beginners – Page 97
tip.CalculateTip(billAmountTextBox.Text, double.Parse(selectedRadio.Tag.ToString()));
amountToTipTextBlock.Text = tip.TipAmount; totalTextBlock.Text = tip.TotalAmount;
}
The performCalculation first determines which RadioButton was checked by using a clever LINQ statement. Here, we look at all children objects of the myStackPanel. Then, we narrow it down to just those who are of type RadioButton. Finally, we look for the first RadioButton whose IsChecked property is set to true. I like this instead of using a long switch statement that would require me to add code each time a new RadioButton is added to the StackPanel.
Once I know which RadioButton was selected, I’m ready to call the Tip’s CalculateTip() method. I send in the billAmountTextBox.Text and then use the Tag property of the selected
RadioButton as the tip percentage. Since the Tag property is of type string, we’ll have to call double.Parse() to pass it to CalculateTip() correctly as a double.
Now, we can use performCalculation() in the two places where I anticipate it will be useful, namely, as the user is typing in a new bill amount number (billAmountTextBox_TextChanged) and when a different RadioButton is selected (RadioButton_Click):
private void billAmountTextBox_TextChanged(object sender, TextChangedEventArgs e)
{
performCalculation();
}
private void RadioButton_Click(object sender, RoutedEventArgs e)
{
performCalculation();
}
At this point, when testing the app, it works correct, but there are a few inconveniences. Ideally when I tap the Bill Amount TextBox to edit the value, it would remove the number and not require I use the delete button to remove the existing value before typing in a new one:
Windows Phone 8.1 Development for Absolute Beginners – Page 98

Also, I would like for the new value to be formatted as dollars and cents correctly when I am finished typing it in the Bill Amount TextBox:
Windows Phone 8.1 Development for Absolute Beginners – Page 99