

Phone_81_Development_for_Absolute_Beginners
.pdfcontent += String.Format("ID: {0}, Make: {1}, Model: {2} ... ", car.Id, car.Make, car.Model);
}
resultTextBlock.Text = content;
}
And change the Read button’s event handler method to call it:
private async void readButton_Click(object sender, RoutedEventArgs e)
{
//await readXMLAsync(); //await readJsonAsync(); await deserializeJsonAsync();
}
… and then run the app …
Recap
The biggest challenge is understanding the role each of the pieces play. If you don’t fundamentally understand that there are four parts:
-The object graph
-The serialization classes / methods
-The stream
-The file in the Local Folder
… then it will be a mystery when you ask “What do I need to do next?” Hopefully you can remember at a high level the notion of serialization because it plays a big role whenever transferring data between layers or formats. A good example is serializing and deserializing data for transfer via web services.
Windows Phone 8.1 Development for Absolute Beginners – Page 240
Windows Phone 8.1 Development for Absolute Beginners – Page 241
Lesson 23: Working with the Command Bar
In this short lesson we’ll learn about the CommandBar, another user interface element we can use on the Phone to provide more options in the form of icons and menu options to the user than what they see displayed by default.
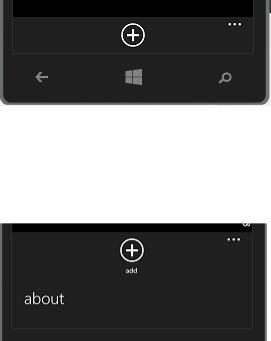
Here’s an example of a CommandBar with a single PrimaryCommand AppBarButton:
Clicking the ellipsis on the right will reveal the label for the PrimaryCommand
AppBarButton and reveals a SecondaryCommand AppBarButton for an “about” feature:
How do you add these? Obviously, with XAML. However, Visual Studio does have a tool that makes quick work of this.
Create a new Blank App project called CommandBarExample. Open the MainPage.xaml into the designer.
On the left side of Visual Studio, hover over the Document Outline tab and pin it down. It will reveal each of the elements of the Page including a BottomAppBar and a Grid:
Windows Phone 8.1 Development for Absolute Beginners – Page 242
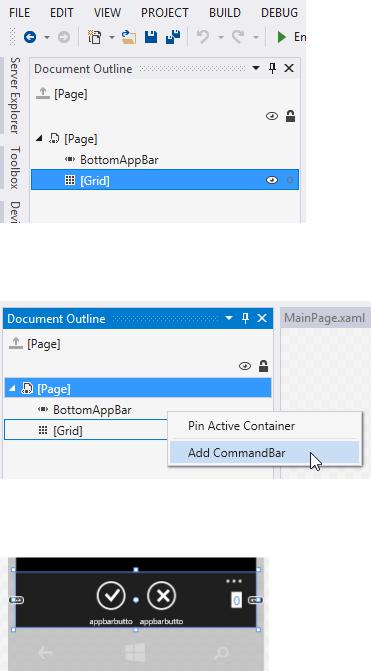
Right-click the ButtomAppBar to reveal a context menu. Select “Add CommandBar”:
The following will be generated for you:
As you can see, several items were created in XAML. First, a BottomAppBar is created for the Page. Inside the BottomAppBar is a CommandBar element containing two AppBarButton controls:
<Page.BottomAppBar> <CommandBar>
<AppBarButton Icon="Accept" Label="appbarbutton"/> <AppBarButton Icon="Cancel" Label="appbarbutton"/>
Windows Phone 8.1 Development for Absolute Beginners – Page 243
</CommandBar> </Page.BottomAppBar>
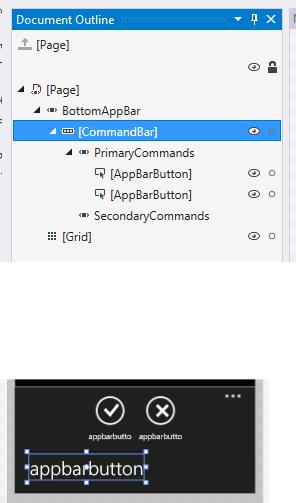
If you peek back at the Document Outline window, it will display the new elements in the outline:
We’ll right-click the SecondaryCommands item and select the menu option from the context menu to add a new AppBarButton:
Now, the XAML looks like this:
<Page.BottomAppBar> <CommandBar>
<CommandBar.SecondaryCommands> <AppBarButton Label="appbarbutton"/>
</CommandBar.SecondaryCommands> <AppBarButton Icon="Accept" Label="appbarbutton"/> <AppBarButton Icon="Cancel" Label="appbarbutton"/>
Windows Phone 8.1 Development for Absolute Beginners – Page 244
</CommandBar> </Page.BottomAppBar>
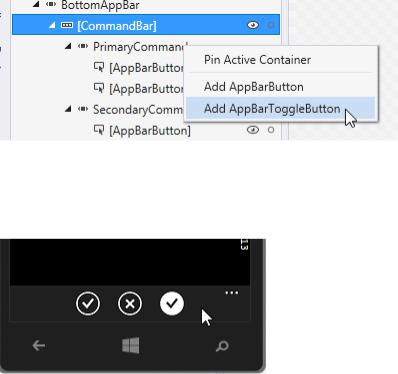
In addition to the PrimaryCommands and SecondaryCommands, we can also add an AppBarToggleButton:
This will provide two states … on and off, as designated by the “chrome” around the symbol:
The Phone API has many common symbols available. Put your mouse cursor on a given AppBarButton in the XAML view, then look at the Properties window. If you scroll down to the Icon section, the Symbol Icons are visible by default:
Windows Phone 8.1 Development for Absolute Beginners – Page 245
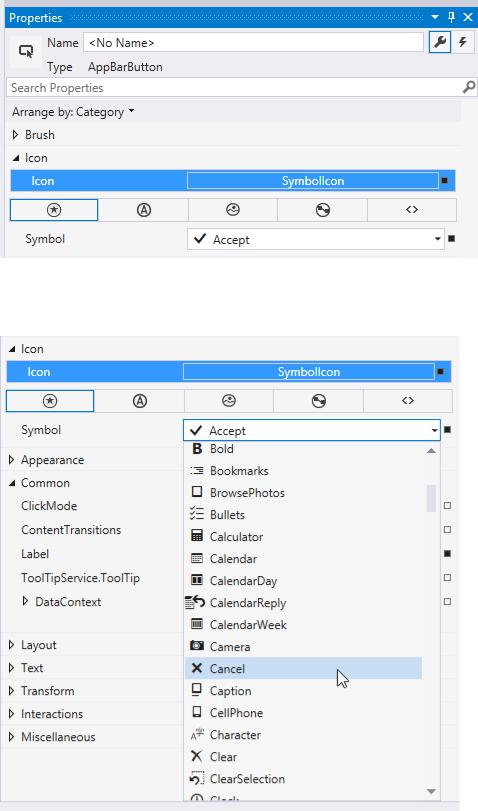
You can select one of the available symbols for use in your app:
You can also use Fonts to choose a Glyph (letter) for use as an icon:
Windows Phone 8.1 Development for Absolute Beginners – Page 246

This selection produces the following XAML:
<AppBarButton Label="appbarbutton"> <AppBarButton.Icon>
<FontIcon Glyph="B"/> </AppBarButton.Icon>
</AppBarButton>
And produces the following preview.
There are other options that allow you to use your own images as well. Final note: the AppBarButton operates much like a regular button insomuch that you can handle the Click event and other related options.
Windows Phone 8.1 Development for Absolute Beginners – Page 247
Lesson 24: Binding to Commands and CommandParameters
We’ve already discussed several facets of the Model-View-ViewModel design pattern, or rather MVVM. In this lesson I want to add one more piece to the puzzle so that we can employ it in our upcoming project.
MVVM provides a clean separation of concerns between the data model and the view. This is accomplished through the ViewModel class which is responsible for publishing methods that return collections of our data model to the view so that the view bind to it and display it.
That covers the *display* of data.
What if, for example, we want to not only bind data in our view, but also bind the Click event of a button to a method defined on our data model?
Commands allow us to do that.
It is easier to show you what I mean than to explain it in theory without a concrete example in front of you.
I’ll create an app that might be used to check in cars at a Car rental company.
Customers drop off their cars in an airport, the Car rental employee sees a list of cars scheduled to be returned today, they click a button next to the car that they receive and see a message with the check in time. This is far from a complete example, but it will allow us to see a simple example of Commands in action.
I’ll start by creating a new project called “BindingToCommands”. I’ll immediate add a Car class:
public class Car
{
public int ID { get; set; } public string Make { get; set; }
public string Model { get; set; }
public string CheckedInDateTime { get; set; }
}
Note: Ideally we would store CheckedInDateTime as a DateTime, not a string. I did this because I want to format the string nicely. As you’ll learn in the next lesson, we can create a
ValueConverter for the purpose of formatting the date nicely while keeping the value as a DateTime.
Next I create a simple CarDataSource like so:
Windows Phone 8.1 Development for Absolute Beginners – Page 248
public class CarDataSource
{
private static ObservableCollection<Car> _cars = new ObservableCollection<Car>();
public static ObservableCollection<Car> GetCars()
{
if (_cars.Count == 0)
{
_cars.Add(new Car() { ID = 1, Make = "Olds", Model = "Cutlas" }); _cars.Add(new Car() { ID = 2, Make = "Geo", Model = "Prism" }); _cars.Add(new Car() { ID = 3, Make = "Ford", Model = "Pinto" });
}
return _cars;
}
}
In the MainPage.xaml, I’ll call the static GetCars() method to wire up the Default View Model for the page:
private ObservableCollection<Car> _carsViewModel = CarDataSource.GetCars();
public ObservableCollection<Car> CarsViewModel { get { return this._carsViewModel; }
}
… and then binding to the view model in XAML like so:
<Page
. . .
DataContext="{Binding CarsViewModel, RelativeSource={RelativeSource Self}}">
Then I’ll implement the layout and make sure the binding works.
<StackPanel Margin="20,40,20,40">
<ListView x:Name="myListView" ItemsSource="{Binding}" >
<ListView.ItemTemplate>
<DataTemplate x:Name="dataTemplate">
Windows Phone 8.1 Development for Absolute Beginners – Page 249