

Phone_81_Development_for_Absolute_Beginners
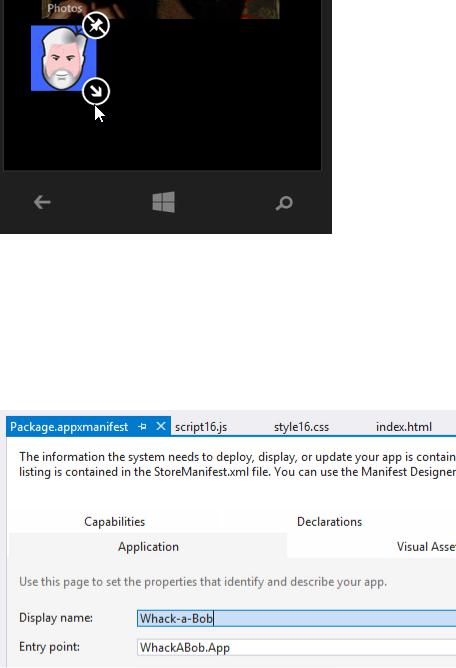
.pdfBy default, it looks good however I would prefer if the app’s title appeared in text under the logo (like the other apps on my phone).
If I hold down on the tile, I can modify the various sizes of the app tile to test those as well.
Windows Phone 8.1 Development for Absolute Beginners – Page 170
I stop debugging and begin to fix a few of the issues with my app.
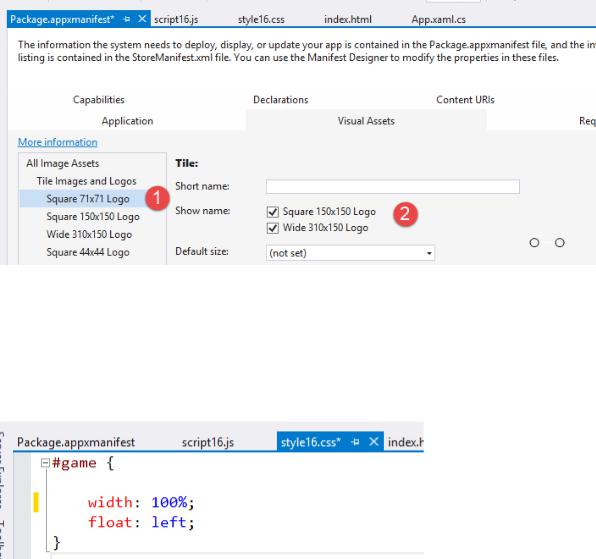
To begin, I’ll modify the display name that appears on the app and the start page tiles of the phone by going to the package.appxmanifest and modifying the Application tab’s Display name property:
To add the display name under the pinned tiles on the Phone’s Start page, on the Visual Assets tab, I’ll (1) select the Square 71x71 Logo page, and (2) put a check mark next to both the Show Name check boxes:
Windows Phone 8.1 Development for Absolute Beginners – Page 171
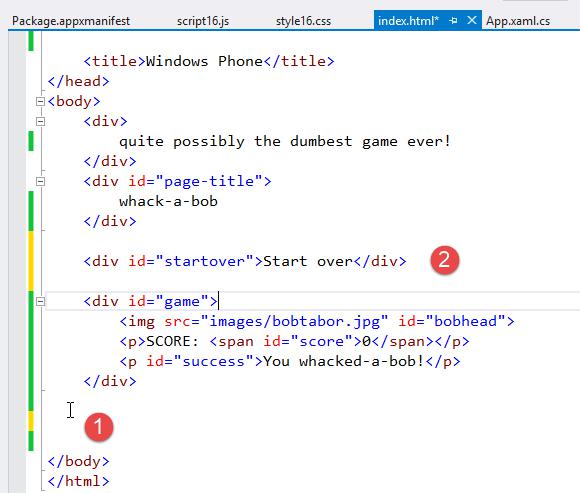
Next, I’ll want to modify the index.html’s layout to properly fit everything on the page, modify the text size, etc. Appropriate for a Phone app (as opposed to it’s original purpose as a simple web page). I’ll modify the #game id, removing the specific width (200px) replacing it with
100%, and floating to the left instead of the right:
The Start Over button requires some major changes. I change virtually every CSS property like so (in the #startover id’s css definition):
Windows Phone 8.1 Development for Absolute Beginners – Page 172

Next, in the index.html, I want to move the Start Over button (1) from the bottom, to (2) above the game div:
Windows Phone 8.1 Development for Absolute Beginners – Page 173
To fix the text selection issue and the drag / movement issue, I’ll modify the phone.css page’s html / body definition adding the -ms-touch-action: none; and -ms-user-select: none; settings like so:
Windows Phone 8.1 Development for Absolute Beginners – Page 174
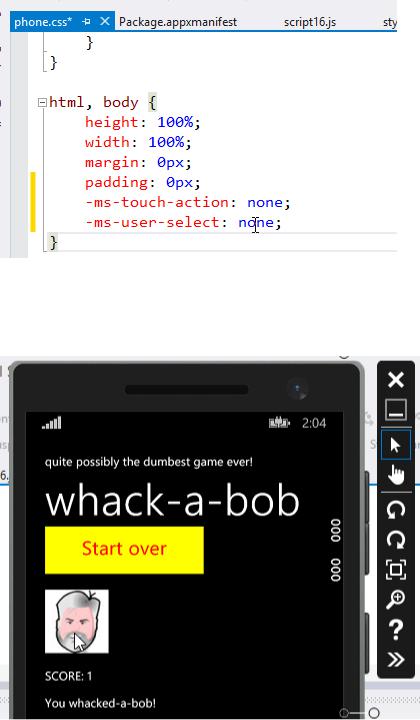
This time when I re-run the app, I get the results I desire:
Before we conclude, Matthias wanted me to point out that if you're going to do a lot of work with jQuery inside of Visual Studio, you might prefer to install using Nuget package “jQuery vsdoc”. This will give you IntelliSense for jQuery, syntax highlighting, and other helpful additions inside of Visual Studio. You'd get the same experience with Javascript and with all the jQuery methods and selectors and things of that nature as you get with XAML and C#.
Windows Phone 8.1 Development for Absolute Beginners – Page 175
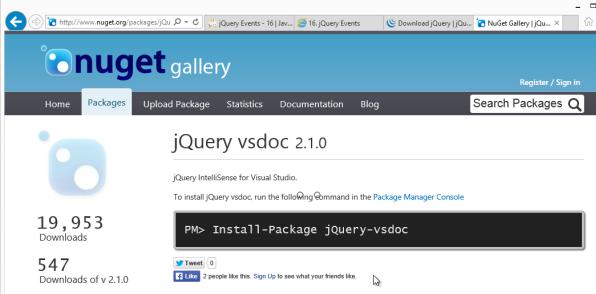
https://www.nuget.org/packages/jQuery/2.1.0
Windows Phone 8.1 Development for Absolute Beginners – Page 176
Lesson 15: Understanding the Hub App Template Overview and
Navigation
In this lesson, we’ll learn about the Hub App template. If you’re familiar with the Windows Phone, you’ll have seen instances of the Hub in use. There is so much here that we’ll spend the majority of the remaining series talking about this template, the technologies it uses, and how to modify it and extend it to get the results we want. That’s no small matter.
(1)Create a new Hub App Template project called “HubAppTemplate”
(2)Run the app. Note the navigation. Tie the navigation to pages in the project.
(3)Open the HubPage.xaml and roll up the major sections … they will primarily break down into: DataTemplates and HubSections.
Begin by creating a “throw away” project using the Hub App Template.
So, let’s talk about a high level about how this app works and then we’ll drill down into each of the pieces.
At the highest level is the Hub control which allows you to create a series of panels, or rather, HubSections. You can see there are five HubSections that correspond to the five panels in our app.
Each HubSection is comprised of (a) data and (b) a template that defines how that data should be displayed. So, two parts, data and a data template.
I’ll talk about the source of the data in just a moment. However, let’s take a look at the data templates. If we drill into a given HubSection like “SECTION 2”:
<HubSection x:Uid="Section2Header" Header="SECTION 2" Width="Auto"
DataContext="{Binding Section2Items}"
d:DataContext="{Binding Groups[1], Source={d:DesignData
Source=./DataModel/SampleData.json,Type=data:SampleDataSource}}"> <DataTemplate>
<GridView ItemsSource="{Binding Items}" AutomationProperties.AutomationId="ItemGridView" AutomationProperties.Name="Items In Group" ItemTemplate="{StaticResource Standard200x180TileItemTemplate}" SelectionMode="None"
Windows Phone 8.1 Development for Absolute Beginners – Page 177
IsItemClickEnabled="True" ItemClick="ItemView_ItemClick">
<GridView.ItemsPanel> <ItemsPanelTemplate> <ItemsWrapGrid /> </ItemsPanelTemplate> </GridView.ItemsPanel> </GridView> </DataTemplate> </HubSection>
There’s a lot going on here. That’s because this is employing a whole framework of templating in order to make it extremely flexible. The unfortunate trade off to making a technology very flexible is often complexity, at least at first. However, it’s all logical, so if you can just understand the logic behind it, if you can build a mental model, you can at a minimum be able to command it to do what you need it to by force with a lot of trial and error.
Besides the properties of the HubSection itself which I’ll ignore for now because it has to do with the data, the HubSection has a child called DataTemplate. The DataTemplate is a
GridView … similar to a Grid control that we’ve used for layout, but it supports binding to data. The GridView represents this entire area in “SECTION 2”. The GridView’s ItemsPanel controls the flow of each individual item in the GridView. So, you have a collection of items. Will they flow horizontally or vertically? In this case, the ItemsWrapGrid by default will position each child elements sequentially from top to bottom. When elements extend beyond the container edge (the bottom, in this case), elements are positioned in the next column.
So, The ItemsPanel uses the ItemsWrapGrid to layout each item in our data in a certain flow direction, from top to bottom, then left to right.
But what about the layout of each individual item in our data? The GridView’s
ItemTemplate="{StaticResource Standard200x180TileItemTemplate} property dictates that. As you can see, it is binding to a StaticResource called Standard200x180TileItemTemplate which is defined in the Page.Resources section:
<Page.Resources>
<!-- Grid-appropriate item template as seen in section 2 --> <DataTemplate x:Key="Standard200x180TileItemTemplate"> <Grid Width="180">
<Grid.RowDefinitions> <RowDefinition Height="Auto"/> <RowDefinition Height="Auto"/> </Grid.RowDefinitions>
Windows Phone 8.1 Development for Absolute Beginners – Page 178
<Border Background="{ThemeResource ListViewItemPlaceholderBackgroundThemeBrush}" Height="173"
Width="173"
Grid.Row="0" HorizontalAlignment="Left">
<Image Source="{Binding ImagePath}" Stretch="UniformToFill" AutomationProperties.Name="{Binding Title}" Height="173"
Width="173"/> </Border>
<TextBlock Text="{Binding Title}" Style="{ThemeResource BaseTextBlockStyle}" Typography.Capitals="SmallCaps" Grid.Row="1"
Margin="0,12,0,0" IsTextScaleFactorEnabled="False"/>
</Grid> </DataTemplate>
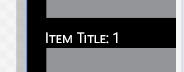
Each individual items is made up of a Grid that is 180 pixels wide. The grid defines two rows. The first row is filled with an border that contains an image, these gray images we see in the designer. I think the Border is just there in case the image cannot be displayed, or perhaps it provides a themed background color for transparent images. I’m not really sure of the purpose, but I think that will be the result.
The second row is filled with a TextBlock, the “Item Title: 1” and so forth.
So, now we understand how each item in our data source will be rendered to screen for
“Section 2”. Admittedly, there are many tiny details I’m overlooking, but I can perform a search online for their meaning. I highly encourage you to do the research when you come across something that is not obvious by just reading it’s name or setting.
For example, I refrained from talking about the <TextBlock Typography.Capitals=”SmallCaps” /> because I give you enough credit to be able to look at that and understand what it is doing when you see the results on screen:
Windows Phone 8.1 Development for Absolute Beginners – Page 179