

Phone_81_Development_for_Absolute_Beginners
.pdfDiscovering Theme Resources
In addition to styles, there are Themes. Themes are built-in styles available to all Windows Phone apps and their color and other appearance settings are set by the user of the phone. So, on my Phone, I go to Settings -> theme and I choose the dark background and the yellow accent color. I would like to see apps utilize this color scheme to stay consistent with my preferred colors. As a developer, I can make sure I adhere to those settings and others by binding to a ThemeResource.
If you look at the Page template, it utilizes a theme resource:
<Page x:Class="XAMLResources.MainPage"
. . .
Background="{ThemeResource ApplicationPageBackgroundThemeBrush}">
And I can even use theme resources inside of my styles. Here I’ll modify my application scoped style to use the accent color the user has chosen:
<Application.Resources>
. . .
<Style TargetType="Button" x:Key="MyButtonStyle"> <Setter Property="Background"
Value="{ThemeResource PhoneAccentBrush}" />
. . .
</Style> </Application.Resources>
Themed Resources should be leveraged to keep your apps looking like they below on the Windows Phone. You should resist the urge to use custom colors, fonts and the like unless you have a good reason to (such as to match your company's established branding elements, etc.)
Furthermore, there are built-in styles available to your app. For example, if I were to modify my MainPage.xaml like so:
<TextBlock Text="page name"
Style="{StaticResource HeaderTextBlockStyle}" />
It will produce the following appearance:
Windows Phone 8.1 Development for Absolute Beginners – Page 70
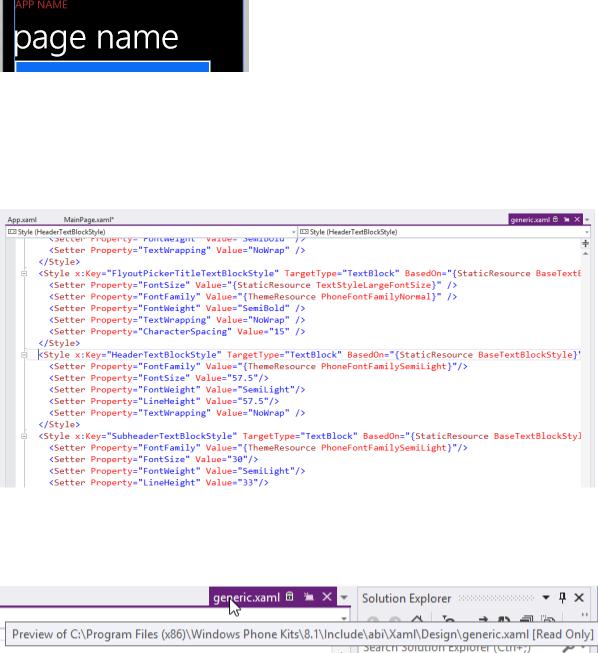
But where did this StaticResource come from? I did not define it.
If you right-click on the style name and select “Go To Definition” you’ll see that it opens a readonly file from your hard drive:
If you hover over the preview tab, you’ll see the location of this file and the fact that it is readonly:
These are pre-built styles for you to use to ensure consistency across apps.
It's also worth noting that many of the styles are based on styles which are based on yet other styles. Notice the definition of the style we’re investigating:
<Style x:Key="HeaderTextBlockStyle" TargetType="TextBlock" BasedOn="{StaticResource BaseTextBlockStyle}">
. . .
Windows Phone 8.1 Development for Absolute Beginners – Page 71
</Style>
The key here is the BasedOn attribute. So, this style builds on the BaseTextBlockStyle and adds several modifications to it. In this way, we can override these styles with our own. This visual inheritance allows developers to avoid repeating the attribute settings that will be common across variations of the styles, much like how Cascading Style Sheets work in web development.
I said earlier that there were different binding expressions in the Windows Phone for different purposes. The {StaticResource } is generally a resource or style that has been created by you or was created by Microsoft (as we have just seen). The {ThemeResource } is for binding to a theme. The last binding expression we’ll see is simply {Binding } which is used for binding data
(i.e., usually generic lists of custom types with their properties set to the data we want to work with in our app) to on page elements. We'll see this at work much later in this series.
Recap
Just to recap, the big takeaway from this lesson was the ways in which we can style our app to make it look like it belongs on the Windows Phone while also expressing our own individuality. We learned how to bind to StaticResources like styles and resources, and ThemeResource which borrow from the user’s selections.
Windows Phone 8.1 Development for Absolute Beginners – Page 72
Lesson 7: Understanding the Navigation Model
Many apps you will want to build require more than one Page, therefore you’ll need to learn how to navigate from one page to another and learn how to pass important data between pages. Furthermore, you will want to learn how to manipulate the navigation history so that you can control what happens when the user uses the Phone’s physical back button.
Let’s start with the basics. We’ll create a new Blank App project template called NavigationExample. Immediately, I’ll add a new Blank Page called Page2.xaml.
Back on the MainPage.xaml, I’ll replace the <Grid> with the following code:
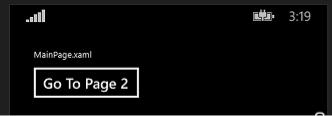
<StackPanel Margin="30,30,0,0" > <TextBlock Text="MainPage.xaml" /> <Button Content="Go To Page 2"
Click="Button_Click" /> </StackPanel>
I’ll right-click the Button_Click event name and select “Go To Definition” to create the event handler method stub. I’ll add the following code:
// Simple navigation, no parameters Frame.Navigate(typeof(Page2));
On Page2.xaml, I’ll replace the <Grid> with the following code:
<StackPanel Margin="30,30,0,0"> <TextBlock Text="Page2.xaml" /> <TextBlock x:Name="myTextBlock"
Text="" FontSize="32" />
<Button Content="Go To Page 3" Click="Button_Click" />
</StackPanel>
When I run the app, I can click the button to navigate from the MainPage.xaml to Page2.xaml.
The key to this example is the Frame.Navigate() method. The Frame object allows you to load and unload Page objects into and out of the viewable area. Furthermore, it will keep track of the order of pages as they are visited so that you can use methods like GoBack() and
Windows Phone 8.1 Development for Absolute Beginners – Page 73
GoForward() to traverse the history of pages visited. In that respect, the Frame is very much like the history feature of your web browser.
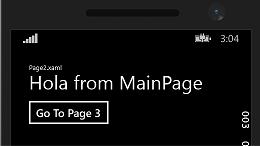
In addition to simple navigation, you are able to pass data from one page to the next. To do this, we’ll add the following code in the Button_Click event of the MainPage.xaml:
//Simple navigation, no parameters //Frame.Navigate(typeof(Page2));
//Passing a simple type, like a string
Frame.Navigate(typeof(Page2), "Hola from MainPage");
We’ll retrieve the values that were “sent” via the OnNavigatedToEvent that should already be generated for you in the Page template. Here’s the code in my version:
///<summary>
///Invoked when this page is about to be displayed in a Frame.
///</summary>
///<param name="e">Event data that describes how this page was reached.
///This parameter is typically used to configure the page.</param> protected override void OnNavigatedTo(NavigationEventArgs e)
{
}
As you can read in the comments, this Page event is invoked when the page is about to be displayed in the Frame. You can use the input parameter of type NavigationEventArgs to retrieve the value passed from the calling page (if anything was, in fact, passed). In our case, we’ll add the following code:
myTextBlock.Text = e.Parameter.ToString();
In addition to the OnNavigatedTo() method, there’s also a OnNavigatedFrom() which will be triggered right before the current page is removed from the Frame. This might be a good opportunity to clean up any resource or save the current state of the page depending on your needs.
(Note: I also needed to implement the Button_Click event handler method stub on Page2.xaml. I right-click the name Button_Click on the Page2.xaml and select “Go To Definition”. This will allow the app to be compiled.)
When I run the app in the emulator, I can see the following when navigating to Page2:
Windows Phone 8.1 Development for Absolute Beginners – Page 74
Typically, sending a simple type is not enough. You may need to send several pieces of information from one page to the next. To accomplish this, I usually create a class I call NavigationContext that contains the data I need to pass. I’ll include properties for each data element I may need.
So, I’ll add a new class in my project called NavigationContext.cs and fill it with the following class definition:
public class NavigationContext
{
public int ID { get; set; } public string Name { get; set; }
public string Description { get; set; }
}
Now, in MainPage.xaml, I’ll add the following code in the Button_Click event handler:
//Simple navigation, no parameters //Frame.Navigate(typeof(Page2));
//Passing a simple type, like a string //Frame.Navigate(typeof(Page2), "Hola from MainPage");
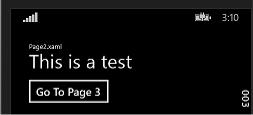
//Passing an instance of a 'Navigation Context' object NavigationContext nav = new NavigationContext()
{
ID = 7,
Name = "Test",
Description = "This is a test"
};
Frame.Navigate(typeof(Page2), nav);
Windows Phone 8.1 Development for Absolute Beginners – Page 75
And then in the OnNavigatedTo event handler of the Page2.xaml.cs page:
//myTextBlock.Text = e.Parameter.ToString();
var nav = (NavigationContext)e.Parameter; myTextBlock.Text = nav.Description;
Now, when I navigate from the MainPage to Page2, I see the following:
Finally, I want to show you how you can manipulate the Frame’s history. I’ll add a third page called Page3.xaml and replace its <Grid> with the following:
<StackPanel Margin="30,30,0,0"> <TextBlock Text="Page 3" /> <TextBlock x:Name="pagesTextBlock"
Text="" />
<Button Content="Go Back" Click="Button_Click" />
</StackPanel>
In the Page3.xaml.cd I’ll implement the following
protected override void OnNavigatedTo(NavigationEventArgs e)
{
string myPages = "";
foreach (PageStackEntry page in Frame.BackStack)
{
myPages += page.SourcePageType.ToString() + "\n";
}
pagesTextBlock.Text = myPages;
Frame.BackStack.RemoveAt(Frame.BackStackDepth - 1);
Windows Phone 8.1 Development for Absolute Beginners – Page 76

}
private void Button_Click(object sender, RoutedEventArgs e)
{
Frame.GoBack();
}
Returning to Page2.xaml.cs, I’ll implement:
private void Button_Click(object sender, RoutedEventArgs e)
{
Frame.Navigate(typeof(Page3));
}
When I navigate from the MainPage to Page2 to Page3 by clicking buttons, I will see the following displayed on Page 3:
The key to this example is traversing the Frame.BackStack which is an IList<PageStackEntry>. A PageStackEntry represents a page that was navigated to.
After I display the pages that we’ve travelled through to get to Page 3, I do the following:
Frame.BackStack.RemoveAt(Frame.BackStackDepth - 1);
This allows me to find the last page (Frame.BackStackDepth - 1) and remove it from the collection of pages. The result? When you click the “Go Back” button on Page 3, we navigate through the Frame.BackStack using the Frame.GoBack() method which will navigate to the last item in the Frame.BackStack … that should be the MainPage since we removed the Page2
BackStackEntry.
Windows Phone 8.1 Development for Absolute Beginners – Page 77
In addition to the Frame.GoBack(), there’s also a Frame.GoForward() which allows us to return to the previous page in the BackStack.
Recap
In this lesson we learned the absolute basics of navigation. We learned about the purpose of the Frame object, and how to handle the OnNavigatedTo() method to retrieve values that are passed from one page to the next. We learned how to create a NavigationContext class to allow us to pass more than one simple type between pages, and finally learned about the BackStack which is a collection of PageStackEntry objects, each object representing a page we’ve navigated through, and how to traverse the BackStack using the GoBack() and
GoForward() methods.
Windows Phone 8.1 Development for Absolute Beginners – Page 78
Lesson 8: Working with the package.appxmanifest
The Package.appxmanifest contains meta-data about your application. In other words, it describes your app to the operating system including the friendly name of the app, icons and images that will be used on the Start page, what the phone’s hardware must support in order for your app to work properly, and much more.
I just want to take a quick tour of the Package.appxmanifest … admittedly, this will lack the context of when during the development lifecycle you might need to employ some of these settings. If nothing else, this will give you some insight into what’s possible when building apps for the Windows Phone, even if I don’t demonstrate the specifics of how to implement a given feature.
First, the Package.appxmanifest is used during compilation of your source code into a install package. The install package will have the file extension appx. A manifest introduces your app to the phone telling it which assemblies are contained in the appx, which asset files should be used for the start and apps screen of the phone, as well as the app’s name, and the features of the phone that the app uses, and so on. This is why it is sometimes referred to as the metadata about your app.
Second, when you open it in the main area, you see this tabbed designer:
Windows Phone 8.1 Development for Absolute Beginners – Page 79