
Phone_81_Development_for_Absolute_Beginners
.pdf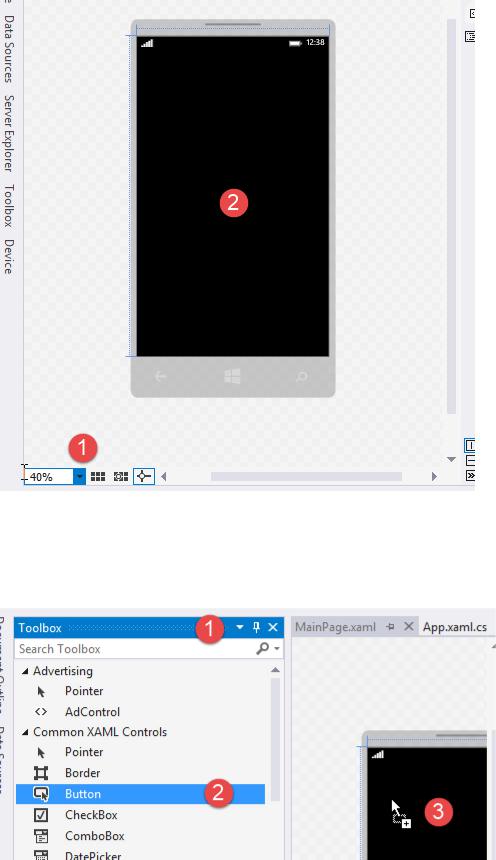
Next, I’ll hover my mouse cursor over the Toolbox tab docked to the right. This will display the
Toolbox. (1) I’ll pin down (or rather, I’ll disable auto-hide), then (2) drag a Button control (3) and drop it on the design surface:
Windows Phone 8.1 Development for Absolute Beginners – Page 10
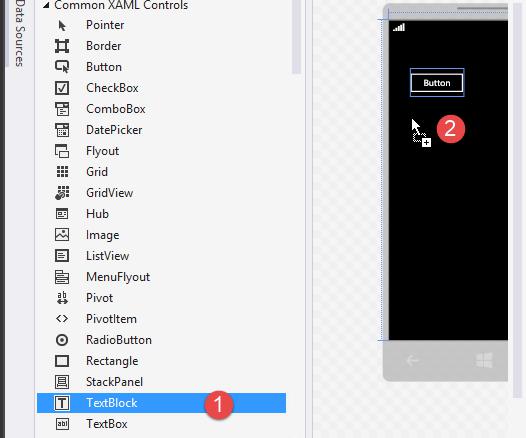
I’ll repeat by (1) dragging a TextBlock control and (2) dropping it on the designer surface:
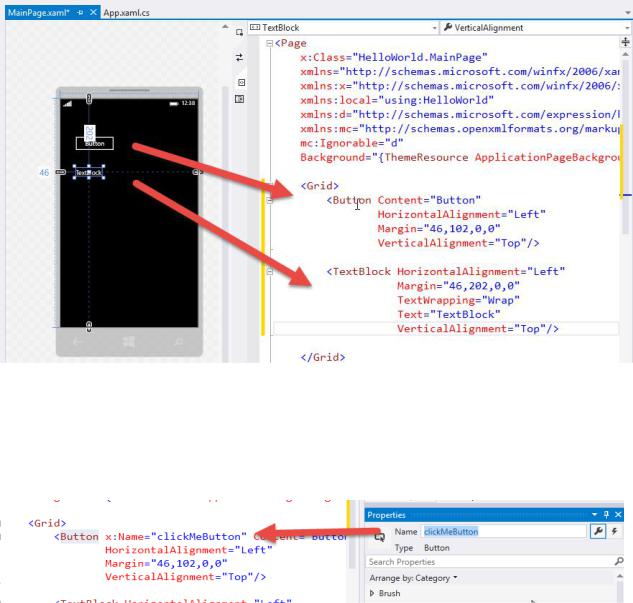
Notice that by dragging and dropping controls from the toolbox on to the designer surface, XAML is produced in the code editor along with some properties set such as default content or text, some sizing and positioning set, and so on:
Windows Phone 8.1 Development for Absolute Beginners – Page 11
I can also affect the XAML that is generated by Visual Studio using the Properties window. For example, I’ll put my mouse cursor into the Button control’s XAML definition OR I’ll select the button control on the design surface, then give the Button a name: clickMeButton:
You’ll notice that by giving the Button control a name in the Properties window, it generated a x:Name property in XAML and set that Name to “clickMeButton”.
Likewise, when I modify the Content property of the Button in the Properties window setting the property to “Click Me”, there’s a change to both the XAML and to the preview pane:
Windows Phone 8.1 Development for Absolute Beginners – Page 12

The key idea here is that these are three perspectives of the same fundamental object: a Button, a TextBlock, etc. so changes you make in any of the panels affect the others. Having said that, my personal belief is that you will become much more productive using the XAML text editor than the other panes. It will give you a full fidelity control over the properties that control appearance and positioning and as a result, I’ll almost exclusively edit the XAML by hand in this series of lessons.
However, for now I’ll make continue to use Properties window as a gentle introduction to building a user interface for our Phone app. I’ll select text TextBlock in the XAML or preview pane, then change its Name in the Properties window to: resultTextBlock.
You may find it odd that, by default, XAML controls do not have a Name property already created. This is because, as we’ll learn, XAML is a very concise language that is used by the
Windows Phone API for layout. You only need a name for a control if you plan on accessing that control programmatically in C# code. We’ll do that in a moment.
I’ll also change the font size of the text that we’ll fill into the TextBlock control. With the TextBlock still selected, I’ll find the Text properties and set the font size to 48, which will in turn modify the FontSize attribute in the XAML code:
Windows Phone 8.1 Development for Absolute Beginners – Page 13
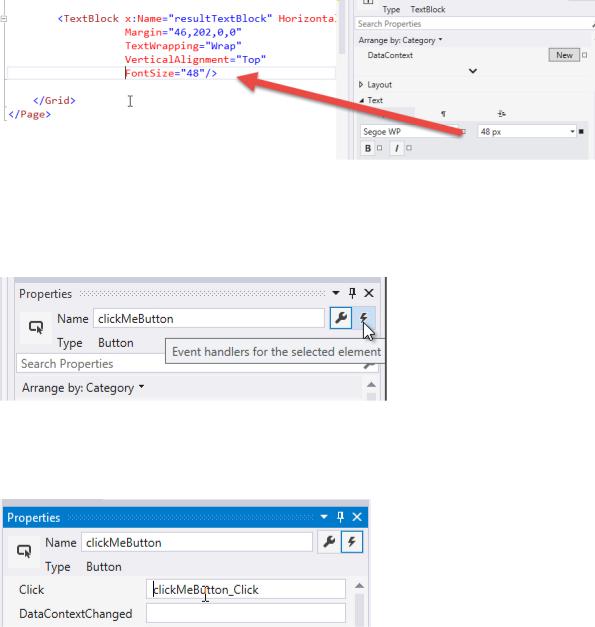
Next, I’ll select the Button control again (whether in XAML or in the preview pane), then I’ll select the lightning bolt icon next to the Name property to view the events that can be handled for this control:
Now you should be able to see all of the events for the Button. I’ll double-click the white area / text box next to the Click event to automatically create a method called: clickMebutton_Click …
… which will in turn create a method stub in the code behind for our MainPage.xaml. In other words, the MainPage.xaml.cs file opens in the main area of Visual Studio allowing us to write C# code in response to events that are triggered by the user (or in the case of other events, they could possibly be triggered by the life-cycle of the app itself).
Windows Phone 8.1 Development for Absolute Beginners – Page 14
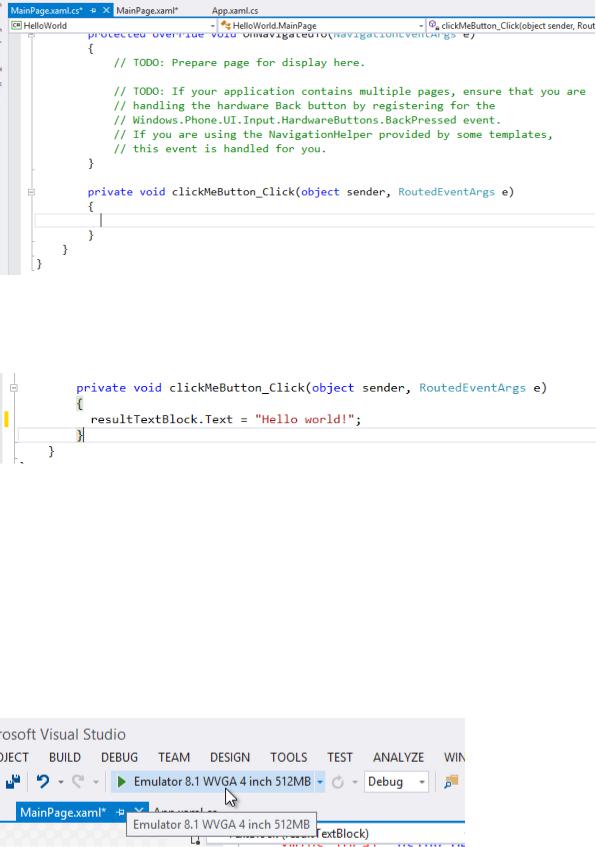
Inside of the method stub for the clickMeButton_Click event handler, I’ll add one line of code to set the Text property of our resultTextBlock (the TextBlock we added earlier) to the string value
“Hello World”.
Now I’ll attempt to run the app in debug mode. As we learned in the C# Fundamentals for Absolute Beginner’s Series, while running our app in debug mode, we can set break points, view the values of variables, etc. When building a Widows Phone app, there’s one more great feature: we can see our Phone app working without needing to deploy our app to an actual, physical Windows Phone. In this case, we’ll select the green triangular Run button … notice that we’ll be launching our app in the “Emulator 8.1 WVGA 4 inch 512 MB”. What does this mean? It specifies which physical phone we’ll be emulating, including the screen size and memory on the phone. As you’ll learn, there are several different emulators we can use that will allow us to see how our app performs on different hardware:
Windows Phone 8.1 Development for Absolute Beginners – Page 15
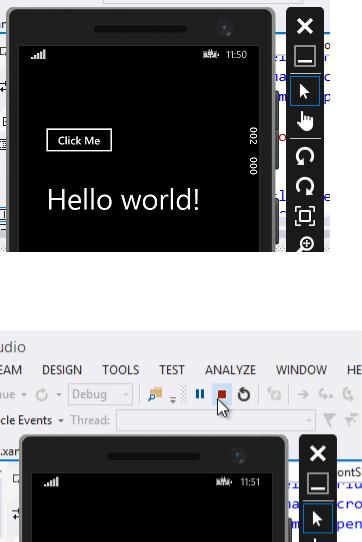
Once we run the app, we’ll see it sitting inside of a software representation of a physical phone. For now, let’s focus on the app itself, and we’ll devote an entire lesson to learning more about the Emulator in an upcoming lesson.
If you use your mouse cursor to click the “Click Me” button (simulating the use of your finger to tab the button on the Phone’s screen) it will display the message “Hello World!” in a large font:
To stop running the app in the Emulator, return to Visual Studio and press the red square Stop button:
Alternatively, you could shut down the Emulator using the large X icon in the toolbar to the right, however that is not necessary. You should get into the habit of leaving the Emulator running even when you’re not debugging. There are two reasons for this. First, the Emulator is running as a virtual machine, and it takes time to “re-boot”. Second, any data that your app saved to the phone between debugging runs will be lost when you shut down the Emulator.
Windows Phone 8.1 Development for Absolute Beginners – Page 16
Hopefully you were able to see the relationship between the work we did in XAML and the finished app.
There are some key takeaways from this lesson as we're getting started. First of all, you're going to be able to leverage your existing knowledge of creating user interfaces and Visual Studio and apply that to creating Windows Phone Apps. It's easy and it's fun, and certainly there's a lot to learn here, but there's nothing to be intimidated about. We have the option of making changes in the most visual way by dragging and dropping items from the Toolbox onto the designer surface. We see how that created the XAML code, which looks very much like HTML. We'll learn more about this mysterious XAML syntax in the next lesson. We can also make changes in the properties window to modify the various attributes of the controls that we see on screen.
Furthermore, just like ASP.NET Web Forms and the Windows Presentation Foundation apps we created, every “screen”, or rather, every Page has a code behind that's associated with it, where we can write event handler code to perform operations whenever the user interacts with our application in a given way.
The phone API provides this rich collection of controls and other options, as well as classes per form various operations or allow us to retrieve values produced by the Phone’s sensors. As developers we can tap into that API to enable powerful functionality in our apps. The API is similar to working with Windows applications in so much that you have classes with properties and methods and events. Some of those affect the life-cycle of the app, some affect the visual qualities, like the visual controls or the layout of the app, and then some affect the navigation from page to page, which we haven't seen yet, but we will discuss in a later lesson. We'll talk about those in detail in just a little bit and they'll help us to build more complex and complex applications.
The third takeaway is that, like the Windows Presentation Foundation app example from the C# Fundamentals for Absolute Beginners Series, Phone apps are composed of a combination of both XAML and C# syntax. We can see there’s a relationship between the MainPage.xaml and the MainPage.xaml.cs files because they’re named similarly, and they’re also visually related in the Solution Explorer. As we’ll learn, these two files actually represent two parts of a whole. In the MainPage.xamlcs file, notice that this class is named MainPage:
Windows Phone 8.1 Development for Absolute Beginners – Page 17
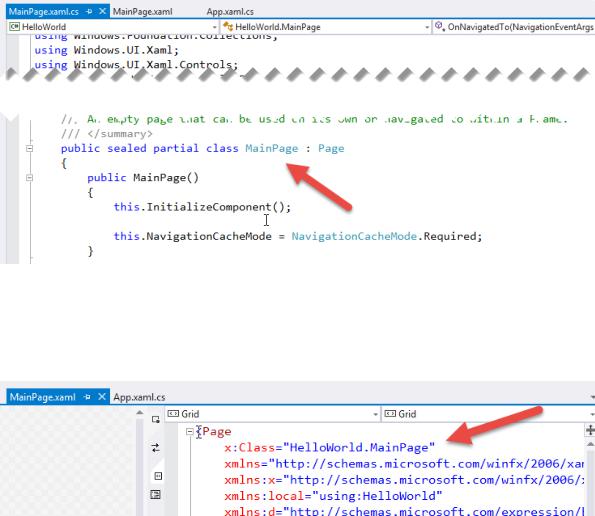
And if we go to the MainPage.xaml, we can see that this Page, too, is a class called "MainPage":
Because they two parts that are compiled together to create one “idea”, one “page” in our app.
We'll learn a little bit more about that in the next lesson.
Finally, we ran our app in debug mode inside of the Phone Emulator. The Emulator provides a fantastic way to develop and test your apps without having to deploy it to a physical device every single time you want to test some small change in your app. Furthermore, we can use techniques that we learned about in the C# Fundamental Series to set break points and to debug our app in real time as it's running. There's so much more that we can learn about the Emulator, it's various options, that we're going to devote an entire lesson to just that.
Windows Phone 8.1 Development for Absolute Beginners – Page 18
Windows Phone 8.1 Development for Absolute Beginners – Page 19
