

1introjunos
.pdfIntroduction to JUNOS Software
The Factory-Default Configuration (contd.)
Factory-default configurations can vary from one platform family to another or even between the different models within the same platform family. All platforms running JUNOS Software are designed for specific roles within a network environment and their factory-default configurations are created with those specific roles in mind. One example is the EX Series switches, which are designed to operate as Layer 2 switches right out of the box. To meet this default operational requirement the associated factory-default configurations have all interfaces configured for Layer 2 operation and also include protocol configuration commonly used on switches, such as Rapid Spanning Tree Protocol (RSTP) and Link Layer Discovery Protocol (LLDP). Other platforms do not have these same default operational requirements and thus do not include those configuration parameters in their factory-default configurations.
|
for |
Reproduction |
Not |
|
|
|
|
Initial Configuration • Chapter 4–5

Introduction to JUNOS Software
Loading a Factory-DReproductionfault Configuration
JUNOS S ftwa e d es not allow you to save the configuration until you configure root
Under certain conditions, you might want to return a device running JUNOS Software to its factory-default configuration. You can overwrite the candidate configuration while in configuforation mode using the load factory-default command. The
authenticati n inf rmation. Do not forget to issue a commit to activate your changes. Not
Chapter 4–6 • Initial Configuration
Introduction to JUNOS Software
|
|
Reproduction |
|
Initial Configuration |
|
|
The slide highlights the topic we discuss next. |
|
Not |
for |
|
|
|
|
Initial Configuration • Chapter 4–7
Introduction to JUNOS Software
Powering On a DeviceReproductionRunning JUNOS Software
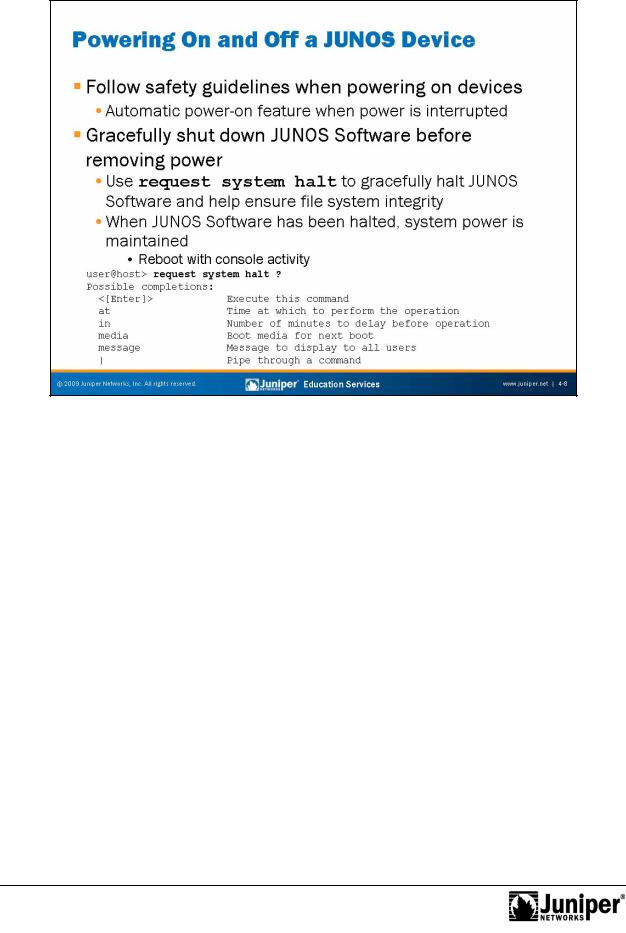
Always refer to your platform-specific documentation and follow the safety guidelines when connectingforpower and powering your device running JUNOS Software. Once a device running JUNOS Software is powered on and if power to that system is interrupted, the device automatically powers on when the power is restored. In other words, no manual intervention is required for the system to reboot in this situation.
NotGracefully Shutting Down JUNOS Software
The JUNOS Software is a multitasking environment. To ensure file system integrity, you should always gracefully shut down platforms running JUNOS Software. Although unlikely, failure to gracefully shut down the system could possibly leave it unable to boot. As illustrated on the slide, you use the request system halt command to gracefully shut down JUNOS Software. This command provides options that allow you to schedule the shut down in a specified number of minutes or at an exact time, to specify the media from which the next boot up operation will use, and to log a message to the console and to the messages file.
For JUNOS platforms that offer redundant Routing Engines (REs), you can halt both REs simultaneously using the request system halt both-routing-engines command. For EX Series switches participating in a virtual chassis, where multiple switches function as a single virtual device, you can halt all participating members simultaneously with the request system halt all-members command.
Chapter 4–8 • Initial Configuration
Introduction to JUNOS Software
Initial ConfigurationReproductionChecklist
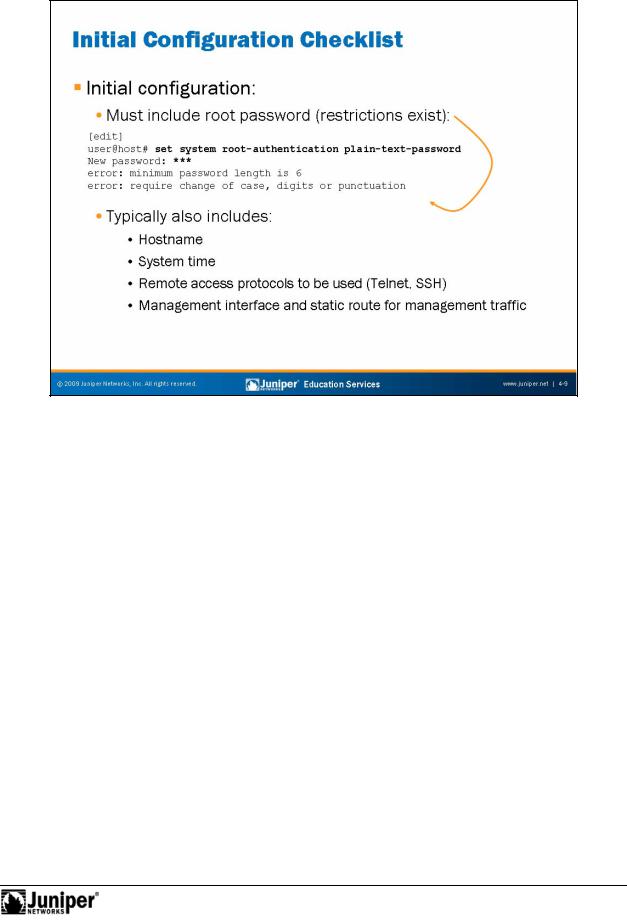
When you receive a device running JUNOS Software from the factory, the JUNOS Softwa e is p einstalled. Once you power the device, it is ready to be configured. When the initial configuration is performed, the root authentication must be included. In additi n to oot authentication, we also recommend that you configure the following items:
|
• |
Hostname; |
for |
||
Not |
• |
System time; |
• |
System services for remote access (Telnet, SSH); and |
|
• |
Management interface and static route for management traffic. |
|
|
|
|
As displayed on the slide, JUNOS Software enforces password restrictions. All passwords are required to be no less than six characters and must include a change of case, digits, or punctuation.
The subsequent pages provide sample configuration syntax for the initial configuration tasks listed on the slide.
Initial Configuration • Chapter 4–9

Introduction to JUNOS Software
Logging In as Root
Remember when you receive a platform running JUNOS Software from the factory, the |
|
root password is not set. To log in to the CLI for the first time, you must log in through |
|
the console po t using the root username with no password. |
|
for |
Reproduction |
When con igu ed, the console login displays the hostname of the device. When no |
|
hostname is c nfigured, such as is the case with a factory-default configuration, |
|
Amnesiac is displayed in place of the hostname. |
|
NotStarting the CLI
When you log in as the root user, you are placed at the UNIX shell. You must start the CLI by typing the cli command. When you exit the CLI, you return to the UNIX shell. For security reasons, make sure you also log out of the shell using the exit command.
Entering Configuration Mode
After starting the CLI, you enter operational mode. You can make changes to the configuration only in configuration mode. Enter configuration mode by entering configure at the operational mode prompt, as shown on the slide.
Chapter 4–10 • Initial Configuration
Introduction to JUNOS Software
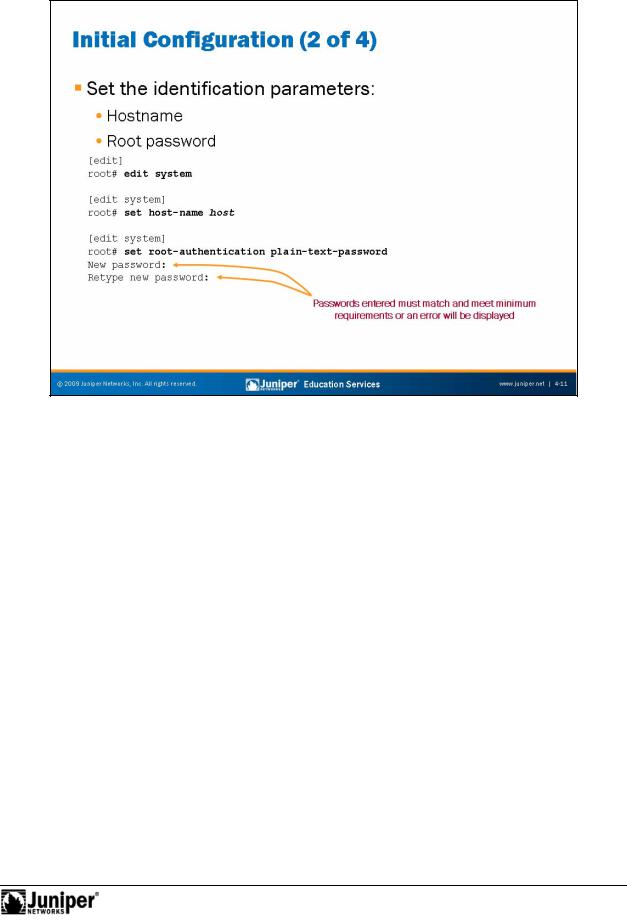
IdentificationReproductionParam t rs
The slide shows how to use the CLI to configure the hostname and a root password. As displayed the slide, a check is made when the root password is entered to ensufore that it has been entered correctly. In the event that both entered passwords do n t match, an error will be generated, the change is not made, and the password will need to be reentered.
NotThe example on the slide uses the plain-text authentication option. Unlike the
sof ware from some vendors, JUNOS Software never actually displays the password in its plain-text format but rather encrypts the password for you. You can see the encrypted password by viewing the relevant configuration:
[edit system]
root# show root-authentication
encrypted-password "$1$ti58nUSg$8xnQtTJeA0dA/.eUjjZOq1"; ## SECRET-DATA
Because you cannot retrieve the passwords by looking at the configuration file, you should keep the configured passwords in a secure location. If you do forget the password and cannot login, you can always perform the password recovery process, which we cover in a subsequent chapter.
Initial Configuration • Chapter 4–11
Introduction to JUNOS Software
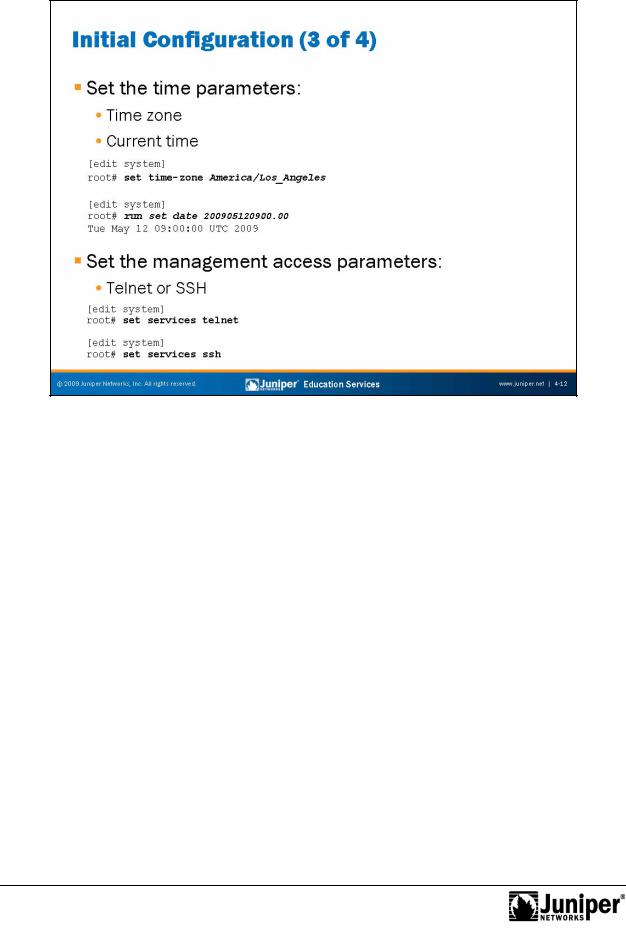
The slide shows how toReproductionuse the CLI to configure the time settings. You can configure the current date and time information along with the proper time zone for the device.
The defaultfortime zone JUNOS devices is UTC (Coordinated Universal Time, formerly known as Greenwich Mean Time, or GMT). When you define the local time on a JUNOS device, y u must account for the time difference between the defined time zone and Notthe de ault ime z ne. Once the time zone is changed and committed, the local time is
adjus ed accordingly to account for the difference. If you do not want to make the necessary adjustments, you can simply set the system’s time after the defined time z ne parameter has been committed.
Instead of setting the local time on each network device in your network, you might consider implementing the Network Time Protocol (NTP). We cover NTP in detail in the secondary system configuration chapter.
Management Access Parameters
The slide also shows how to use the CLI to enable SSH and Telnet access to a device running JUNOS Software. Although not shown on the slide, you could also enable the HTTP service, which allows the device to be accessed and managed through a Web browser. When connecting to a device running JUNOS Software using one of these access protocols, use the same user logins defined under the [edit system login] hierarchy.
Chapter 4–12 • Initial Configuration

Introduction to JUNOS Software
The slide shows how to use the CLI to configure a management interface and a static forroute management traffic. Note that we highly recommend against using a default static oute for management traffic! You should be as specific as possible. You can
ManagementReproductionN twork Parameters
also use the no-readvertise option for the static route used for management
tra ic. The no-readvertise option marks the route ineligible for readvertisement Nothr ugh r uting policy.
e that the static route defined for management traffic (or any other traffic) is only available when the system’s routing protocol process (rpd) is running. When JUNOS devices boot, the routing protocol process is not running; therefore, the system has no static or default routes. To allow the device to boot and to ensure that it is reachable over the network if the routing protocol process fails to start properly, you configure a backup router, which is a router or gateway device that is directly connected to the local system (that is, on the same subnet). To configure a backup router running IPv4, include the backup-router statement at the [edit system] hierarchy level:
[edit system]
root# show backup-router
10.0.1.129 destination 10.0.1.0/24;
In the sample configuration shown above, hosts on the 10.0.1.0/24 subnet are reachable through the backup router. If the destination statement is omitted, then all hosts are reachable through the backup router.
Continued on next page.
Initial Configuration • Chapter 4–13

Introduction to JUNOS Software
Management Network Parameters (contd.)
To eliminate the risk of installing a default route in the forwarding table, you should always include the destination option, specifying an address that is reachable through the backup router. Specify the address in the format network/mask-length, as shown in the previous example, so that the entire network is reachable through the backup router.
When the routing protocols start, the address of the backup router is removed from the local routing and forwarding tables. To have the address remain in these tables, configure a static route for the desired destination prefix with the backup router as the next hop and the retain option as shown in the following capture:
[edit routing-options] |
|
|
root# show |
Reproduction |
|
static { |
||
|
||
route 10.0.1.0/24 { |
|
|
next-hop 10.0.1.129; |
|
|
retain; |
|
|
no-readvertise; |
|
|
} |
|
|
} |
|
Activating Your Configuration
Once you complete your initial configu ati |
n, use the commit command to apply your |
||
changes. You can include the and-quit |
pti n, as shown, to return to operational |
||
mode. In the example |
the slide, we see that once the configuration changes are |
||
activated and the user r |
turns to o erational mode, the configured hostname is |
||
displayed. This displayed hostname is a sure sign that the active configuration has |
|||
changed. |
|
|
|
Not |
for |
|
|
|
|
|
|
Chapter 4–14 • Initial Configuration