

epwzf20
.pdfEasy PHP Websites with the Zend Framework |
208 |
|
|
the controllers, the only real difference being that in order to test the Doctrine entities we need to obtain access to the entityManager resource. Create a helper class named ModelTestCase.php and place it in the tests/application/models directory:
01 |
<?php |
02 |
|
03 |
class ModelTestCase extends PHPUnit_Framework_TestCase |
04 |
{ |
05 |
|
06 |
protected $em; |
07 |
|
08 |
public function setUp() |
09 |
{ |
10 |
|
11$application = new Zend_Application(
12'testing',
13APPLICATION_PATH . '/configs/application.ini'
14);
15 |
|
16 |
$bootstrap = $application->bootstrap()->getBootstrap(); |
17 |
|
18 |
$this->em = $bootstrap->getResource('entityManager'); |
19 |
|
20 |
parent::setUp(); |
21 |
|
22 |
} |
23 |
|
24public function tearDown()
25{
26parent::tearDown();
27}
28
29 }
Let's review the code:
•Line 06 defines a protected attribute named $em which will store an instance of the entity manager (see Chapter 7 for more about the role of Doctrine's entity manager). This attribute will be used within the tests to interact with the Doctrine entities.
•Lines 11-13 creates a Zend_Application instance, setting APPLICATION_ENV to testing and identifying the location of the application.ini file.
•Line 16 retrieves an instance of the application bootstrap, which is in turn used to access the entity manager resource (Line 18).

Easy PHP Websites with the Zend Framework |
209 |
|
|
Save this file as ModelTestCase.php to your /tests/application/models/ directory, and create a test class named AccountEntityTest.php, remembering to extend it with the ModelTestCase class. Finally, add a simple test so we can make sure everything is working properly:
<?php
class AboutEntityTest extends ModelTestCase
{
public function testCanSaveAndRetrieveUser()
{
$account = new \Entities\Account; $account->setUsername('wjgilmore-test'); $account->setEmail('example@wjgilmore.com'); $account->setPassword('jason'); $account->setZip('43201'); $account->setConfirmed(1); $this->em->persist($account); $this->em->flush();
$account = $this->em->getRepository('Entities\Account') ->findOneByUsername('wjgilmore-test');
$this->assertEquals('wjgilmore-test', $account->getUsername());
}
}
Creating Test Reports
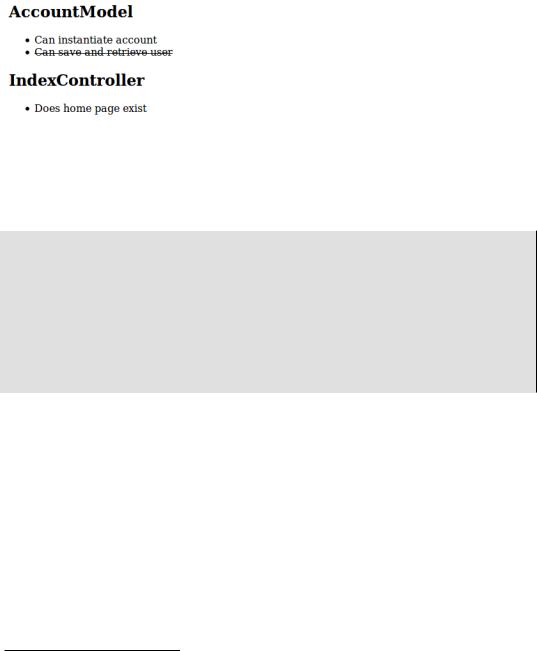
Viewing the phpunit command's terminal-based output is certainly useful, however quite a few other convenient and useful test reporting methods are also available. One of the simplest involves creating an HTML-based report (see Figure 11.1) which clearly displays passing and failing tests. The report is organized according to the test class, with failing tests clearly crossed out.
Easy PHP Websites with the Zend Framework |
210 |
|
|
Figure 11.1. Viewing a web-based test report
To enable web-based test reports, modify your phpunit.xml file, adding the logging element as presented below. You'll also need to create the directory where you would like to store the HTML report (in the case of the below example you would create the directory tests/log/):
<programlisting>
<
Easy PHP Websites with the Zend Framework |
211 |
|
|
Figure 11.2. A Doctrine entity code coverage report
In order to enable PHPUnit's code coverage generation feature you'll need to install the Xdebug extension (http://www.xdebug.org/). Installing Xdebug is a very easy process, done by following the instructions presented here: http://www.xdebug.org/docs/install.
With Xdebug installed, you'll next need to define a log element of type coverage-html to your project's phpunit.xml file, as demonstrated in the below example. You'll also need to create the directory where you would like to store the code coverage reports (in the case of the below example you would create the directory tests/log/report/):
<phpunit bootstrap="./application/bootstrap.php" colors="true">
<testsuite name="gamenomad"> <directory>./</directory>
</testsuite>
<filter>
<whitelist>
<directory suffix=".php">../application/</directory> <exclude>
<file>../application/bootstrap.php</file> </exclude>

Easy PHP Websites with the Zend Framework |
212 |
|
|
</whitelist>
</filter>
<logging>
<log type="testdox-html" target="tests/log/testdox.html" />
<log type="coverage-html" target="tests/log/report" charset="UTF-8" yui="true" highlight="true" lowUpperBound="50"
highLowerBound="80"/>
</logging>
</phpunit>
Test Your Knowledge
Test your understanding of the concepts introduced in this chapter by answering the following questions. You can find the answers in the back of the book.
•Define unit testing and talk about the advantages it brings to your development process.
•What Zend component and open source PHP project work in conjunction with one another to bring unit testing to your Zend Framework applications?
•What is the name of the syntactical construct used to validate expected outcomes when doing unit testing?
•Why are code coverage reports useful?

Chapter 12. Deploying Your Website with Capistrano
I seriously doubt there is a developer on the planet who has not experienced at least one moment of sheer panic due to at least one botched website deployment in their career. Those who admit to having suffered through troubleshooting a sudden and mysterious issue with their production website following an update almost always attribute the problem to FTP. Perhaps a configuration file was mistakenly overwritten, you neglected to transfer all of the modified files, or you forgot to login to the production server following completion of the file transfer and adjust file permissions.
You might be surprised to learn that under no circumstances should you be using FTP to update anything but the simplest website. Unfortunately, FTP offers the illusion of efficiency, because it provides such an incredibly intuitive interface for transferring files from your laptop to your remote server. However, FTP is slow, transferring all selected files rather than only those which have been modified since the last update. It is also stupid, capable of only transferring files without any consideration of platform-specific settings (such as the APPLICATION_ENV setting in your Zend Framework website's .htaccess file). And perhaps worst of all, FTP offers no undo option; once the files have transferred, it is not possible to revert those changes should you want to return the production website to its previous state.
Fortunately, an alternative deployment solution exists called Capistrano (https://github.com/ capistrano/) which resolves all of FTP's issues quite nicely. Not only can you use Capistrano to securely and efficiently deploy changes to your Zend Framework website, but it's also possible to rollback your changes should a problem arise. In this chapter I'll show you how to configure your development environment to use Capistrano, freeing you from ever having to worry again about a botched website deployment.
Configuring Your Environment
Capistrano is an open source automation tool originally written for and primarily used by the Rails community (http://rubyonrails.org/). However it is perfectly suitable for use with other languages, PHP included. But because Capistrano is written in Ruby, you'll need to install Ruby on your development machine. If you're running OS X or most versions of Linux, then Ruby is likely already installed. If you're running Windows, the easiest way to install Ruby is via the Ruby Installer for Windows (http://rubyinstaller.org/).
Easy PHP Websites with the Zend Framework |
214 |
|
|
Once installed, you'll use the RubyGems package manager to install Capistrano and another application called Railsless Deploy which will hide many of the Rails-specific features otherwise bundled into Capistrano. Although Railsless Deploy is not strictly necessary, installing it will dramatically streamline the number of Capistrano menu options otherwise presented, all of which would be useless to you anyway because they are intended for use in conjunction with Rails projects.
RubyGems is bundled with Ruby, meaning if you've installed Ruby then RubyGems is also available. Open up a terminal window and execute the following command to install Capistrano:
$ gem install capistrano
Next, install Railsless Deploy using the following command:
$ gem install railsless-deploy
Once installed you should be able to display a list of available Capistrano commands:
$ cap -T |
|
cap deploy |
# Deploys your project. |
cap deploy:check |
# Test deployment dependencies. |
cap deploy:cleanup |
# Clean up old releases. |
cap deploy:cold |
# Deploys and starts a `cold' application. |
cap deploy:pending |
# Displays the commits since your last... |
cap deploy:pending:diff |
# Displays the `diff' since your last... |
cap deploy:rollback |
# Rolls back to a previous version and... |
cap deploy:rollback:code |
# Rolls back to the previously deployed... |
cap deploy:setup |
# Prepares one or more servers for depl... |
cap deploy:symlink |
# Updates the symlink to the most recen... |
cap deploy:update |
# Copies your project and updates the s... |
cap deploy:update_code |
# Copies your project to the remote ser... |
cap deploy:upload |
# Copy files to the currently deployed... |
cap invoke |
# Invoke a single command on the remote... |
cap shell |
# Begin an interactive Capistrano sessi... |
|
|
Installing a Version Control Solution
Version control is a process so central to successful software development that if you are not currently using a version control solution such as Git (http://git-scm.com/) or Subversion (http:// subversion.tigris.org/) to manage your projects then consider reading the freely available chapter 1 of the book "Pro Git" (http://progit.org/book/). In short, version control brings a great many advantages to any project, including the disciplined evolution of your project's source code, changelog tracking and publication, the ability to easily revert mistakes, and experiment with new features, to name a few.

Easy PHP Websites with the Zend Framework |
215 |
|
|
Further, maintaining a project under version control solution will greatly streamlines the deployment process because Capistrano will be able to detect and transfer only those files which have changed since the last deployment. While it's not strictly necessary for your project to be under version control in order for Capistrano to perform the deployment, I urge you to do so because like Capistrano, instituting version control will greatly reduce the possibility of unforeseen gaffes thanks to the ability to rigorously track and traverse changes to your code.
Capistrano supports quite a few different version control solutions, among them Bazaar, CVS, Git, Mercurial, and Subversion. If you haven't already settled upon a solution, I'd like to suggest Git (http://git-scm.com/), not only because it happens to be the solution I know best and can therefore answer any questions you happen to have, but also because as of the moment it is easily the most popular version control solution on the planet. Additionally, Git clients are available for all of the major platforms, Windows included. Install Git on your development machine by heading over to http://git-scm.com/download and following the instructions specific to your operating system.
Once installed you can confirm that the command-line client is working properly by executing the following command:
$ git --version git version 1.6.3.3
Because Git associates repository changes with the user performing the commit, a useful feature when working with multiple team members, you'll need to identify yourself and your e-mail address so Git can attribute your commits accordingly:
$ git config --global user.name "Jason Gilmore"
$ git config --global user.email "wj@wjgilmore.com"
You'll only need to do this once, as Git will save this information in a configuration file associated with your system account.
To place your project under version control, enter your project's root directory and execute the following command:
$ git init
Initialized empty Git repository in /var/www/dev.gamenomad.com/.git/
Executing this command will in no way modify your project nor its files, other than to create a directory called .git which will host your repository changes.
Presuming your project directory contains various files and directories, you'll next want to begin tracking these files using Git. To do so, execute the add command:

Easy PHP Websites with the Zend Framework |
216 |
|
|
$ git add .
The period tells Git's add command to recursively add everything found in the directory. You can confirm which files will be tracked by executing the status command. For instance, if you're tracking a project which was just created using the zf command-line tool, the status command will produce the following output:
$ git status
#On branch master
#Initial commit
#Changes to be committed:
#(use "git rm --cached <file>..." to unstage)
#new file: .zfproject.xml
#new file: application/Bootstrap.php
#new file: application/configs/application.ini
#new file: application/controllers/ErrorController.php
#new file: application/controllers/IndexController.php
#new file: application/views/scripts/error/error.phtml
#new file: application/views/scripts/index/index.phtml
#new file: docs/README.txt
#new file: public/.htaccess
#new file: public/index.php
#new file: tests/application/bootstrap.php
#new file: tests/library/bootstrap.php
#new file: tests/phpunit.xml
#
Finally, you'll want to commit these changes. Do so using the commit command:
|
$ git commit |
-m "First project commit" |
||
|
[master |
(root-commit) 5be0656] First project commit |
||
|
10 files changed, 303 insertions(+), 0 deletions(-) |
|||
|
create |
mode |
100644 |
.zfproject.xml |
|
create |
mode |
100644 |
application/Bootstrap.php |
|
create |
mode |
100644 |
application/configs/application.ini |
|
create |
mode |
100644 |
application/controllers/ErrorController.php |
|
create |
mode |
100644 |
application/controllers/IndexController.php |
|
create |
mode |
100644 |
application/views/scripts/error/error.phtml |
|
create |
mode |
100644 |
application/views/scripts/index/index.phtml |
|
create |
mode |
100644 |
docs/README.txt |
|
create |
mode |
100644 |
public/.htaccess |
|
create |
mode |
100644 |
public/index.php |
|
create |
mode |
100644 |
tests/application/bootstrap.php |
|
create |
mode |
100644 |
tests/library/bootstrap.php |
|
|
|
|
|

Easy PHP Websites with the Zend Framework |
217 |
|
|
create mode 100644 tests/phpunit.xml
The -m option refers to the commit message which you'll attach to the commit by passing it enclosed in quotations as demonstrated here. Of course, you'll want these messages to clearly explain the changes you're committing to the repository, not only for the benefit of others but for yourself when you later review the commit log, which you can do by executing the log command:
$ git log
commit 5be06569a9d69214a629e888187e59023985f122 Author: Jason Gilmore <wj@wjgilmore.com>
Date: Wed Feb 23 18:37:48 2011 -0500
First project commit
Because I'll show you how to use Capistrano to only deploy the changes committed to your repository since the last deployment, you'll want to make sure you've committed your changes before beginning the deployment process, otherwise you'll be left wondering why the production server doesn't reflect your latest changes! This applies even if you aren't using Git, as the behavior is the same regardless of which version control solution you are using.
This short introduction to Git doesn't even begin to serve as an adequate tutorial, as Git is a vastly capable version control solution with hundreds of useful features. Although what you've learned so far will be suffice to follow along with the rest of the chapter, I suggest purchasing a copy of Scott Chacon's excellent book, "Pro Git", published by Apress in 2009. You can read the book online at http://progit.org/.
Configuring Public-key Authentication
The final general configuration step you'll need to take is configuring key-based authentication. Keybased authentication allows a client to securely connect to a remote server without requiring the client to provide a password, by instead relying on public-key authentication to verify the client's identity.
Public-key cryptography works by generating a pair of keys, one public and another private, and then transferring a copy of the public key to the remote server. When the client attempts to connect to the remote server, the server will challenge the client by asking the client to generate a unique signature using the private key. This signature can only be verified by the public key, meaning the server can use this technique to verify that the client is allowed to connect. As you might imagine, some fairly heady mathematics are involved in this process, and I'm not even going to attempt an explanation; the bottom line is that configuring public-key authentication is quite useful because it